General Information
Introduction
Thank you for purchasing our theme. We are happy that you are one of our customers and we assure you will not be disappointed. We do our best to produce top quality products with unique design and clean code.
Hostiko is a responsive and clean WordPress theme, made by Team Designing Media.
Hostiko is specially designed for Web Hosting Companies. It is based on Visual Composer and Revolution Slider.
Hostiko is built with the latest web technologies (Bootstrap framework, icon font, etc.) with the care of coding quality to make sure the theme works with all browsers and all devices.
Hostiko is professionally designed for web hosting, business, company, multi-purpose, domain sale sites. Hostiko theme includes different page layout for VPS hosting, shared hosting, and dedicated hosting.
You can build powerful web hosting sites with our awesome pricing tables and custom hosting page examples. Our Price sliders are easily customizable as well.
Don’t forget to visit our Portfolio Link.
Rate This Theme
We would appreciate it if you rate this theme on Theme Forest. It only takes a second but it helps more than you think and of course, it is always good to know what others think about our work.
If you like our theme, please consider rating it with 5 stars. You can rate it in the "Downloads" section of your account:

How to Use this Documentation
Before you get started, we highly encourage you to get familiar with this documentation file. Spending half an hour reading the manual may save a lot of your time and avoid questions with obvious answers.
To quickly find the necessary information click on the "Search" button in the upper right corner of this documentation file and type the "Keyword" you are looking for in the opened "Find Window" search box.
Alternatively, you can use your browser's built-in "Search" tool. Press the CMD+F (in macOS) or CTRL+F (in Windows) shortcut to open the search bar.

License
With Theme Forest regular license, you are licensed to use this theme to create one single End Product (i.e. The final website customized with your content) for yourself or one client. In short:
What is allowed with a single regular license?
- You can create one website for yourself or your client and you can transfer that single website to your client for any fee. This license is then transferred to your client.
- You can install the theme on your test server for testing/development purposes (that installation shouldn't be available to the public).
- You can modify or manipulate the theme; you can combine it with other works to create the End Product.
- Theme updates for that single End Product (Website) are free.
What is not allowed:
- With a single regular license, it is not allowed that you create multiple websites. For multiple websites, you will need multiple regular licenses.
- To resell the same website (Single End Product) to other clients. You will need to purchase an extended license for this.
For more information regarding license regulations and policies, please check the links below:
Help & Support
I. Support Policy
Please read this user guide carefully, it will help you eliminate most of the potential issues with the incorrect configuration for using this template.
To be able to request technical support assistance, you need to have a valid purchase code. To get the code, please navigate to your Theme Forest "Download" page and click on the theme download link. Check this Guide for more information on this matter.
PLEASE NOTE! As authors of this theme, we do provide support only for the theme-related features.
We do not provide support for additional customization, 3rd party plugins integration, or any other compatibility issues that might arise. Nevertheless, there is an exception that is only applied to the plug-in(s) we have developed and integrated ourselves.
If you have any questions that are beyond the scope of this help file, feel free to post them on our support message board (forum) at https://designingmedia.com/support/. We will respond as soon as possible (within 24 – 48 hours, usually faster). We are open from 10 am to 7 pm (GMT)UTC +5, from Monday till Friday.
Please be aware that a lot of the questions that are posted in the forum have been posted many times before, and get the same answers each time. Before submitting a new ticket, please try searching the forum for an answer.
II. Third-Party Extensions
Unfortunately, we do not provide support for third-party extensions. Please contact the author of the extension if needed. If you feel that you might have trouble with installing an extension, we advise you to order a professional installation service.
PLEASE NOTE! This theme may not be compatible with some third-party extensions. It is impossible for theme authors to make the theme compatible with all the existing extensions by default.
Only the standard (“default”) WordPress theme is compatible with all third-party extensions. Please be aware that an author of the extension should provide detailed instructions on how to integrate it with a custom theme (since nobody uses “default” themes).
III. Customization
As we have mentioned above the theme's customization/modification is beyond the scope of our support policy.
As for minor CSS tweaks, the best way is to use Web Inspector (available in Safari/ Safari Technology Preview ), Developer Tools (for Firefox and Google Chrome), or other similar tools.
Check these short video tutorials regarding Firebug functionality features:
- http://getfirebug.com/video/Intro2FB.htm
- https://css-tricks.com/video-screencasts/15-introduction-to-firebug/
More information regarding CSS syntax can be found here:
- https://developer.mozilla.org/en-US/learn/css
- http://www.w3schools.com/css/
- http://reference.sitepoint.com/css/syntax
IV. Additional Information
IMPORTANT Please be aware that we do not include theme-related.PSD files into the theme package, because it might significantly increase the size of a downloadable archive. Please also be advised that all the clipart images included in this theme are copyrighted to their respective owners and are not available for download with this theme. Clipart images can not be used without express permission from the owner and/or need to be purchased separately.
Refund Policy
Hi, we're Envato and welcome to the Envato Market Refund Rules. Because we are a platform, these rules outline what you can expect from the authors of the items you buy. They apply to all authors and customers.
The products that authors sell on the platform are digital goods and cannot be "returned", so your entitlement to a refund is designed with this in mind. Of course, in addition to these rules, each country has its laws surrounding refunds, and these local laws are not excluded if they apply to you.
Before you ask for a refund from an author
If you have purchased an item from our “Web Themes and Templates” or “Code” category on Envato Market and you are experiencing a technical issue with the item we recommend that you contact the author of that item and seek assistance. Often they’ll be able to help to troubleshoot your problem.
Asking for refunds from authors via the Envato platform
We understand, however, that sometimes the author may not be able to solve your issue or there may be circumstances in which a refund is warranted. In this case, here are the circumstances in which we would expect an author to provide you with a refund:
- Item is "not as described" or the item doesn’t work the way it should.
- Item has a security vulnerability
- Item support is promised but not provided
- Item support extension not used
- Items that have not been downloaded
- Resolving disputes - asking Envato to help
Item is "not as described" or the item doesn’t work the way it should.
If an item doesn’t work the way it should then the author is required to promptly fix the issue by updating the item. An item is "not as described" if it is materially different from the item description or preview. If the issue can’t be fixed or it turns out that the item is “not as described” then you would be entitled to a refund from the author.
Item has a security vulnerability
If an item contains a security vulnerability and can't easily be fixed you would be entitled to a refund from the author. If the item can be fixed, then the author should do so promptly by updating the item. If the item contains a security vulnerability that is not patched in an appropriate timeframe then we would expect the author to provide a refund for the item.
Item support is promised but not provided
If an author advertises their item as including item support, you have a current support entitlement, and you are not provided that support in accordance with the item support policy the author should provide you with a refund.
Item support extension not used
If you purchase an item support extension and request a refund of that extension before your existing item support expires we would expect the author to provide you with a refund of that item support extension
Items that have not been downloaded
If you have not downloaded a purchased item within 3 months from the date of purchase, you may be eligible for a refund. You will be required to provide the author of that item your purchase code in order for the author to verify your claim that you have not downloaded an item. Although we think 3 months is a reasonable time, depending on where you are located, you might have a longer period to claim a refund if you have purchased for personal use and haven't downloaded the item.
Resolving disputes - asking Envato to help
If you and an author can't come to an agreement about a refund, you can raise a dispute and have Envato investigate the matter. We may ask you to provide supporting documentation or evidence. Any refund issued by Envato is entirely discretionary. We will make a decision based on all available information and you agree that our decision is final.
Neither Envato nor the authors are obliged to give policy refunds in any of the situations listed below.
- You don't want it after you've downloaded it
- The item did not meet your expectations or you feel the item is of low quality
- You simply change your mind
- You bought an item by mistake
- You do not have sufficient expertise to use the item
- You claim that you are entitled to a refund but do not provide sufficient information as to why you are entitled to a refund
- You can no longer access the item because it has been removed or the author who previously provided the item is no longer active on our platform (we advise you to download items as soon as you have purchased them to avoid this situation).
Getting Started
WordPress Installation
Hostiko Theme can only be used on WordPress. So you will need to have wordpress installed on your local system or hosting domain. If you’re new to Wordpress and need help understanding how to install it then the following links can guide you on how to install and use Wordpress.
Installing Wordpress on Local Server:
The following link is a step-by-step guide on Installing Wordpress on Local Server:
https://themeisle.com/blog/install-xampp-and-wordpress-locally/
Installing Wordpress Manually via FTP:
The following link is a step-by-step guide on Installing Wordpress via FTP:
https://www.fastcomet.com/tutorials/wordpress/manual-installation
Installing Wordpress via cPanel:
The following link is a step-by-step guide on Installing Wordpress via cPanel:
https://docs.cpanel.net/knowledge-base/third-party/how-to-install-wordpress-with-cpanel/
If you need any further assistance related to wordpress then you can consult wordpress.org
Theme Requirements
To use this theme you must be running at least WordPress 3.9, PHP5, MySql 5, or higher. If you use low-end hosting with limited resources (e.g. GoDaddy!), you may experience issues with "one-click" demo data installation features.
Many hosting services try to keep PHP limits low without any reason so if you’re facing any issue installing the theme wordpress, we recommend that you contact your web hosting service provider to make sure that your server PHP configuration limits are as follows:
max_execution_time 600
memory_limit 128M
post_max_size 32M
upload_max_filesize 32M
If you are running an unmanaged dedicated server or VPS, you should check your php.ini file. You can access your .htaccess and php.ini file through cPanel or FTP. Alternatively, you can edit the .htaccess file in the root of your website and add the following values:
php_value max_execution_time 600
php_value memory_limit 128M
php_value post_max_size 32M
php_value upload_max_filesize 32M
Setting these values will ensure you will not get error messages during the installation. To safeguard your website, please use secure passwords and the latest version of WordPress and plugins.
Hostiko Theme Installation
Hostiko installation can be done in two ways via Wordpress or FTP. Before Hostiko Theme Installation you need to download all the necessary Hostiko Theme Files from your Theme Forest account.
How to Download Files from Theme Forest:
If you’re downloading files from Theme Forest for the first time then you should download the Complete Theme Package so you can receive documentation for the essential plugins that you will be using with this Theme and demo files too. But if you have downloaded the full package before then you just need to download Wordpress Essential Files for the Theme.
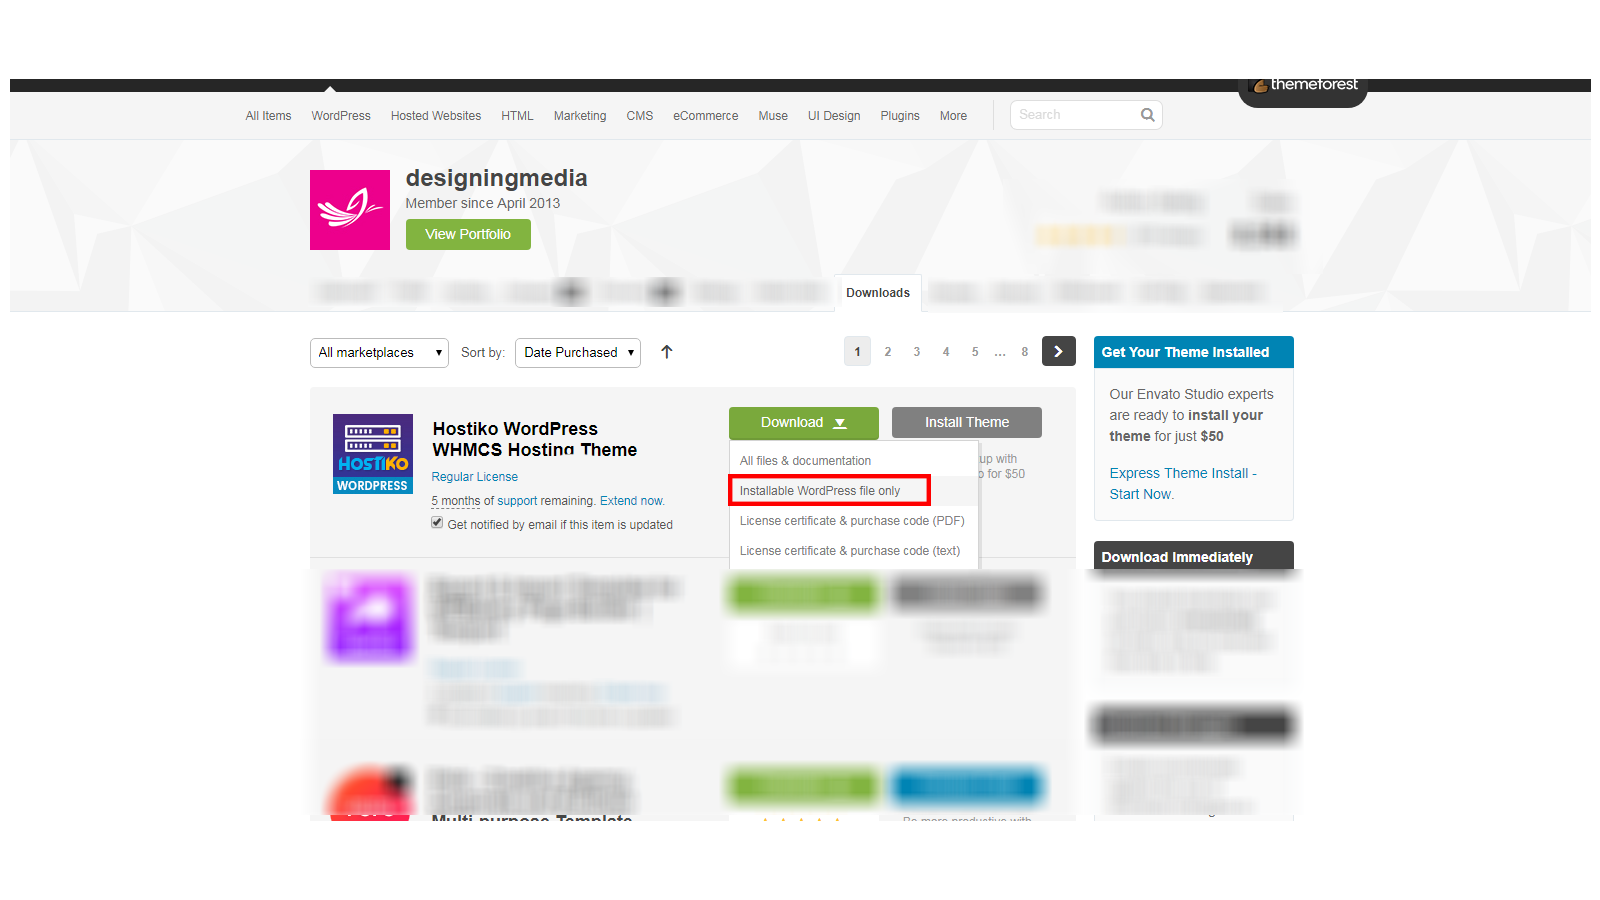
- Step 1: To download these files you need to Log In to your Theme Forest account and go to your “Download” tab and find your Hostiko purchase.
- Step 2:After clicking the Download button you can choose whether you want to download the Installable Wordpress file only i.e just theme’s wordpress installable files or you can choose to download All files & Documentation i.e Complete Hostiko’s Theme Package.

I. Hostiko Theme Installation with Wordpress
If you have downloaded the Complete Hostiko Package, then before installing the theme, open the downloaded Zip file and navigate to the WP-bakery Theme folder.
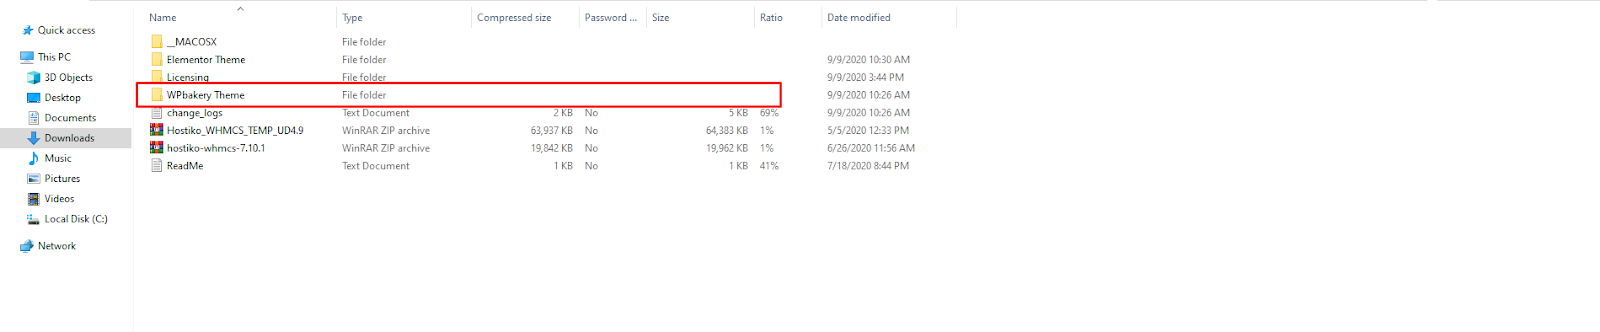
To use Hostiko WP-bakery Theme, you need to upload a hostiko.zip file that is placed in the WP-bakery Theme folder.

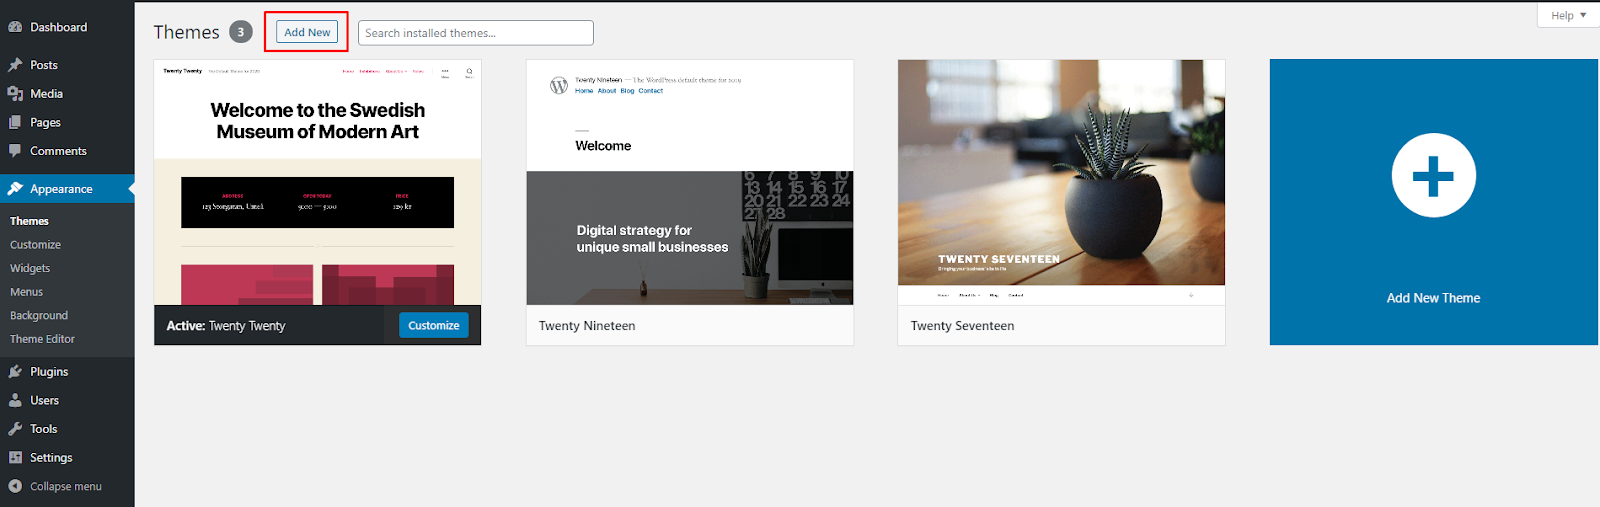
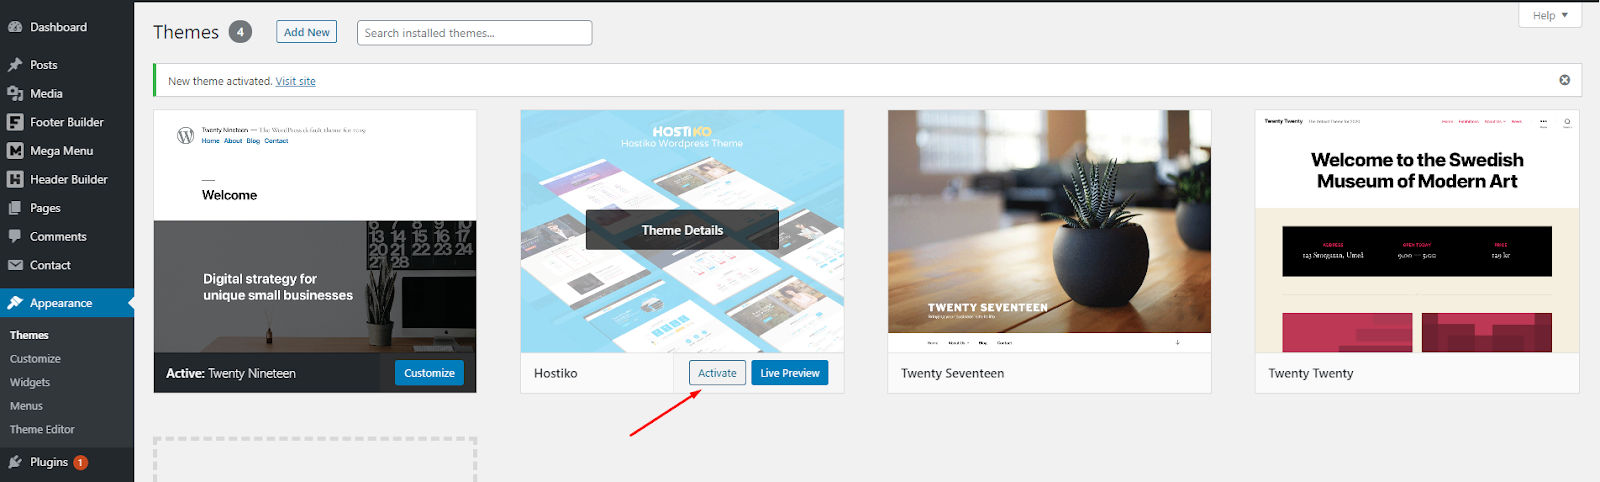
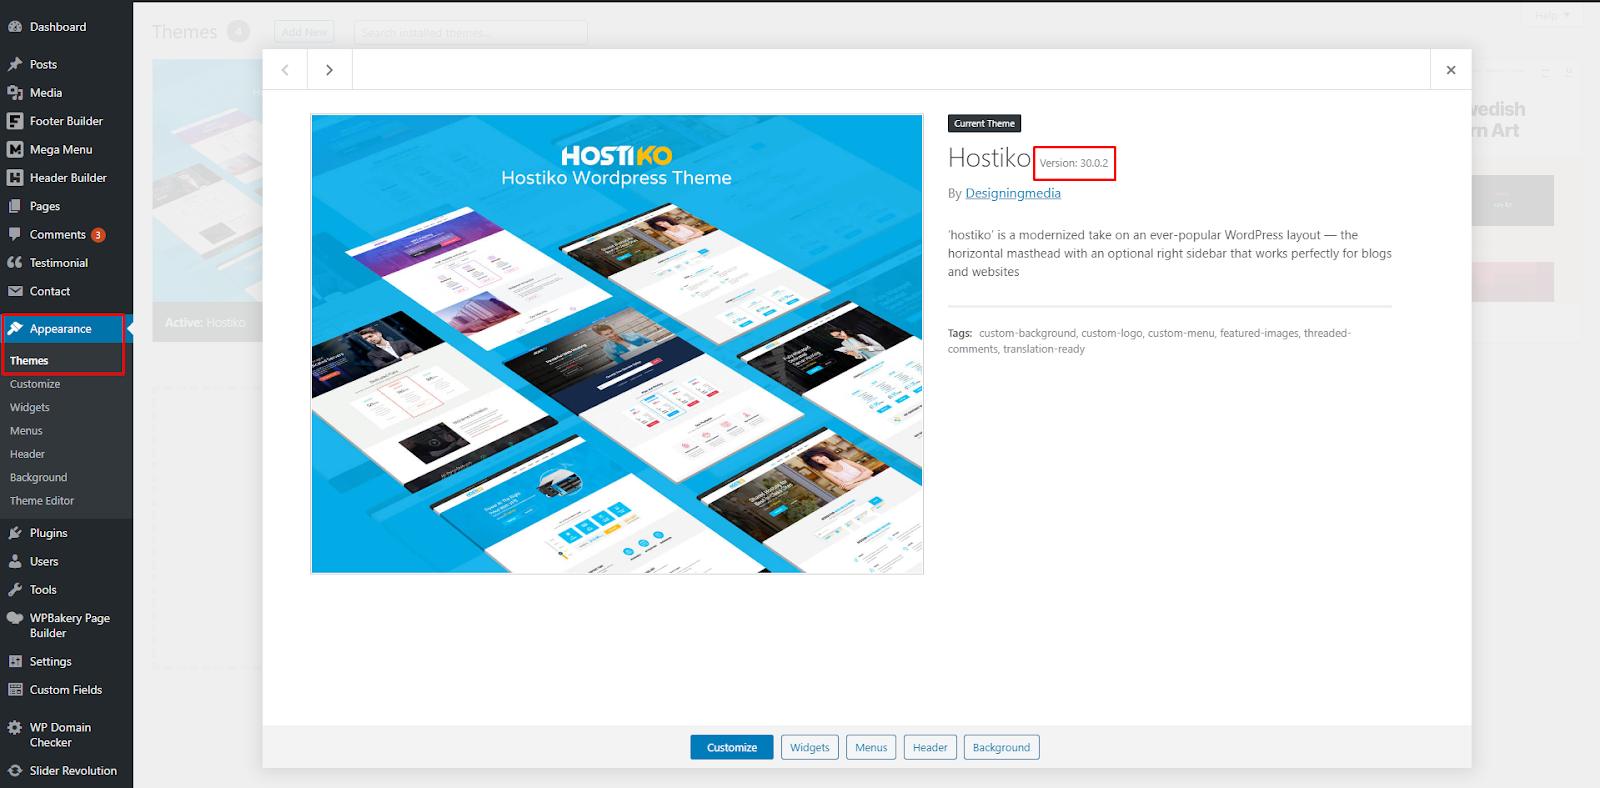
- Step 1: Log In to your wordpress website, once you’ve opened the admin area of your site then find the Appearance Tab on the left side menu and navigate to Appearance > Themes

- Step 2: Click the “Add New” button on the top of the page and then click on the “Upload Theme” button.
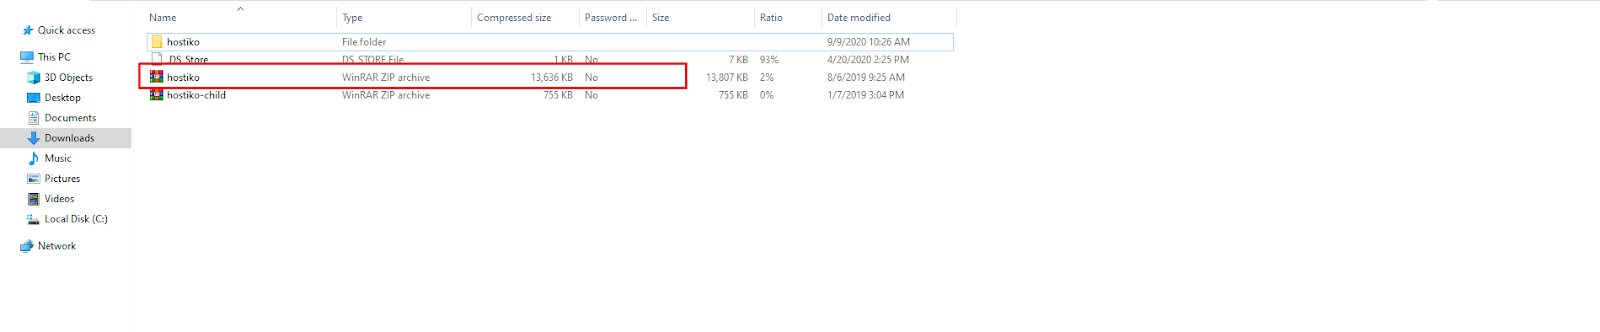
- Step 3: Now by clicking on the “Choose File” button, find the Hostiko Theme files in your system. If you have downloaded the “Installable Wordpress File” then you do not need to unzip that file but if you’ve downloaded Complete Hostiko Package then navigate to the WP-Bakery Theme folder in a downloaded zip file and upload the hostiko.zip file that is placed in the WP-bakery Theme folder as mentioned earlier.

- Step 4: Click on the “Install Now” button and your theme will start installing.
- Step 5: Once your Hositko Theme is installed click on the Activate button to activate the newly installed theme.

- Step 6: Once your theme is activated you will be prompted to install recommended plugins. You can see the Plugin Installation section to see how to install plugins properly.
- All these plugins are included in the theme archive or can be installed from the WordPress.org repository.
The theme can function without the recommended plugins if you are using it for Blogs, Forms, Posts, etc, But it won’t work for Demo Pages. To make your website look more similar to the demo page, you will have to install the recommended plugins and import the demo content.
However, if you have an existing website, you should be very careful with plugins installation and importing demo data: this may affect an entire website's content, it looks, behavior, and structure. Please refer to the Demo Content section for more details. 
- Step 7: Once you have installed and activated all the required plugins, the new menu item “Hostiko” will appear at the bottom of the Wordpress Dashboard Menu on the left side.

- Note: If you want to make changes in the theme’s templates or functions, we recommend activating a child theme before demo data installation. Please see the Child Theme section for more information.
II. Hostiko Theme Installation via FTP
If you have downloaded the Complete Hostiko Package, then before installing the theme, open the downloaded Zip file and navigate to the WP-bakery Theme folder.

To use Hostiko WP-bakery Theme, you need to upload a hostiko.zip file that is placed in the WP-bakery Theme folder.
- Step 1: If you’re accessing your site through FTP for the first time then, I will recommend you download Filezilla and install it on your system. Then read this. This is a step-by-step guide on how to obtain your FTP credentials and how to connect FileZilla with your website.
- Step 2: Once you have connected your site with Filezilla you will be able to access all of your website files on FileZilla. They will appear like this:
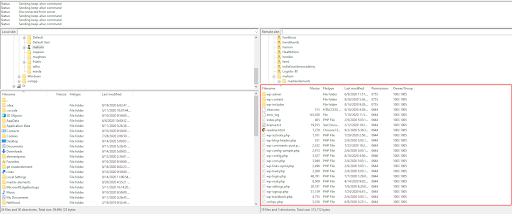
- Step 3: Now navigate to wp-content > themes folder. Locate your extracted Hostiko Theme files in the right window. Open the folder and navigate to WP-bakery Theme folder > hotsiko. Right-click on the hositko folder and select ‘Upload’.
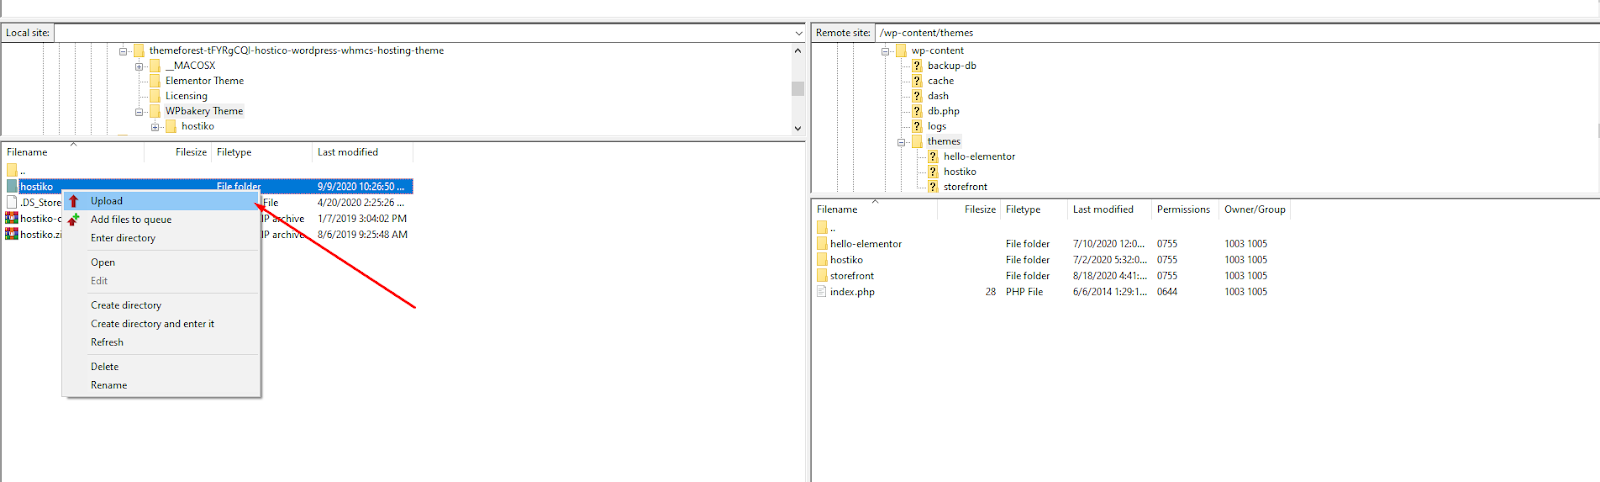
- Step 4: Once your folder is uploaded in the themes directory, then Log In to your Wordpress Site. Navigate to Appearance > Themes. Locate Hostiko Theme and activate it.
- Step 5: Once your theme is activated you will be prompted to install recommended plugins. You can see the Plugin Installation section to see how to install plugins properly.
- All these plugins are included in the theme archive or can be installed from the WordPress.org repository.
The theme can function without the recommended plugins if you are using it for Blogs, Forms, Posts, etc, But it won’t work for Demo Pages. To make your website look more similar to the demo page, you will have to install the recommended plugins and import the demo content.
However, if you have an existing website, you should be very careful with plugins installation and importing demo data: this may affect an entire website's content, it looks, behavior, and structure. Please refer to the Demo Content section for more details. 
- Step 6: Once you have installed and activated all the required plugins, the new menu item “Hostiko” will appear at the bottom of the Wordpress Dashboard Menu on the left side.

- Note: If you want to make changes in the theme’s templates or functions, we recommend activating a child theme before demo data installation. Please see the Child Theme section for more information.
Plugins Installation
- Step 1: Once you’ve installed and activated Hostiko Theme, click on Begin installing plugins link, to make the theme look more similar to the demo page. You will have to install all recommended plugins so your theme can look more similar to the demo page.

- Step 2: Select all the plugins by clicking on the checkbox that is right next to the Plugin heading in the table. Click on “Bulk Actions”, select “Install” and click on the “Apply” button. All the plugins will start installing it may take a few minutes.
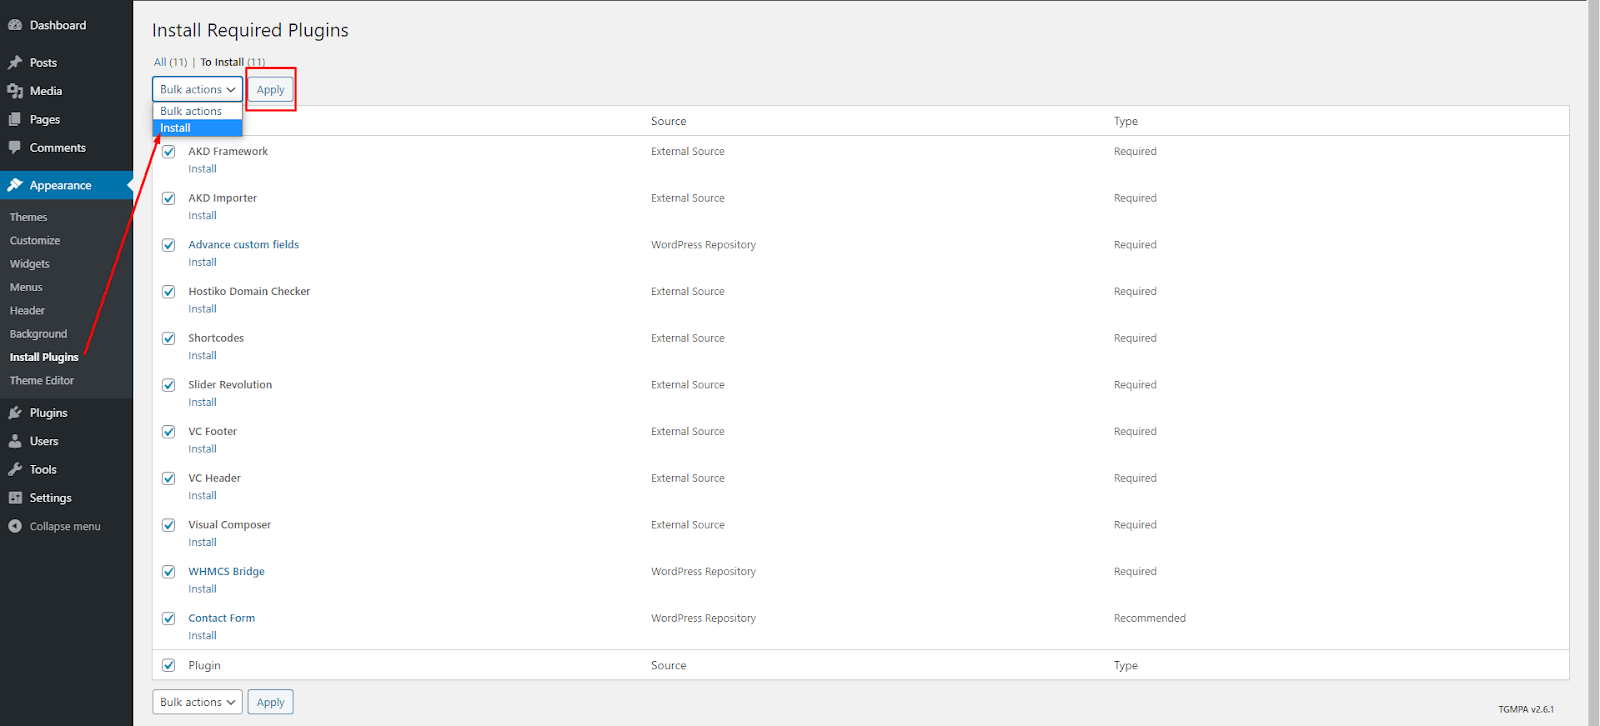
- Step 3: Once all the plugins are installed, navigate to the bottom of the page and click on “Return to Required Plugins Installer”.

- Step 4: Select all the Plugins and navigate to Bulk Actions > Activate and click on ‘Activate’. All required plugins will be activated.
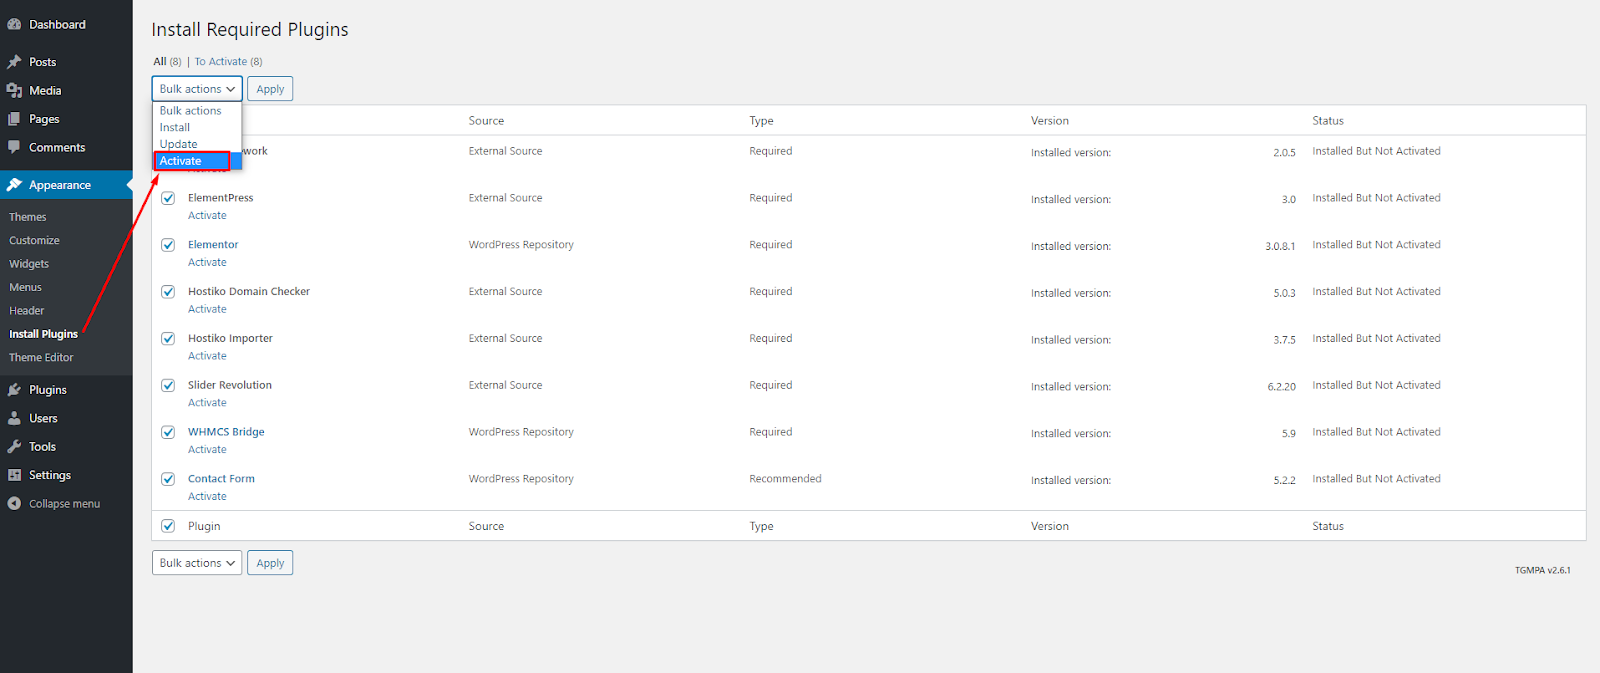
- Step 5: Once all the plugins are activated click on ‘Return to Dashboard’ and the new menu item “Hostiko” will appear at the bottom of the Wordpress Dashboard Menu on the left side.

- Alternatively, you can use the Appearance > Install Plugins menu that redirects to the plug-ins installation page. Check all the listed plug-ins, select the Install option, and click on the Apply button. Installation may take a few minutes, please be patient and do not refresh the page.
Plug-ins activation should be done in the same way. Navigate to Appearance > Install Plugins menu, check all the listed plug-ins, choose the Activate option, and click on the Apply button. Activation may take a few minutes, please be patient and do not refresh the page.
Available plug-ins:
- AKD Framework
- Import-and-export
- Shortcodes
- Slider Revolution
- WP-Bakery Page Builder
- Author-Widget
- Contact Form
- Recent Posts Widget
Theme Registration
The very first step is before importing the demo content is to register them.
- Step 1: Navigate to WP-Dashboard Menu > Hostiko > License
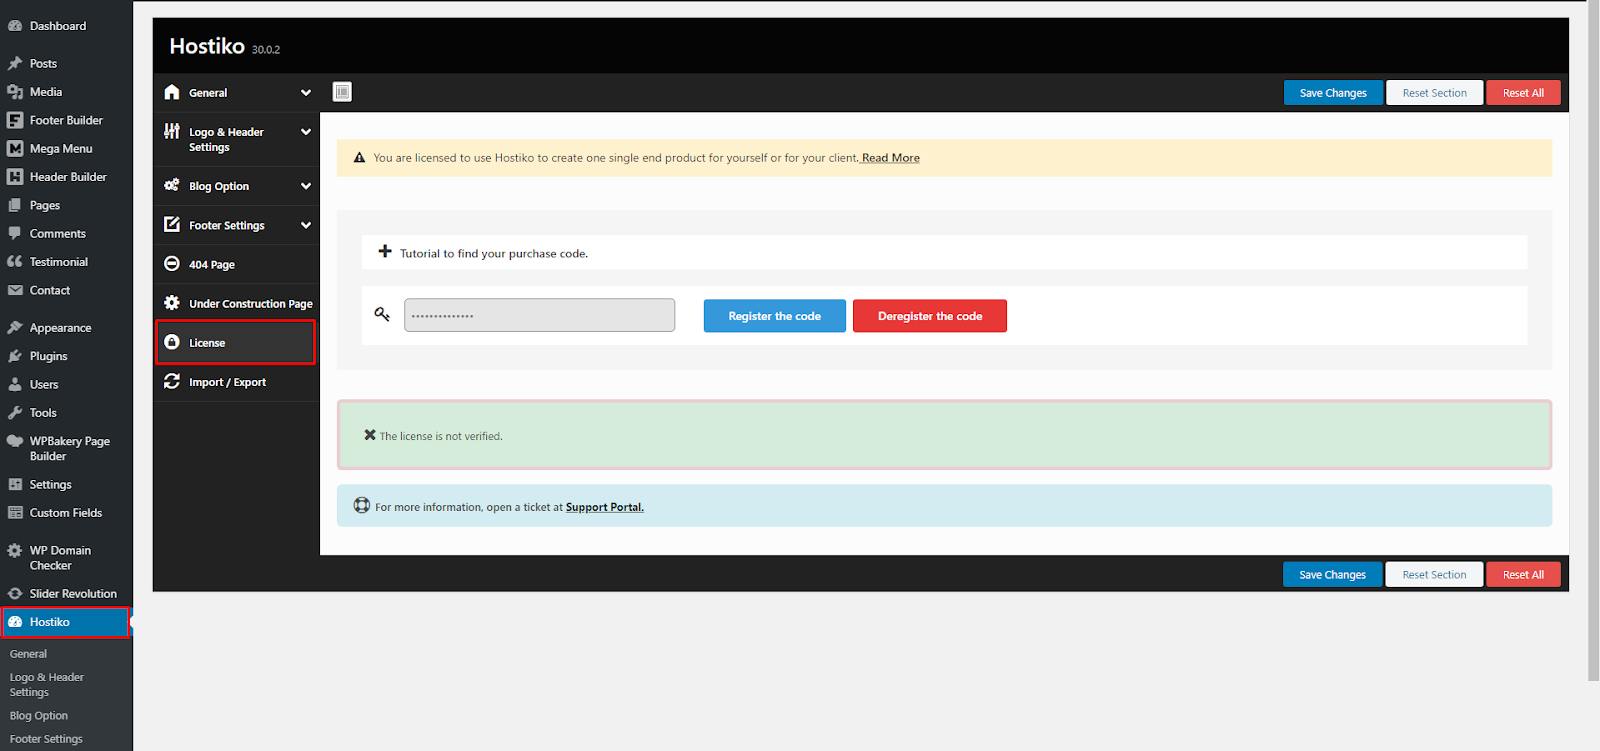
- Step 2: Type in your registration code in the key input box and click on the “Save Changes” button.

- Step 3: Once you see the “Settings Saved” message, click on the “Register this code” button.

- Step 4: You’ll get a message saying “The License is verified” at the bottom.

- Step 5: Once your license is verified you’ll see all your demo’s in the “Import/Export” tab. You can see the Demo Content section to see how to install the demo properly.
Demo Content
Our theme includes a simple One-click demo data import tool. It allows getting a copy of our demo website in just 1 click.
Before installing demo data, please make sure you have installed all the required plugins, check the Plugins installation section for more information.
To import demo content into a WordPress site, please follow these steps:
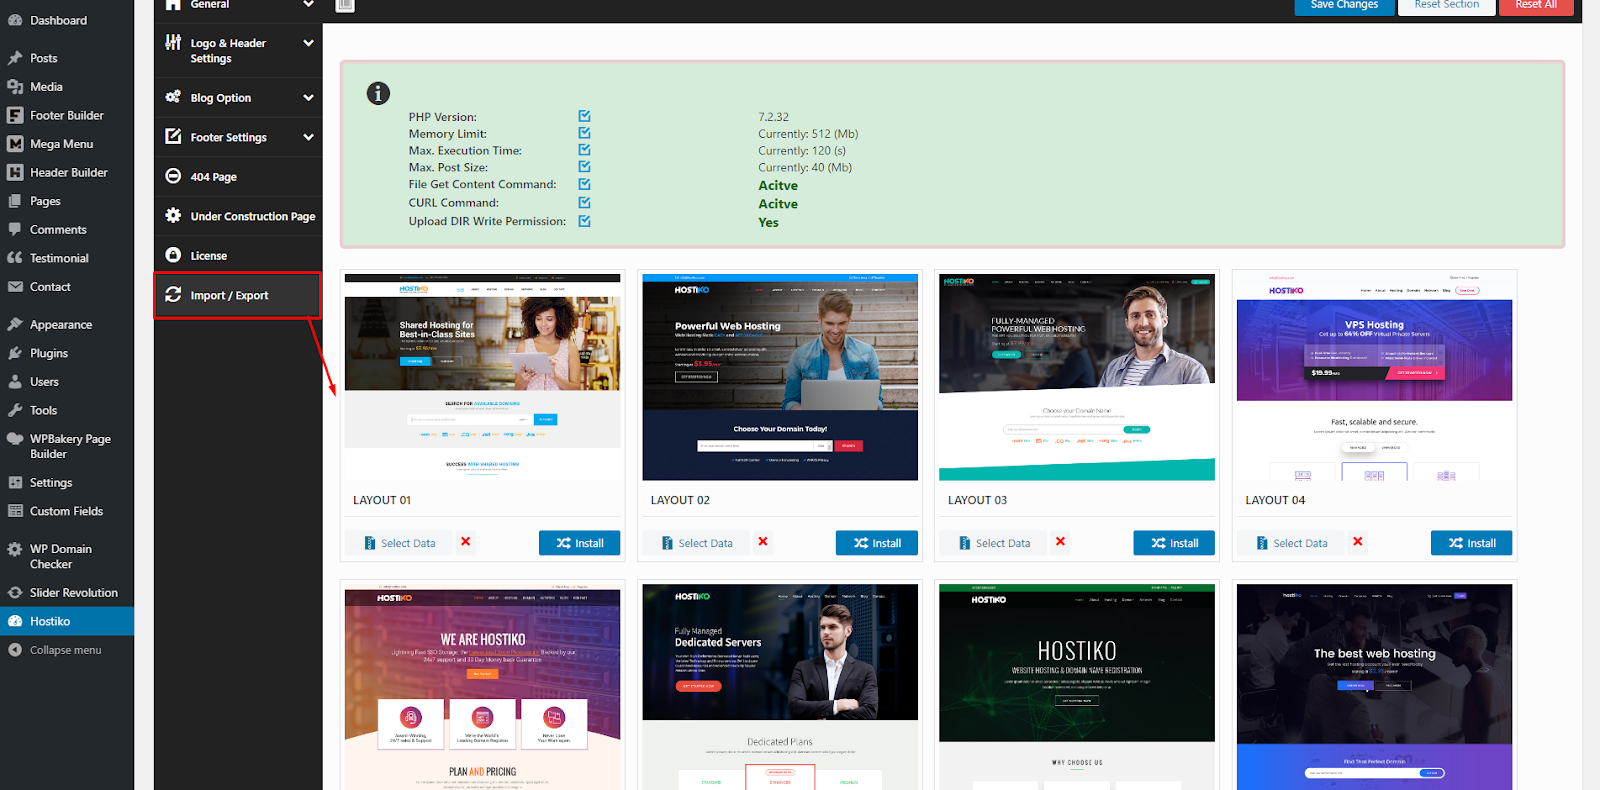
- Step 1: Navigate to WP-Dashboard Menu > Hostiko > Import/Export. Choose the demo content you want to install and click on the “Install Button”.
-
- Step 2: A dialog box will appear at the top asking to ‘Install demo data’, click on “Ok”. Your demo content will start importing. It may take a while for demo data to be copied from our server to your site. It depends significantly on the Internet connection speed between your website and our server. Please wait patiently and do not refresh/leave the page.

- Once your Demo Content is imported your site will look like the demo and now you can use Hostiko Theme and all its features.

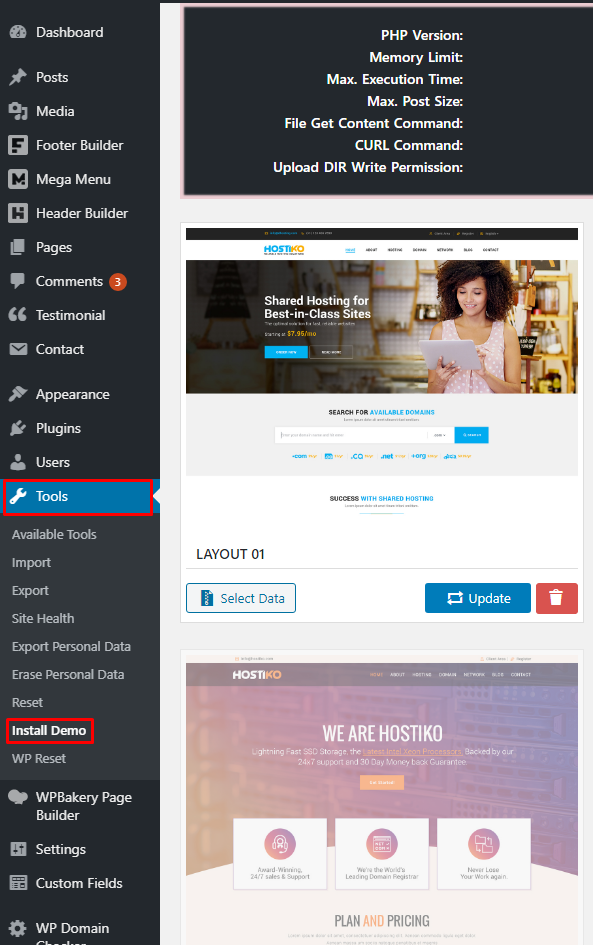
- Alternatively, you can also install demo data by navigating to Tools > Instal Demo
Theme Update
Theme Update is required if you received the notification that a new version of the theme is available. You can see this information in the Changelog section at the bottom of the item's details page.
IMPORTANT! Before you go ahead with the update make sure you backup your old theme's folder. Download it to your computer locally.
It is a good practice to backup both your files and database regularly and especially before making some serious updates.
How to Update Hostiko via FTP?
- Step 1: Log into your ThemeForest account and get the latest version of the theme.
- Step 2: Connect to your site’s FTP using desktop client software like FileZilla. If you’re using Filezilla for the first time then read this. This is a step-by-step guide on how to access your site’s FTP.
- Step 3: Once you’re connected to your website’s FTP, navigate to the wp-content > themes folder.

- Step 4: Don’t delete any files, you have to overwrite the new files.
- Step 5: Extract the theme Installable files you’ve downloaded from Theme Forest and upload it to the theme folder.

- Step 6: Once the files start to upload, a dialog box will appear asking whether to overwrite files or not. Select the “Overwrite”, “Apply to current queue only” and “Apply only to uploads” options and click on “Ok”.

- Step 7: Log In to your WordPress site. Navigate to Appearance > Themes. Click on Hostiko Theme and you will see that your theme is now updated.
Quick Start
After the theme activation and demo content import, we are ready to get started with basic theme settings like site title, tagline, logo, favicon, etc.
To change your site title and tagline, navigate to Settings > General. Please note, these parameters are important for search engines.

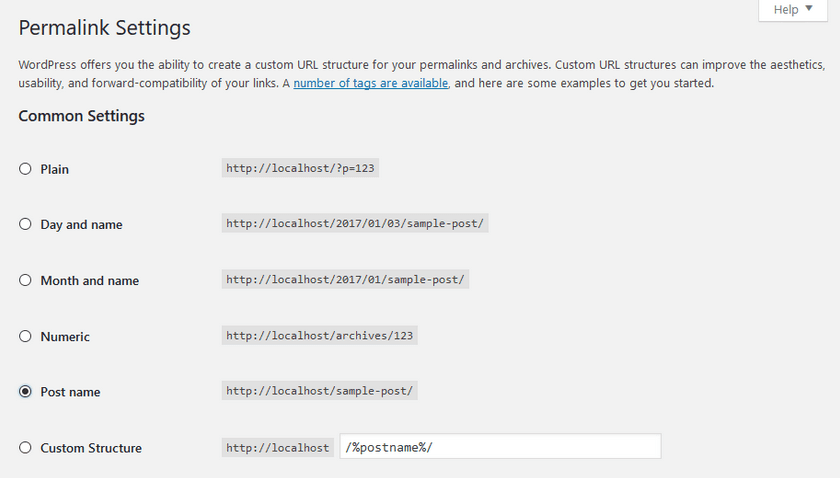
Another great idea may be setting a custom permalinks structure to make them more SEO friendly and human-readable. Go to Settings > Permalinks and make changes according to the example below.
Child Theme
Child theme is for developers willing to make changes to core functions and code. If you are not planning to dig that deep, you can just skip this chapter.
IMPORTANT! If you want to make changes in the theme's templates or functions, we recommend installing a child theme and applying changes there. To learn more about that, please visit the WordPress Codex website.
In the theme's package, you can find all the necessary files for the child theme. The installation of a child theme is similar to the main theme.
- Almost all files in the main theme are available for replacing in to the child theme. It does not concern only .php files with templates and basic logics, but also both .js, .css files from respective folders.
- In case you need to edit some theme-related functions or add new ones, copy/add all the required functions into the functions.php file in the Hostiko-child folder.
PLEASE NOTE! We do not recommend copying respective files into the child theme folder. Instead re-create the respective functions in the child theme's functions.php file.
Header Builder
Hostiko WP-Bakery Theme provides you with Header Builder. By using this option you can either choose an already built Header template by our team to display on your website or you can build your own Header as you like.
If you’re new to WordPress and want help setting up your menus for Header then you can look at this guide here.
How to use the already built Header Template?
If you’re new to WordPress and Visual Composer then you might be looking for already built Templates. Hostiko Header Builder provides you with already built Header templates. Below are the steps on how to use them:
- Step 1: After installing demo data you might want to change your site’s Header Design. Navigate to Header Builder > Settings in WP-Dashboard Menu.

- Step 2: In the Settings tab, the Display Header option must be Disabled ALWAYS.

- Step 3: Navigate to Default Header option and choose whichever Header Style you want to display on your site. You can choose the Default option if you want the same header as displayed in the demo.

- Step 4: Other Settings:
- Max Width => You can change your site’s Header Max Width.
Use Header with conditions => Conditions like is_post() or is_post() && is_page(), you can read about condition tags in Wordpress in here.
Use Metabox => Settings Meta Box will be shown in Post of these Post Types. 
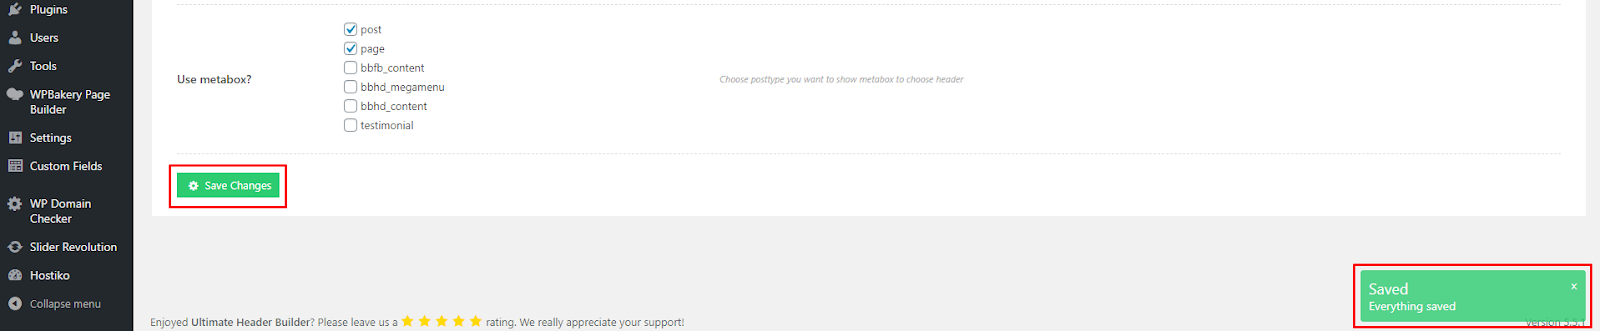
- Step 5: After choosing your header style click on the Save Changes button and a message will appear at the bottom right of your screen to confirm that your changes are saved.

- Step 6: Now visit your site and you will see that your chosen Header Style is displaying on your site.

How to create your own Header?
Hostiko also provides you with an option to create your own Header. You can design your Header the way you have envisioned it. Below are the steps to create your own Header in Hostiko:
- Step 1: Navigate to WP Bakery Page Builder > Role Manager in WP-Dashboard Menu.

- Step 2: Find Post Types and Select Custom option.

- Step 3: Check these options: bbfb_content, bbhd_megamenu, bbhd_content.
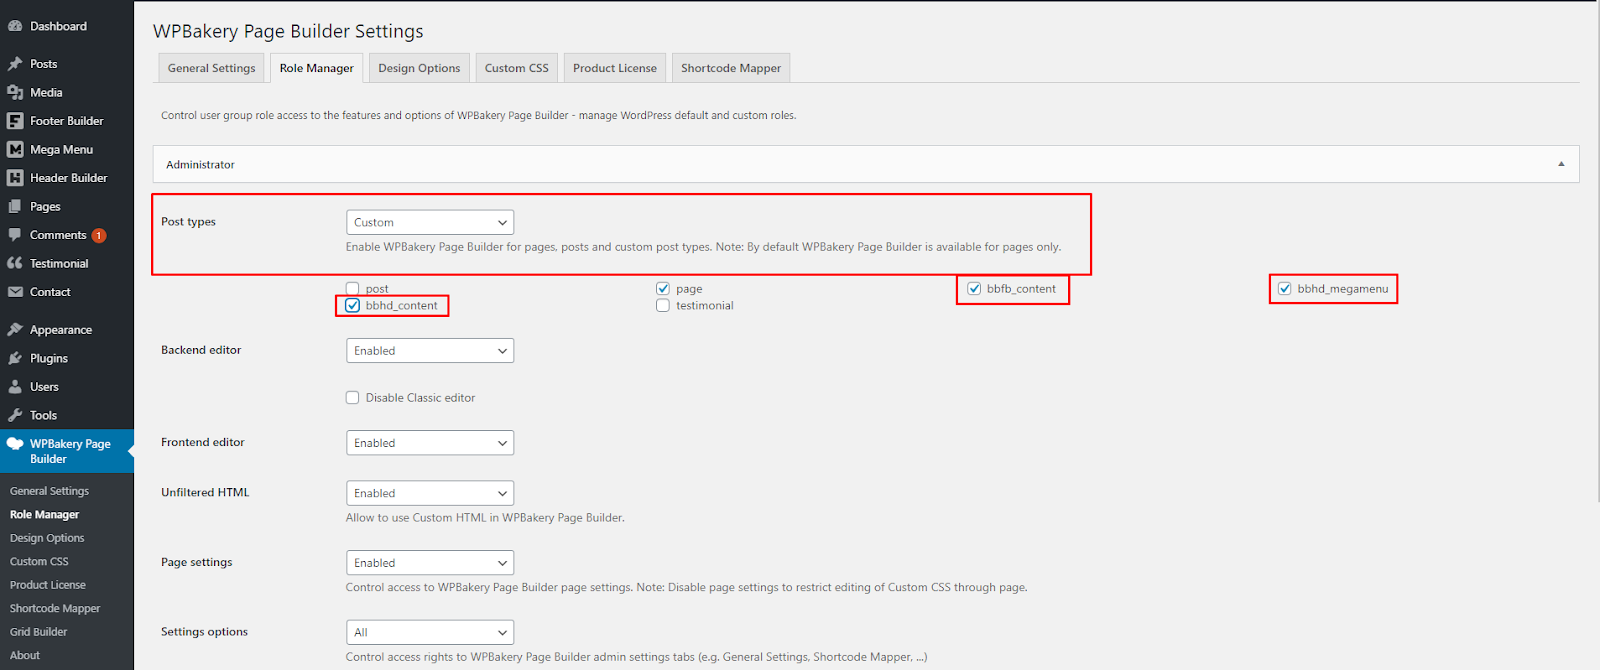
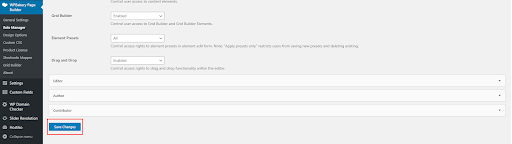
- Step 4: Click on the “Save Changes” button to save all the settings.
- Step 5: Navigate to Header Builder > Add New in WP-Dashboard Menu.
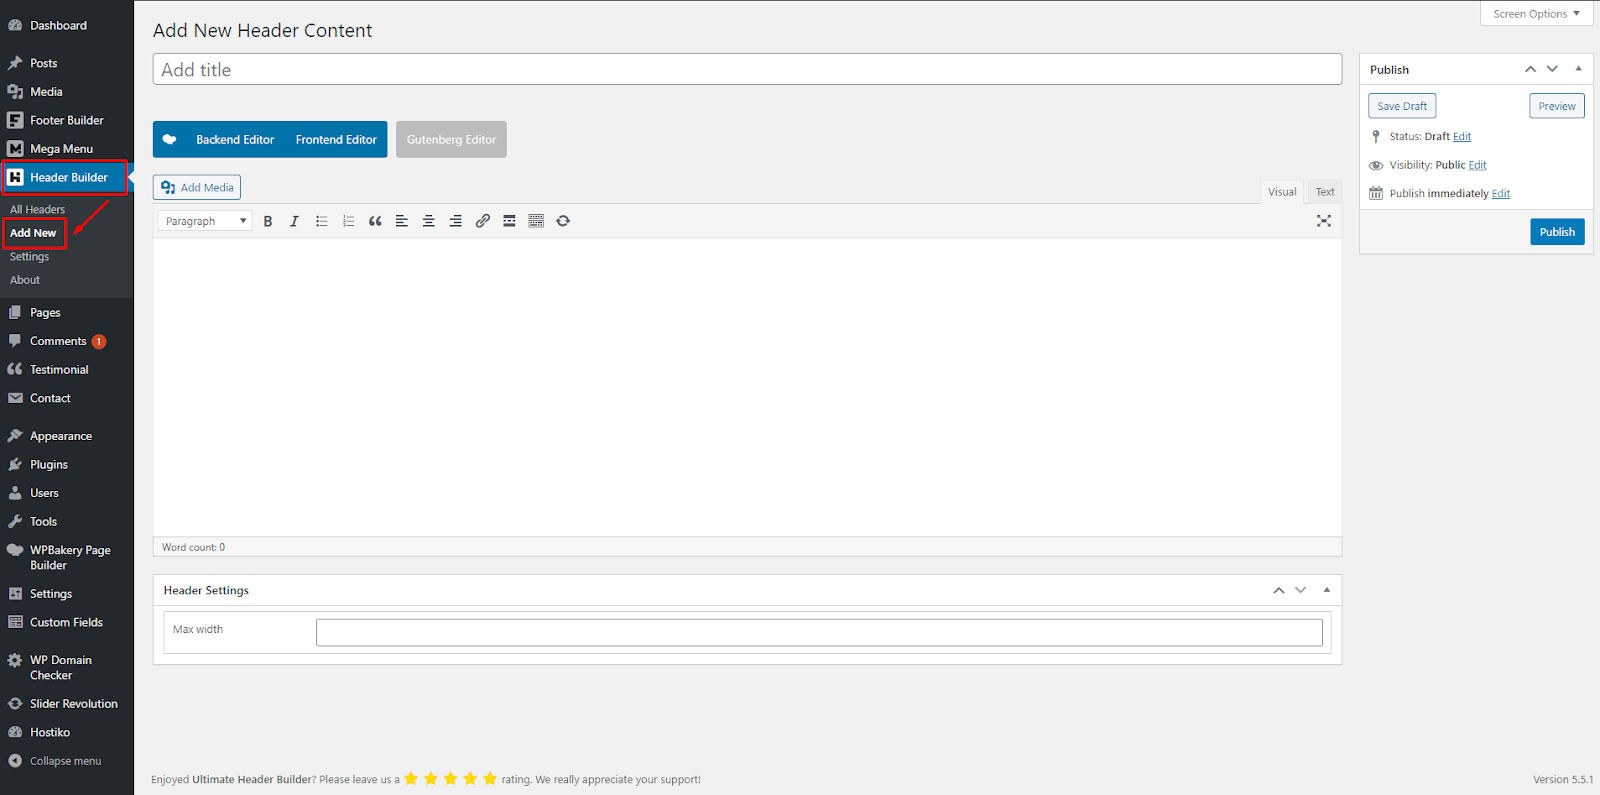
- Step 6: Set the title for your new header in the “Add New Header Content” input field. Select Front End or Back End Editor, whichever you’re comfortable with using. Now you can design your own header using Visual Composer. If you’re using a visual composer for the first time then we will recommend you to watch some tutorial videos on how to use it so it will be easier for you to design your own header.

- Step 7: You can change Header Width according to your website. Navigate to the Header Settings section at the bottom of the Back End Editor. You can enter your Headers width in the Max Width input box.
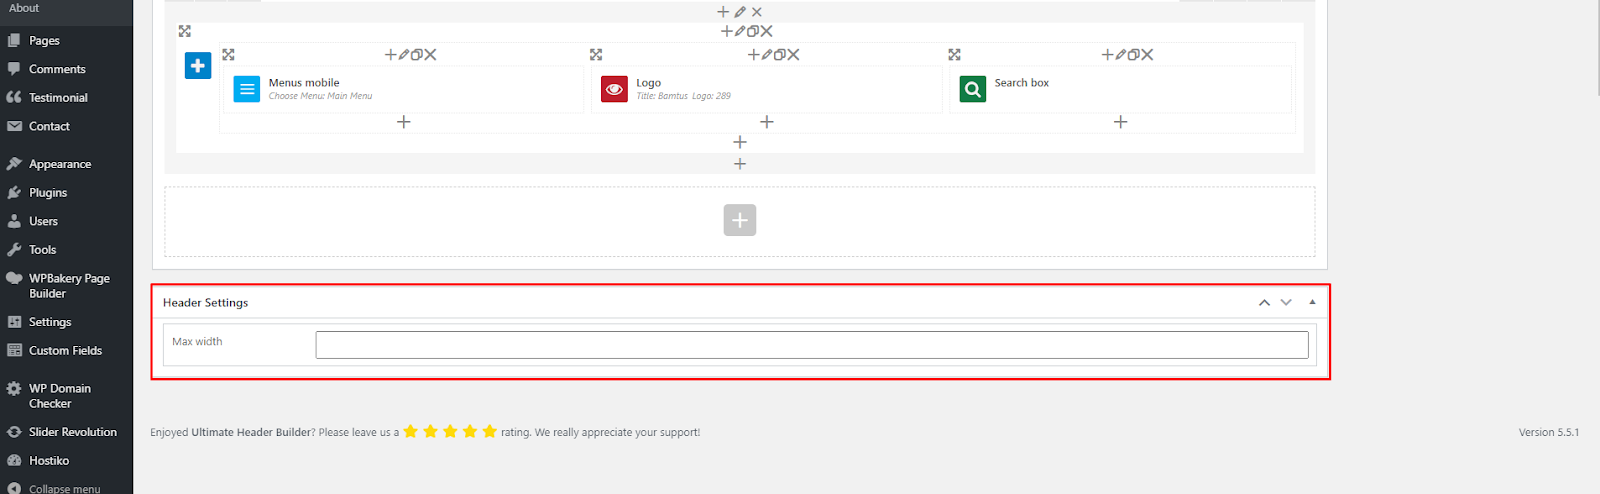
- If you don’t see the Max Width input box then, click on Screen Options at the top right corner of your screen. A drop-down menu will appear. Select Header Settings. Now you will see the Header Settings section at the bottom of Back End Editor

- Step 8: When you are done designing your header, then click on “Publish”.

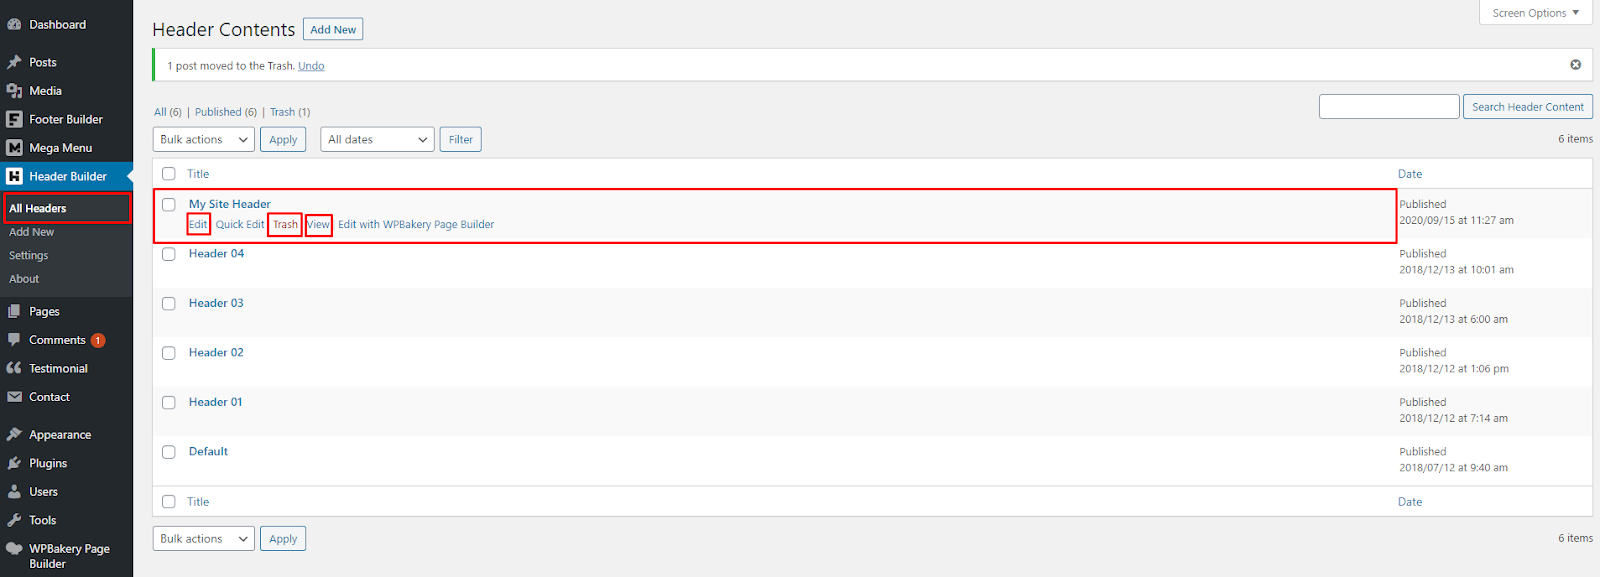
- Step 9: Navigate to Header Builder > All Headers. Your Header will be displayed there, you can Edit, Delete or View your site’s Header from here.
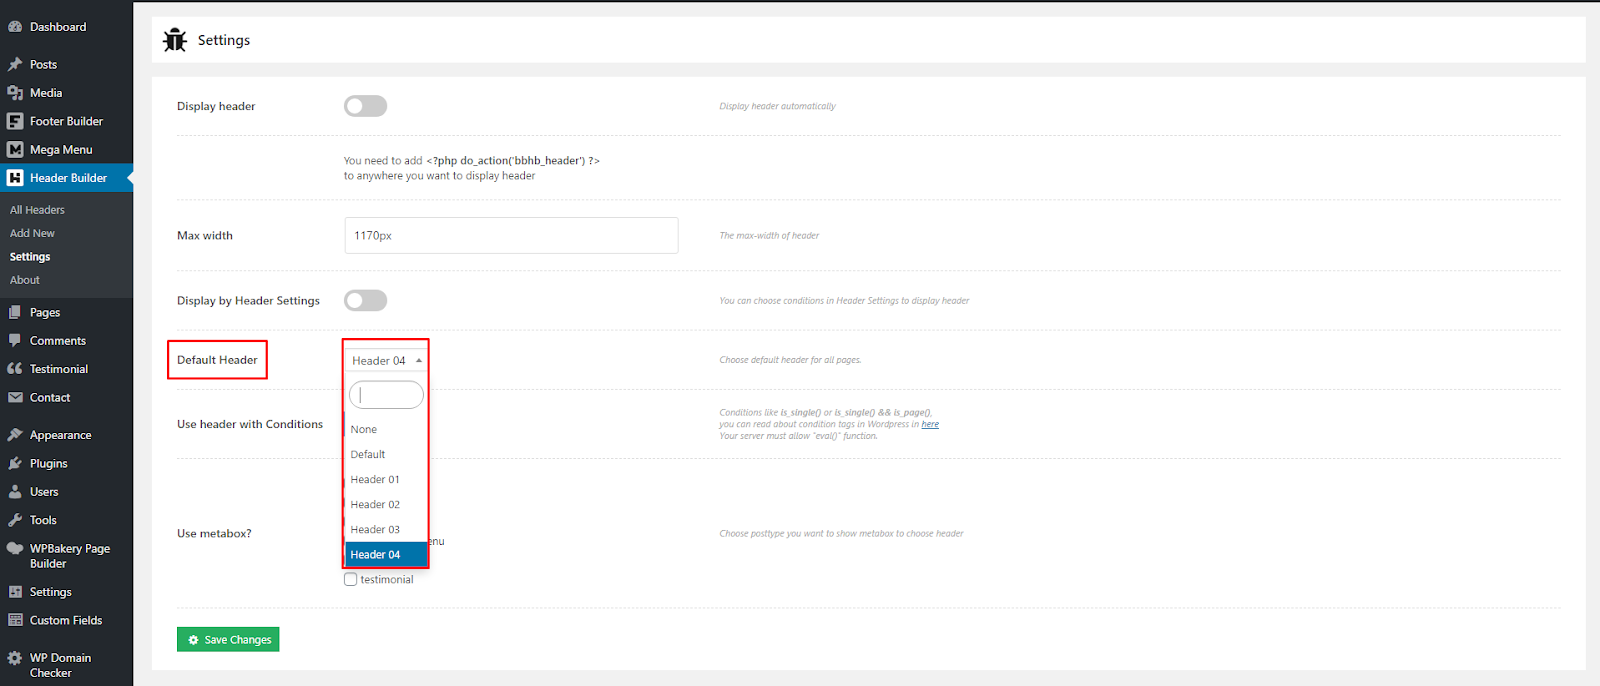
- Step 10: Now that you have created a Header for your site, you need to set this header as the Default Header to display on your site. For that Navigate to Header Builder > Settings. Go to Default Header option and select your Header Title from the options.

- Step 11: You can also change other settings for your header.
- Max Width => You can change your site’s Header Max Width.
Use Header with conditions => Conditions like is_post() or is_post() && is_page(), you can read about condition tags in Wordpress here.
Use Metabox => Settings Meta Box will be shown in Post of these Post Types. 
- Step 12: Click on the Save Changes button to save your settings and a message will appear at the bottom right of your screen to confirm that your changes are saved. You Header will now display at your website.

How to edit any Header?
- Step 1: To edit Header, navigate to WP-Bakery Page Builder > Role Manager in WP-Dashboard Menu.

- Step 2: Find Post Types and Select Custom option.

- Step 3: Check these options: bbfb_content, bbhd_megamenu, bbhd_content.

- Step 4: Click on the “Save Changes” button to save all the settings.

- Step 5: Navigate to Header Builder > All Headers. Select the Header you want to edit and click on the Edit button.

- Step 6: Here you can choose whether you want to edit it with Front End Editor or BackEnd Editor, and you can start editing your Header.

- Step 7: You can change Header Width according to your website. Navigate to the Header Settings section at the bottom of the Back End Editor. You can enter your Headers width in the Max Width input box.

- If you don’t see the Max Width input box then, click on Screen Options at the top right corner of your screen. A drop-down menu will appear. Select Header Settings. Now you will see the Header Settings section at the bottom of Back End Editor

Display Header
Hsotiko gives you the option to show different headers on different pages. There are 4 ways to display a header.
Default Header for all Pages:
- Step 1: If you want to show one header on all your site pages then, navigate to Header Builder > Settings in WP Dashboard Menu.

- Step 2: Navigate to Default Header option and select the header you want to display on all pages from the dropdown.
- Step 3: Click on the Save Changes button, a message will appear at the bottom right corner of the screen confirming that your changes are saved. Now the Header you chose will appear on all your site pages.

- Note: If you don’t want to auto add a default header for your site, then you must add this code to header.php file or where you want to display header:
php do_action('bbhd_header')
Display Header Using Conditions:
- Step 1: Navigate to Header Builder > Settings. You’ll see the “Use Header with Conditions” option. Click on the Plus Sign.

- Step 2: By Clicking on Plus sign you can add as many conditions as you like. If you’re using condition tags for the first time then you can read about WordPress conditional tags here

- Step 3: Click on the Save Changes button, a message will appear at the bottom right corner of the screen confirming that your changes are saved. Now the Header you chose will appear on all your sites according to applied conditions.
Display Header for each Page & Post:
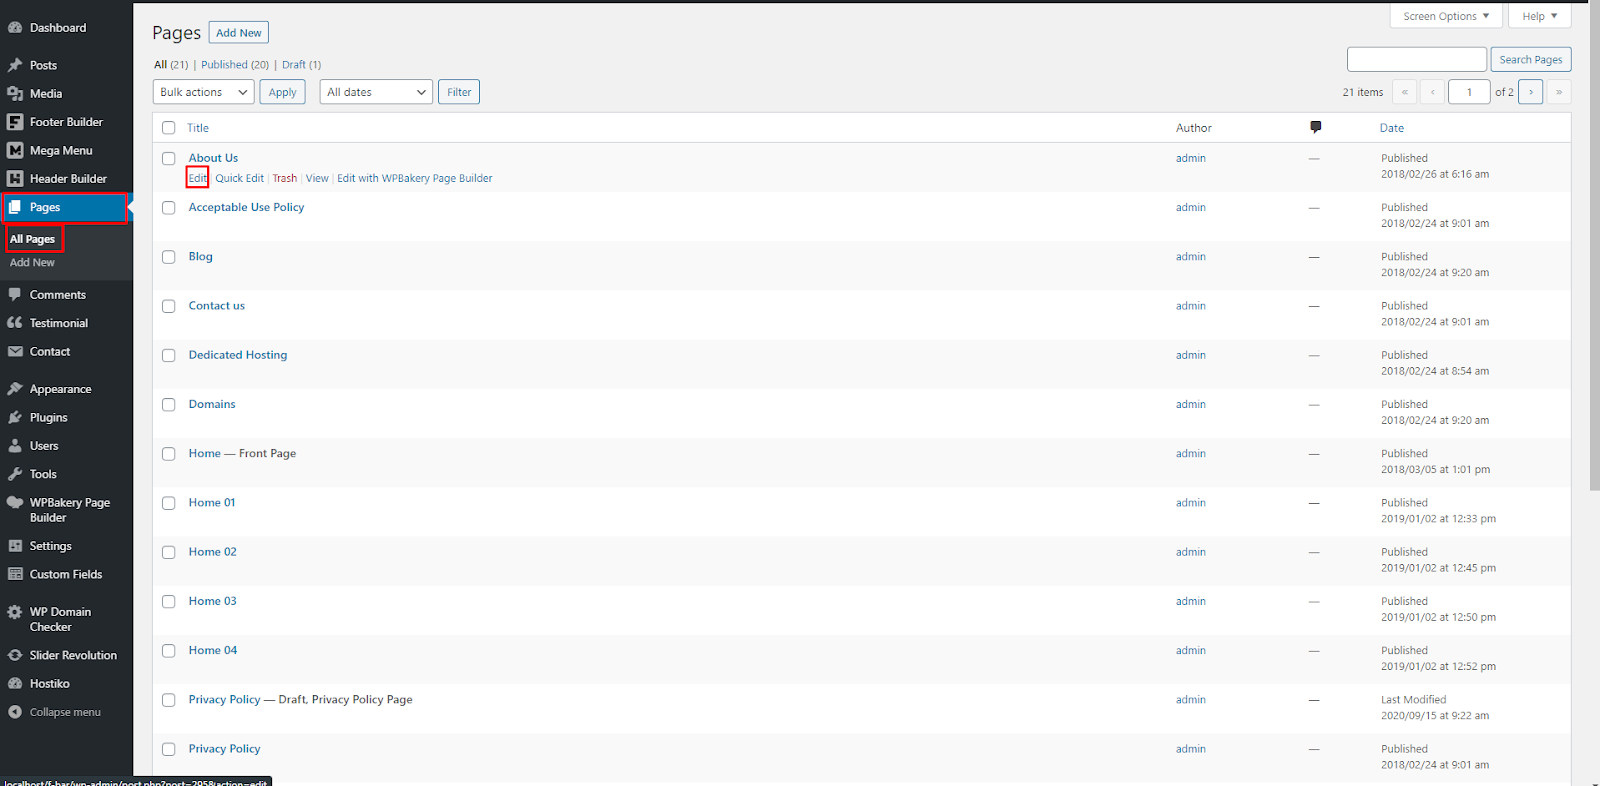
- Step 1: If you want to display different Headers on different pages then you can achieve that with Hostiko very easily. Navigate to Pages > All Pages in WP Dashboard Menu. Choose the Page you want to display different headers on, and click on the Edit button.
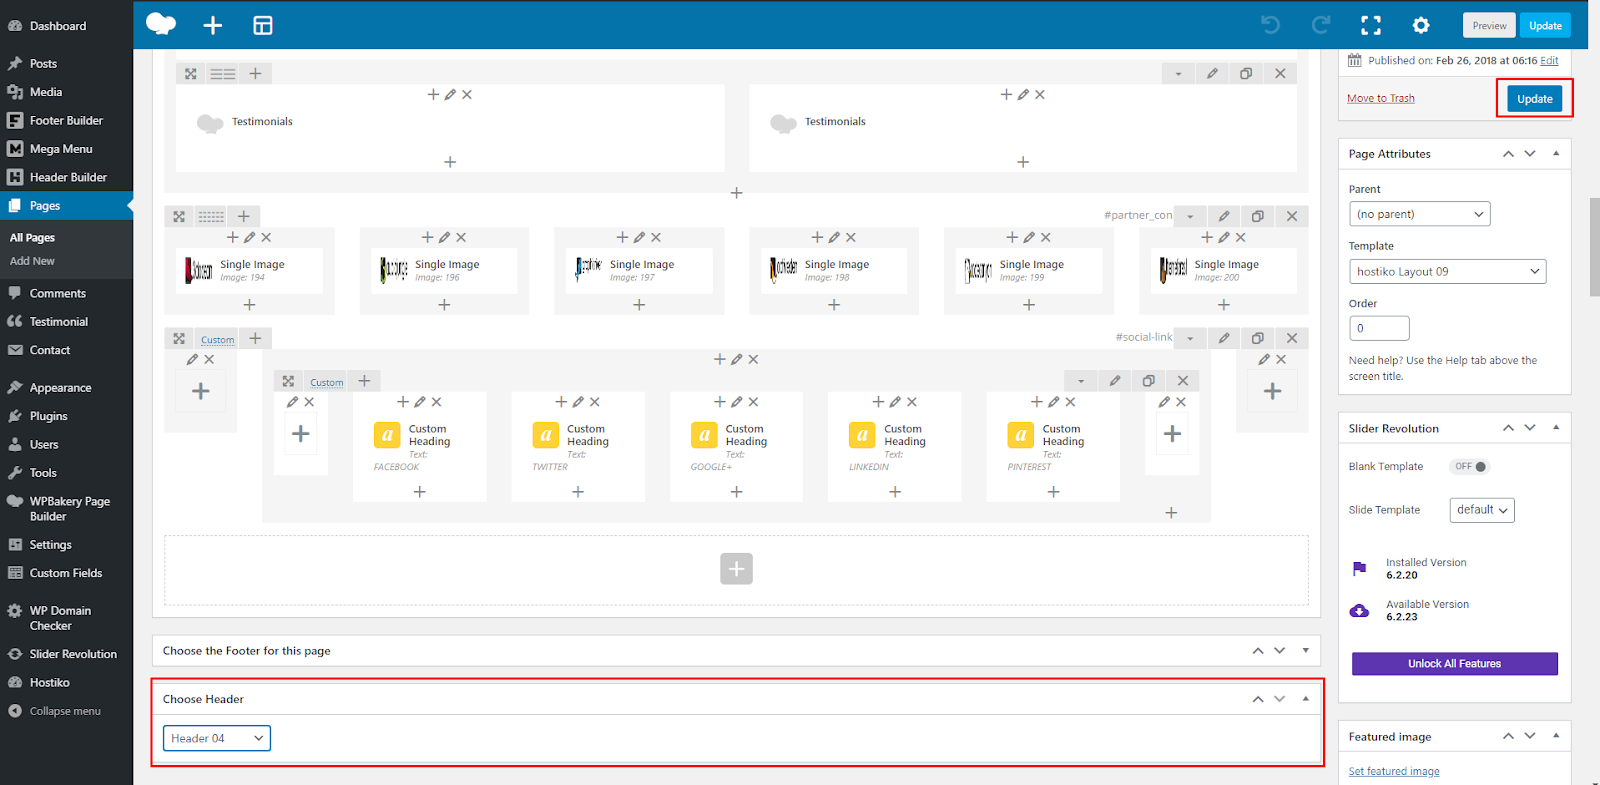
- Step 2: Go to the bottom of your editor page. Go to the “Choose Header” section, and select the Header you want to display on this page.

- If you can’t see the “Choose Header” section, then go to the top of the page and click on the “Screen Options” button that is located at the top right corner. A dropdown menu will appear. Select “Choose Header” checkbox. Now the “Choose Header” section will appear at the bottom of the screen.

- Step 3: Click on the “Update” button. Now the header you chose for this page will display only on this page.
Using var query param to Display Header:
Footer Builder
Hostiko WP-Bakery Theme provides you with Footer Builder. By using this option you can either choose an already built Footer template by our team to display on your website or you can build your own Footer as you like.
If you’re new to WordPress and want help setting up your menus for Footer then you can look at this guide here.
How to use the already built Footer Template?
If you’re new to WordPress and Visual Composer then you might be looking for already built Templates. Hostiko Footer Builder provides you with already built Footer templates. Below are the steps on how to use them:
- Step 1: After installing demo data you might want to change your site’s Footer Design. Navigate to Footer Builder > Settings in WP-Dashboard Menu.

- Step 2: In the Settings tab, the Display Footer option must be Disabled ALWAYS.

- Step 3: Navigate to Display Default Footer option and choose whichever Footer Style you want to display on your site. You can choose Default option if you want the same footer as displayed in the demo.
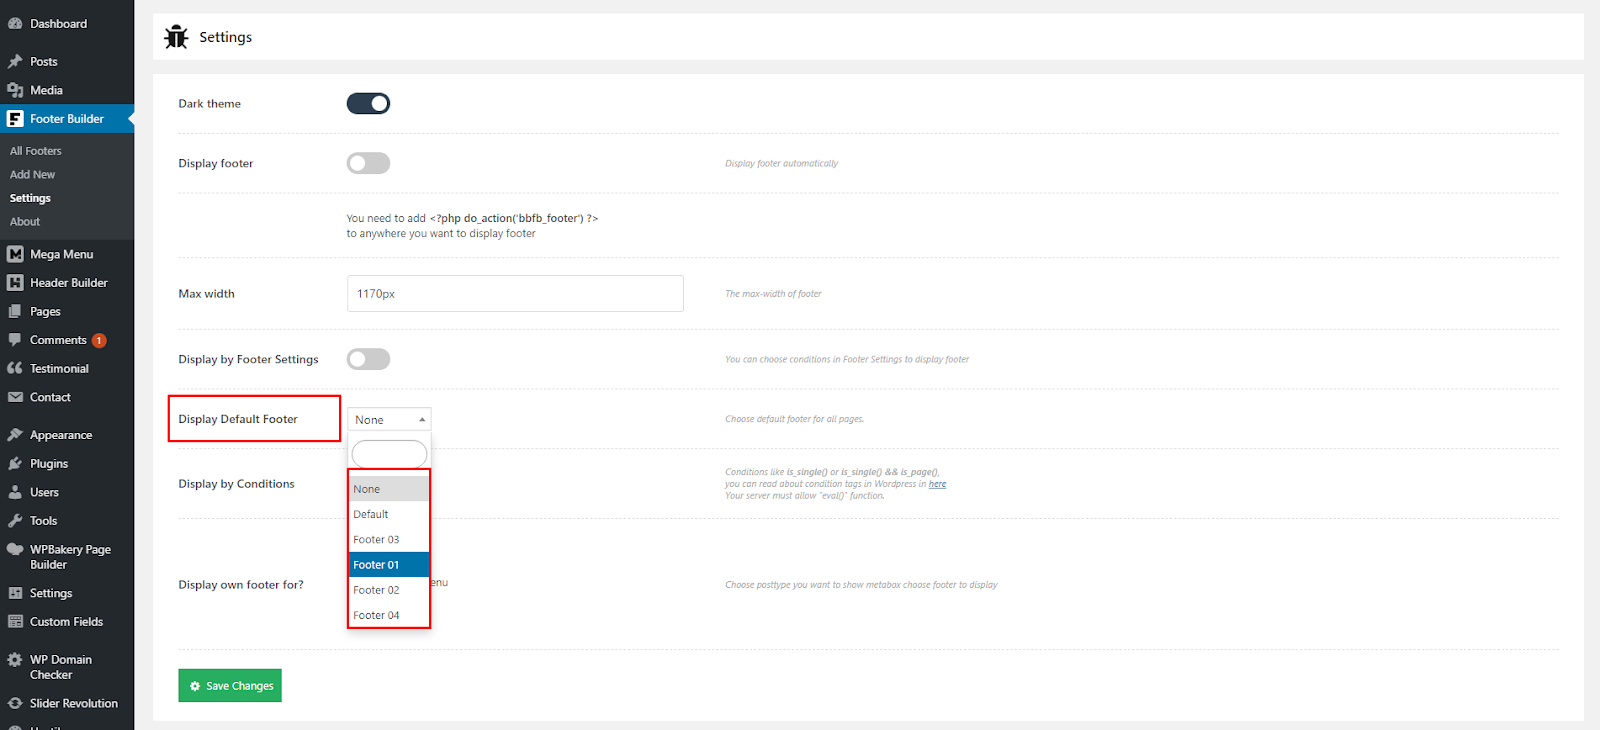
- Step 4: Other Settings:
- Max Width => You can change your site’s Footer Max Width.
Display by Conditions => Conditions like is_post() or is_post() && is_page(), you can read about condition tags in Wordpress here.
Display own Footer for => Settings Meta Box will be shown in Post of these Post Types. 
- Step 5: After choosing your Footer style click on the Save Changes button and a message will appear at the bottom right of your screen to confirm that your changes are saved.

- Step 6: Now visit your site and you will see that your chosen Footer Style is displaying on your site.

How to create your own Footer?
Hostiko also provides you with an option to create your own Footer. You can design your Footer the way you have envisioned it for your website. Below are the steps to create custom Footer in Hostiko:
- Step 1: Navigate to WP-Bakery Page Builder > Role Manager in WP-Dashboard Menu.

- Step 2: Find Post Types and Select Custom option.

- Step 3: Check these options: bbfb_content, bbhd_megamenu, bbhd_content.

- Step 4: Click on the “Save Changes” button to save all the settings.

- Step 5: Navigate to Footer Builder > Add New in WP-Dashboard Menu.
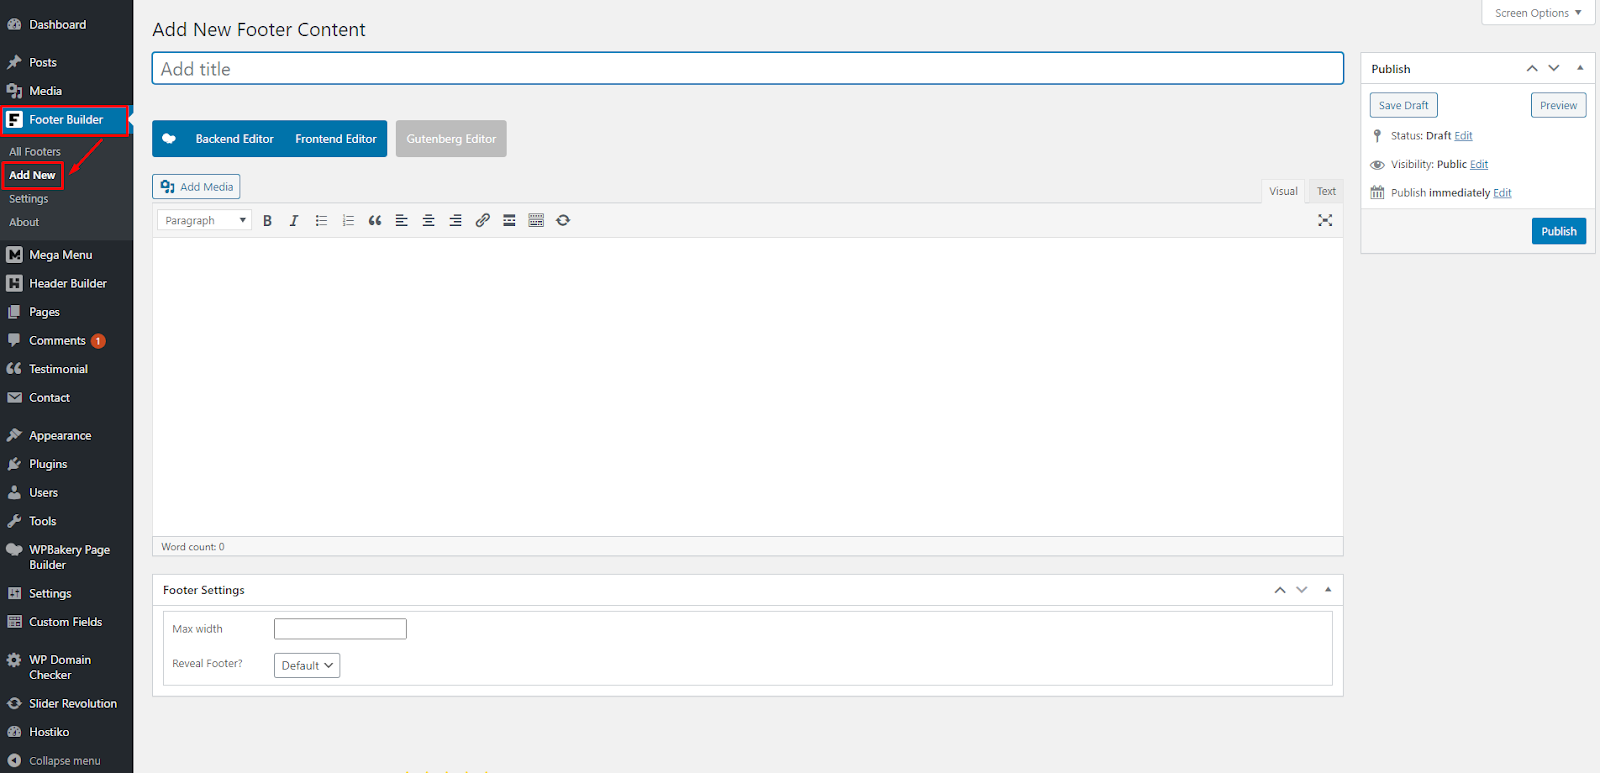
- Step 6: Set title for your new Footer in the “Add New Footer Content” input field. Select Front End or Back End Editor, whichever you’re comfortable with using.
- Now you can design your own header using Visual Composer. If you’re using a visual composer for the first time then we will recommend you to watch some tutorial videos on how to use it so it will be easier for you to design your own footer.

- Step 7: You can change Footer Width according to your website. Navigate to the Footer Settings section at the bottom of the Back End Editor. You can enter your Footer’s width in the Max Width input box.

- If you don’t see the Max Width input box then, click on Screen Options at the top right corner of your screen. A drop-down menu will appear. Select Footer Settings. Now you will see the Footer Settings section at the bottom of the Back End Editor.

- Step 8: When you are done designing your Footer, then click on “Publish”.

- Step 9: Navigate to Footer Builder > All Footers. Your Footer will be displayed there, you can Edit, Delete or View your site’s Header from here.

- Step 10: Now that you have created a Footer for your site, you need to set this footer as Default Footer to display on your site. For that Navigate to Footer Builder > Settings. Go to the Display Default Footer option and select your Footer Title from the options.

- Step 11: You can also change other settings for your footer.
- Max Width => You can change your site’s Footer Max Width.
Display by conditions => Conditions like is_post() or is_post() && is_page(), you can read about condition tags in Wordpress here.
Display own Footer for => Settings Meta Box will be shown in Post of these Post Types. 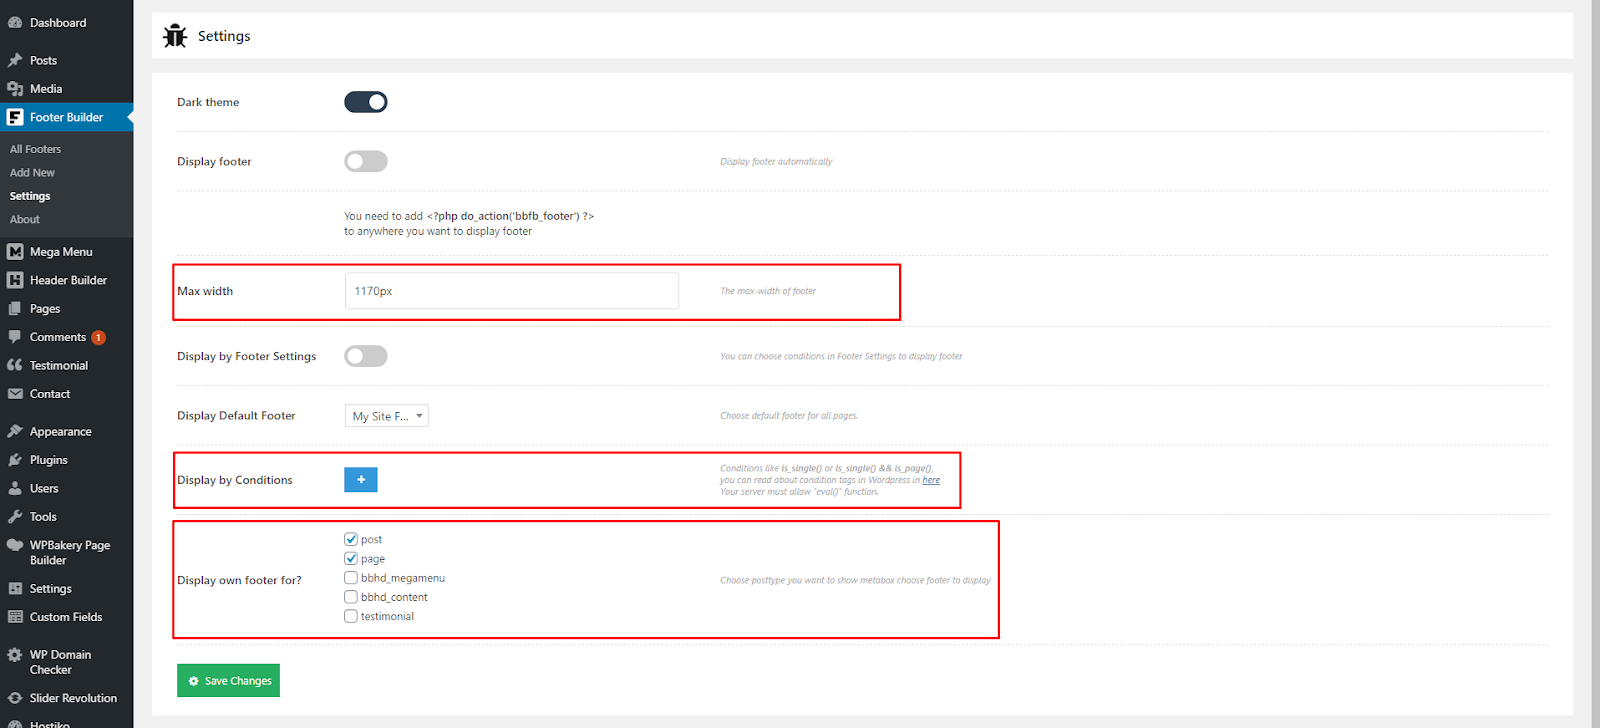
- Step 12: Click on the Save Changes button to save your settings and a message will appear at the bottom right of your screen to confirm that your changes are saved. Your Footer will now display at your website.

How to edit any Footer?
- Step 1: To edit Footer, navigate to WP-Bakery Page Builder > Role Manager in WP-Dashboard Menu.

- Step 2: Find Post Types and Select Custom option.

- Step 3: Check these options: bbfb_content, bbhd_megamenu, bbhd_content.

- Step 4: Click on the “Save Changes” button to save all the settings.

- Step 5: Navigate to Footer Builder > All Footers. Select the Footer you want to edit and click on the Edit button.

- Step 6: Here you can choose whether you want to edit it with Front End Editor or Back End Editor, and you can start editing your Footer.

Display Footer
Hostiko gives you the option to show different headers on different pages. There are 4 ways to display a footer.
Default Footer for all Pages:
- Step 1: If you want to show one header on all your site pages then, navigate to Footer Builder > Settings in WP Dashboard Menu.

- Step 2: Navigate to Default Footer option and select the header you want to display on all pages from the dropdown.

- Step 3: Click on the Save Changes button, a message will appear at the bottom right corner of the screen confirming that your changes are saved. Now the Header you chose will appear on all your site pages.

Display Footer Using Conditions:
- Step 1: Navigate to Footer Builder > Settings. You’ll see the “Use Footer with Conditions” option. Click on the Plus Sign.
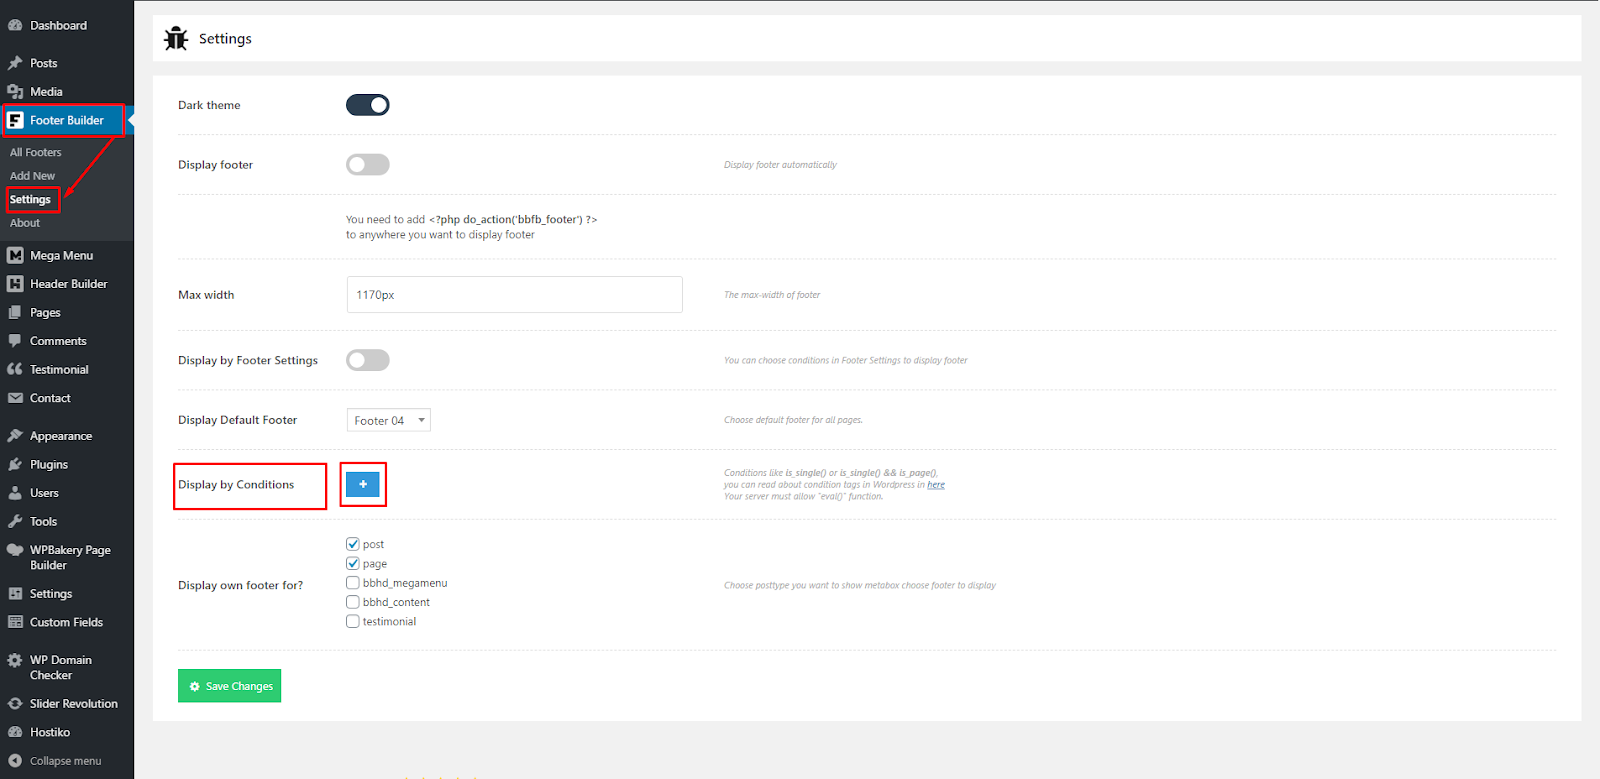
- Step 2: By Clicking on Plus sign you can add as many conditions as you like. If you’re using condition tags for the first time then you can read about WordPress conditional tags here

- Step 3: Click on the Save Changes button, a message will appear at the bottom right corner of the screen confirming that your changes are saved. Now the Footer you chose will appear on all your sites according to applied conditions.

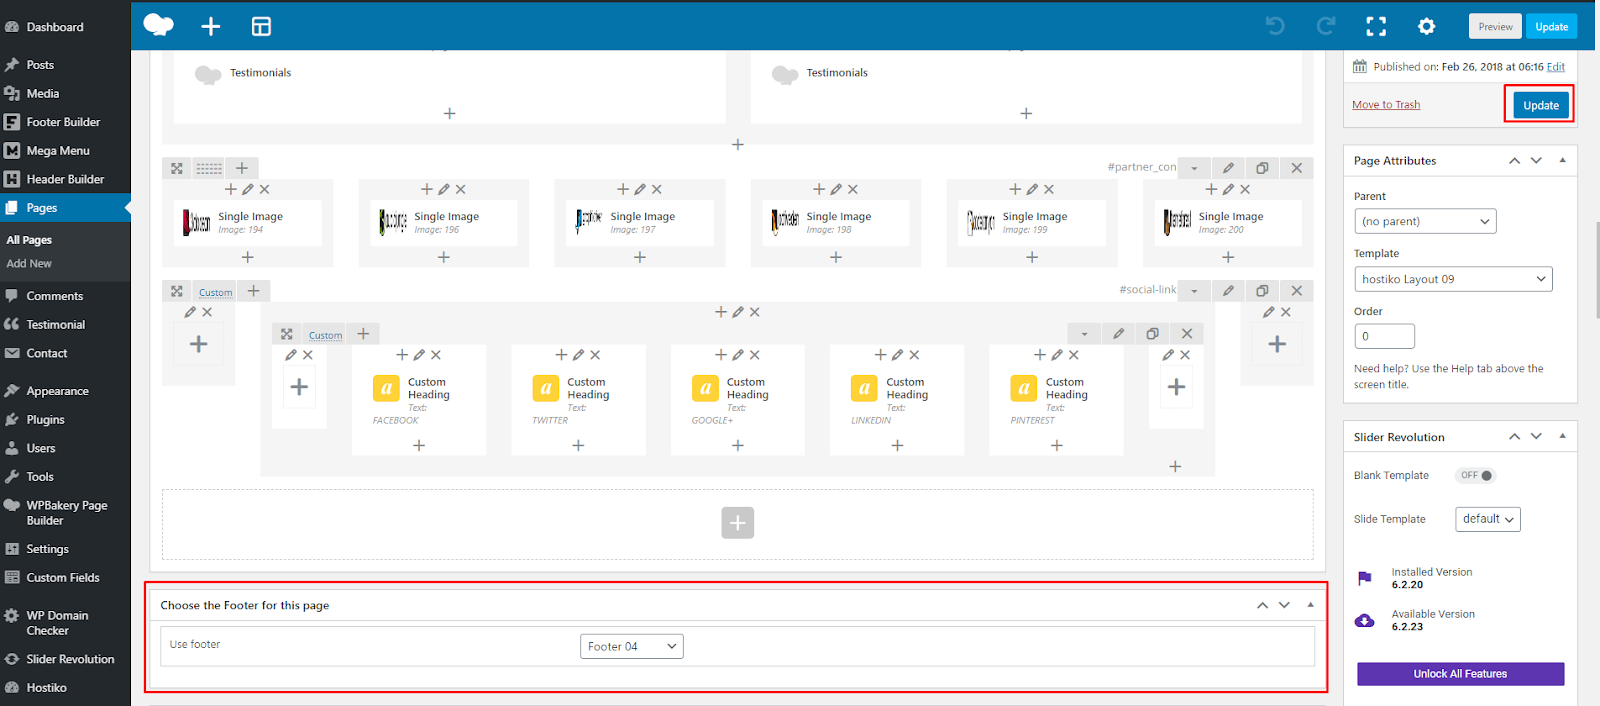
Display Footer for each Page & Post:
- Step 1: If you want to display different Footers on different pages then you can achieve that with Hostiko very easily. Navigate to Pages > All Pages in WP Dashboard Menu. Choose the Page you want to display different footers on, and click on the Edit button.

- Step 2: Go to the bottom of your editor page. Go to the “Choose Footer for this page” section, and select the Footer you want to display on this page.

- If you can’t see the “Choose Footer for this page” section, then go to the top of the page and click on the “Screen Options” button that is located at the top right corner. A dropdown menu will appear. Select “Choose Footer for this page” checkbox. Now the “Choose Footer for this page” section will appear at the bottom of the screen.

- Step 3: Click on the “Update” button. Now the header you chose for this page will display only on this page.
Using var query param to Display Header:
Mega Menu Builder
Hostiko WP-Bakery Theme provides you with Mega Menu Builder. By using this option you can either choose an already built Mega Menu Template by our team to display on your website or you can build your own Mega Menu as you like.
If you’re new to WordPress and want help setting up your menus then you can look at this guide here.
How to use & edit Default Mega Menu Template?
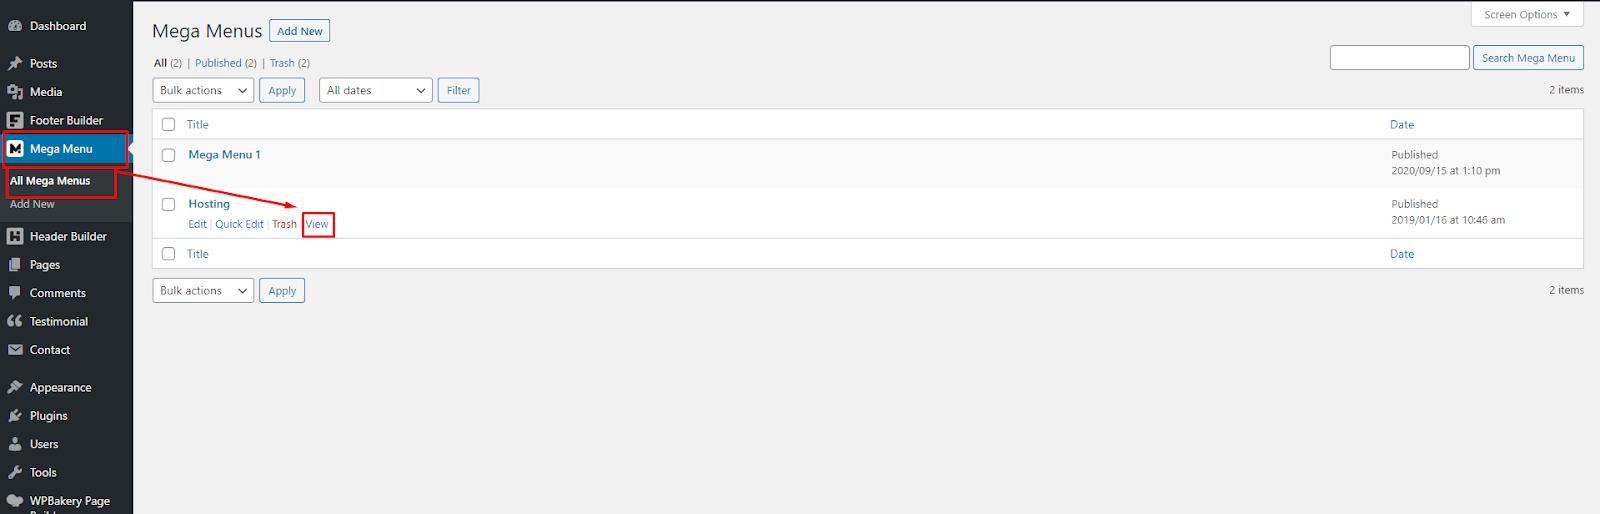
- Step 1: To view the Mega Menu Template you want to use, navigate to Mega Menu > All Mega Menus. Here you’ll see already built Mega Menu Templates. You can view these templates by clicking on the “View” button.
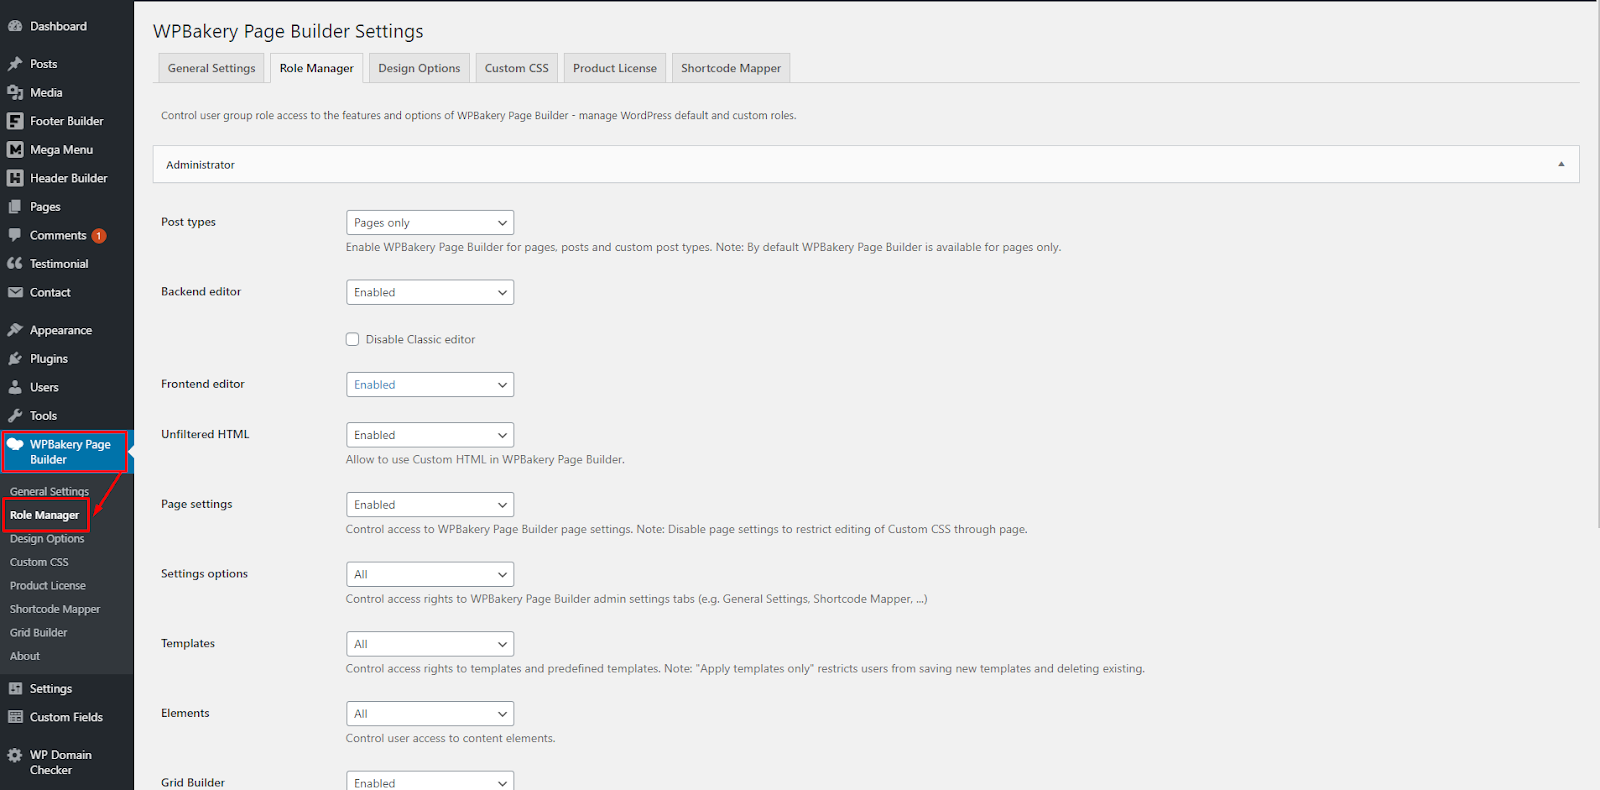
- Step 2: To edit any Mega Menu, Navigate to WP-Bakery Page Builder > Role Manager in WP-Dashboard Menu.

- Step 3: Find Post Types and Select Custom option.

- Step 4: Check these options: bbfb_content, bbhd_megamenu, bbhd_content.

- Step 5: Click on the “Save Changes” button to save all the settings.

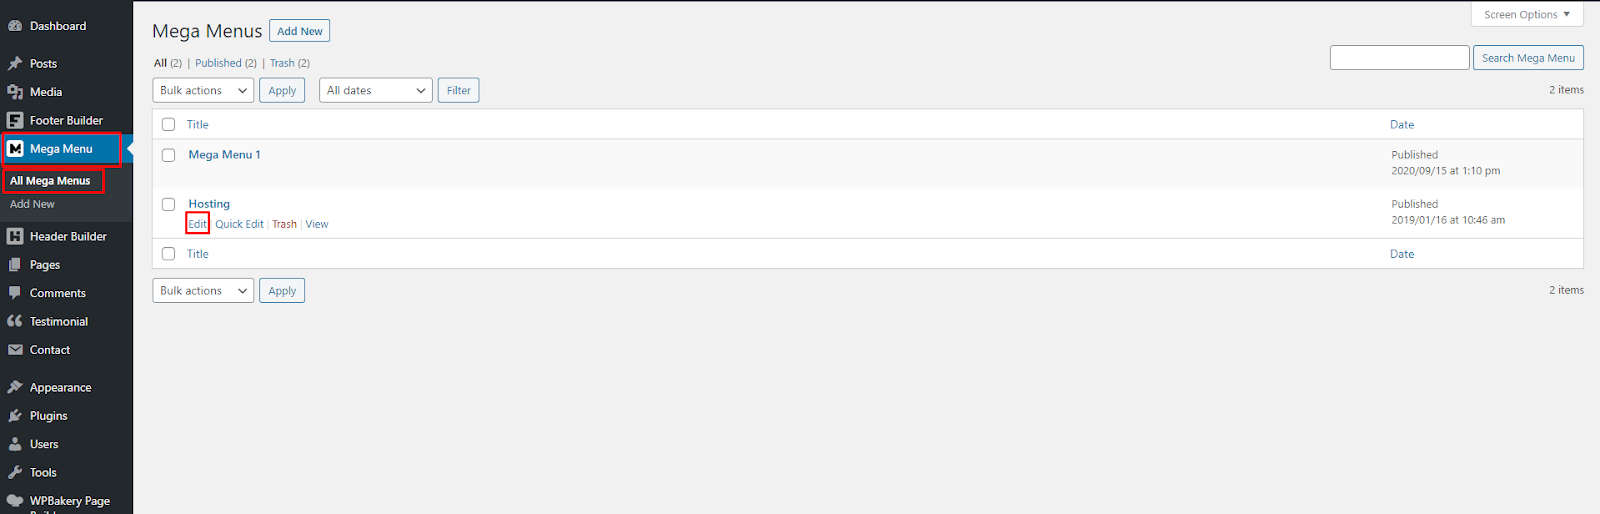
- Step 6: Navigate to Mega Menu > All Mega Menus. Select the Mega Menu you want to edit and click on the Edit button.
- Step 7: Click on BackEnd Editor.

- Step 8: Here you can start editing your Mega Menu Template.

- Step 9: You can change the Mega Menu Width according to your website. Navigate to the Mega Menu Settings section at the bottom of the Back End Editor. You can enter your Mega Menu width in the Max Width input box.

- if you don’t see the Max Width input box then, click on Screen Options at the top right corner of your screen. A drop-down menu will appear. Select Mega Menu Settings. Now you will see the Mega Menu Settings section at the bottom of the Back End Editor.

How to create a Mega Menu?
Hostiko also provides you with an option to create your own Mega Menu. You can design your Mega Menu The way you have envisioned it for your website. Below are the steps to create customMega Menu in Hostiko:
- Step 1: Navigate to WP-Bakery Page Builder > Role Manager in WP-Dashboard Menu.
- Step 2: Find Post Types and Select Custom option.

- Step 3: Check these options: bbfb_content, bbhd_megamenu, bbhd_content.

- Step 4: Click on the “Save Changes” button to save all the settings.

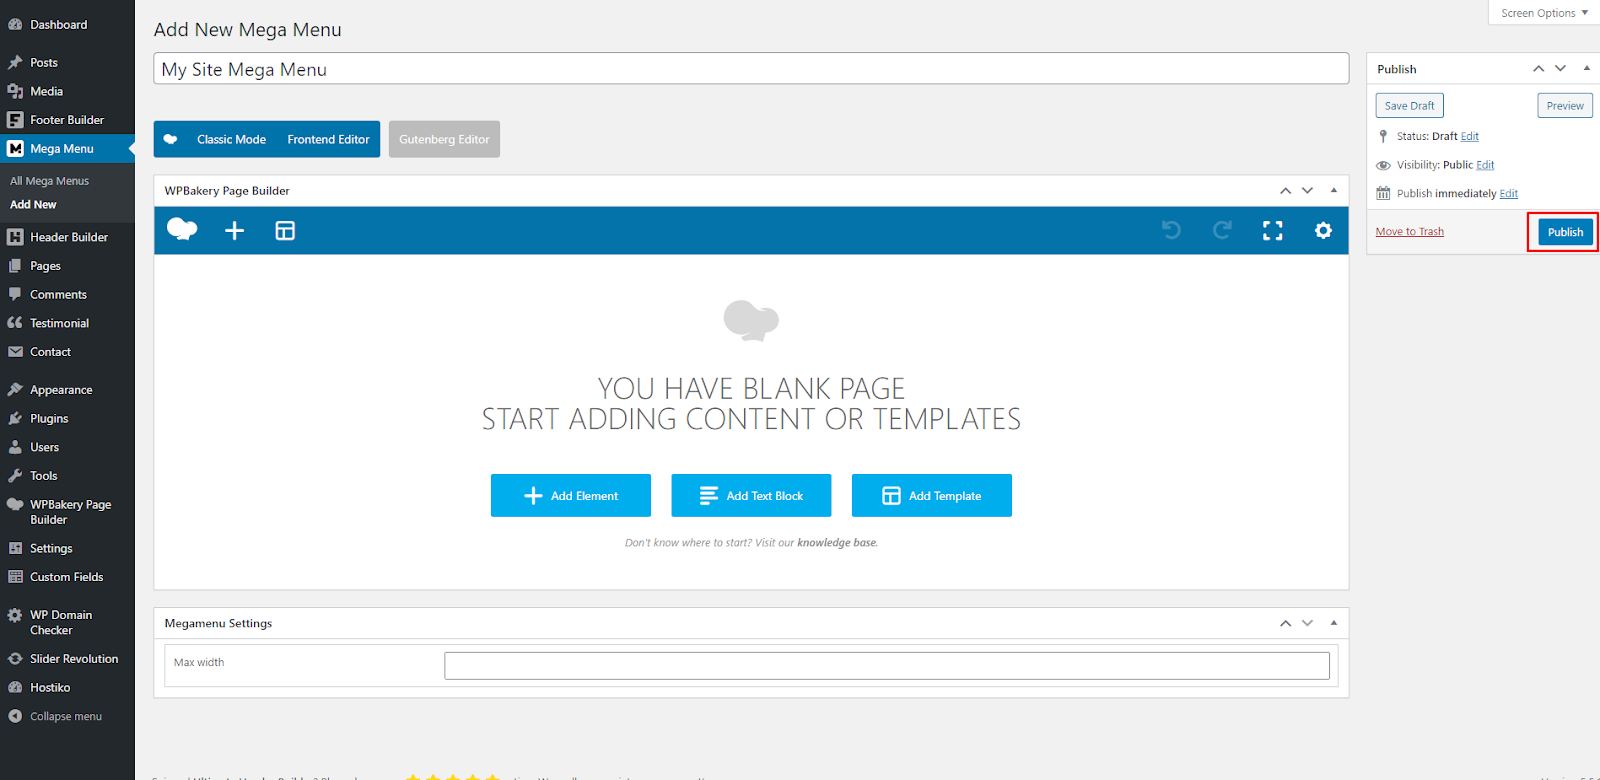
- Step 5: Navigate to Mega Menu > Add New in WP-Dashboard Menu.
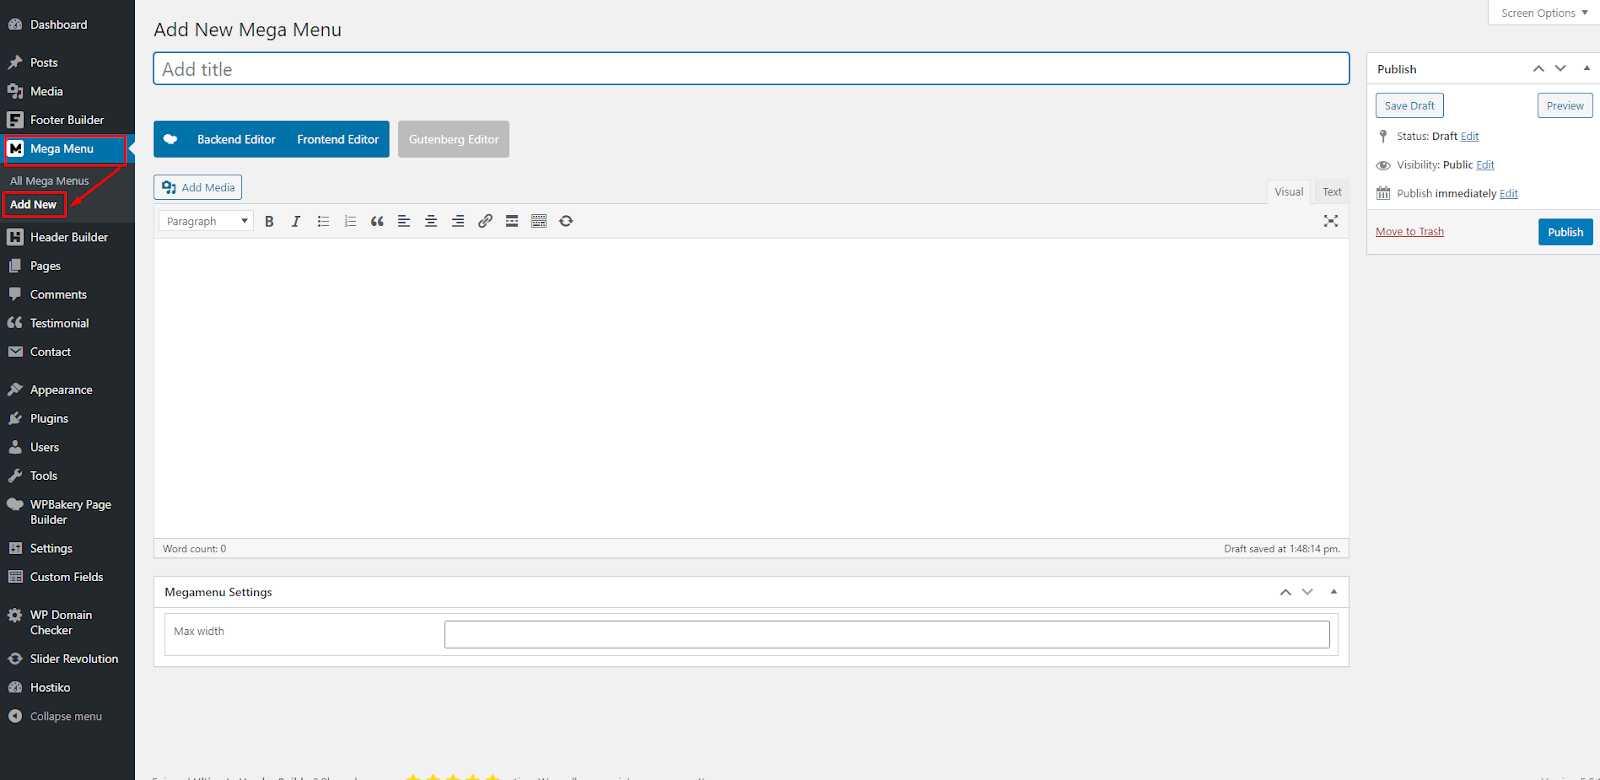
- Step 6: Set the title for your new Mega Menu in the “Add New Mega Menu” input field. Select Back End Editor.
- Now you can design your own header using Visual Composer. If you’re using a visual composer for the first time then we will recommend you to watch some tutorial videos on how to use it so it will be easier for you to design your own footer.

- Step 7: Now you can create your own Mega Menu through Visual Composer Backend Editor.

- Step 8: When you are done designing your Mega Menu, then click on “Publish”.
- Step 9: Navigate to Mega Menu > All Mega Menus. Your Mega Menu will be displayed there, you can Edit, Delete or View the Mega Menu from here.

How to display Mega Menu?
After you have selected which Mega Menu Template to use or have created your own Mega Menu, then to display that Mega Menu on your site, follow the steps given below:
- Step 1: In WP Admin area, Navigate to Appearance > Menus.

- Step 2: At the top right corner of your screen, click on Screen Options, a dropdown selection options menu will appear. Check if the “Mega Menu” option is selected or not. If it is not selected then check the Mega Menu box.
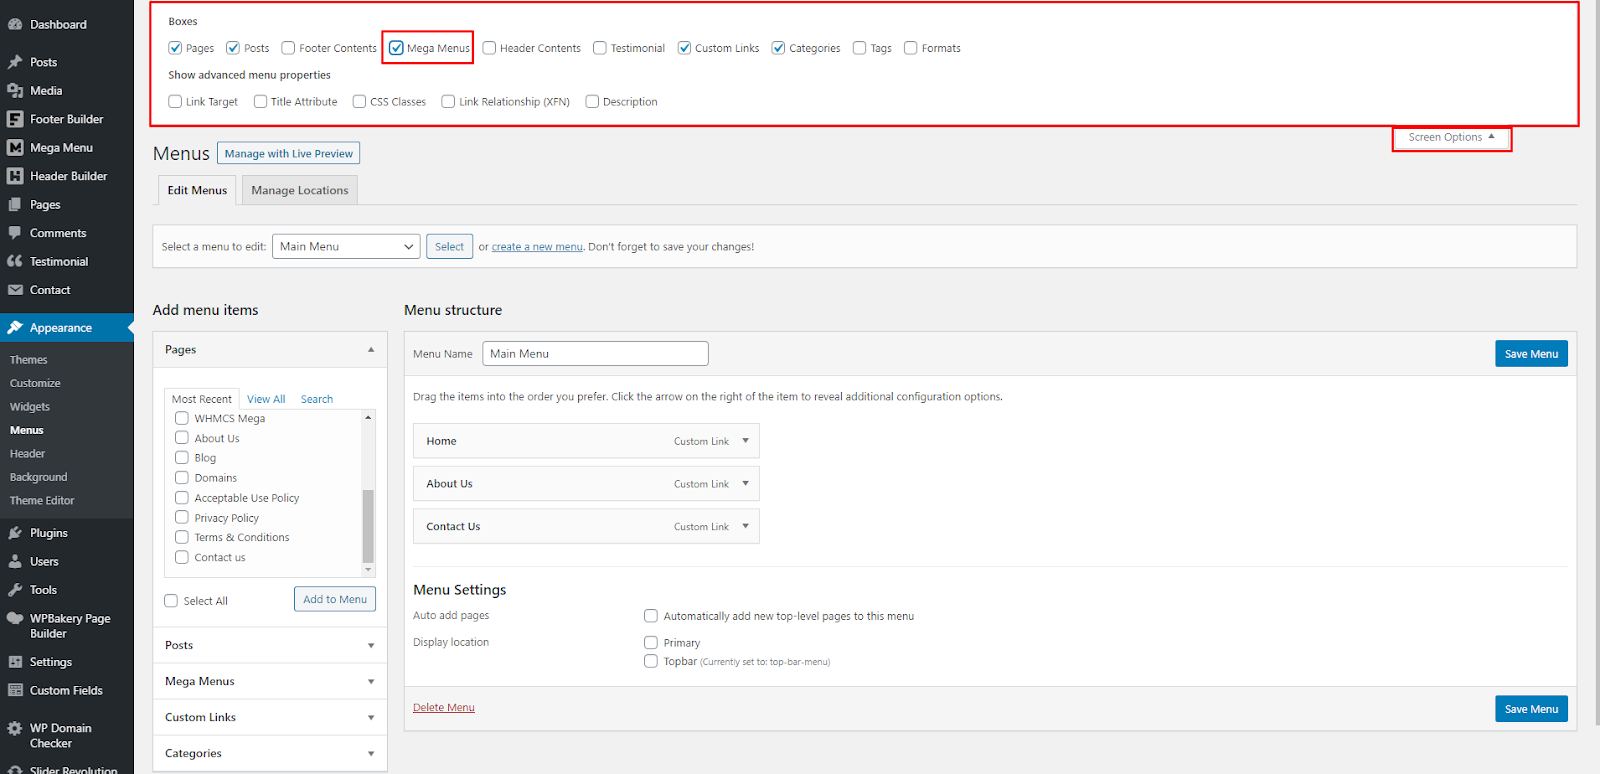
- Step 3: Now Mega Menus tab will appear in the “Add Menu Items” column on the left.

- Step 4: Select the Menu, you want to add Mega Menu in from “Select a menu to edit” option.

- Step 5: After selecting the menu, navigate to Mega Menus Tab, select the Mega Menu you want to use on your website. Click on the Add to Menu button.
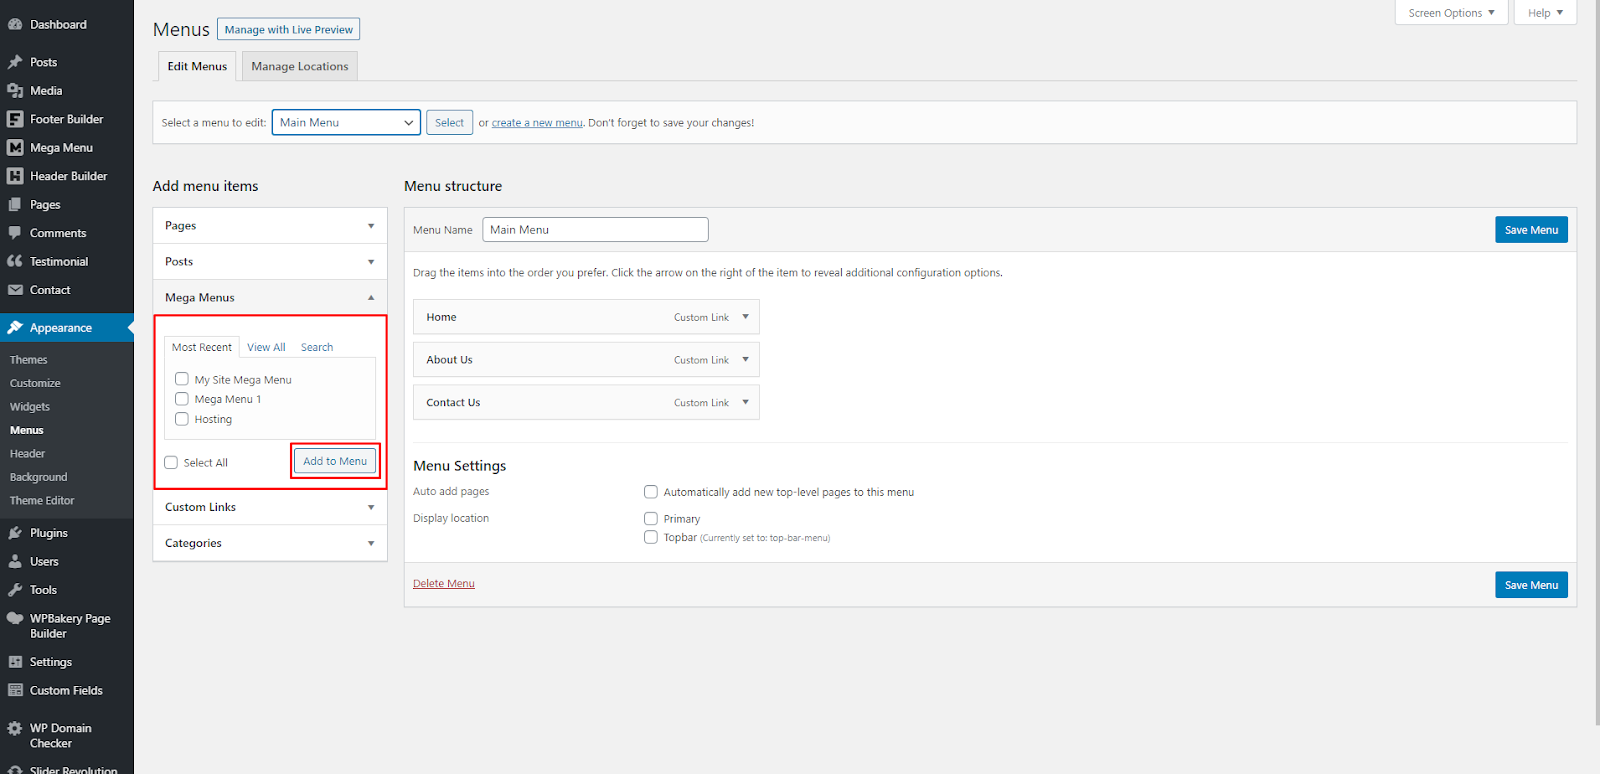
- Step 6: Your Mega Menu will now show in the Menu Structure column, under the menu you selected to edit. Click on the Save Menu button to save your changes.

- Now your Mega Menu will appear in the Header of your website.

WP Domain Checker
WP Domain Checker is a WordPress plugin which allows you to check domain name availability from your wordpress site. To use WP Domain Checker with Hostiko Theme, first you have to make sure that WP Domain Checker plugin is installed and activated. Navigate to Plugins in WP Dashboard Menu. Check if the plugin is activated.

How to use WP Domain Checker?
WP Domain Checker can be used in your site in 2 ways:
- Through a Shortcode
- Through a Widget
Shortcodes:
If you want to display WP Domain Checker Form in any of your site’s pages or posts, you will need to insert a shortcode in that page. Following are the shortcodes that you can use to display WP Domain Checker form:
| Parameter | Description | Example |
|---|---|---|
| Button | Change button text. Default: “Check” | [wpdomainchecker button="SEARCH"] |
| width | Change search box width. Default: 900px | [wpdomainchecker width="600"] |
| item_id | Integrated to specific product ID. (Product ID in settings will be ignored). | [wpdomainchecker item_id="1234"] |
| size | Change search box size (small or large). Default: large | [wpdomainchecker size="small"] |
| recaptcha | Enable/disable recaptcha. Site Key & Secret Key required. Default: no | [wpdomainchecker recaptcha="yes"] |
| allowed_tld | Allow only specific tld to be checked. Separate by comma for each extension. Default: no | [wpdomainchecker allowed_tld="com,net,org"] |
| style | Choose Search Form Design 1 or 2 Default: 1 | [wpdomainchecker style="1"]
[wpdomainchecker style="2"]
|
| available_msg | Text Message if domain available. You can use {domain} {sld} {tld} tag here. | [wpdomainchecker available_msg="{domain} Available"] |
| unavailable_msg | Text Message if domain unavailable. You can use {domain} {sld} {tld} tag here. | [wpdomainchecker allowed_tld="Sorry, {domain} Unavailable"] |
| integration | Override the default integration. | [wpdomainchecker integration="disable"]
[wpdomainchecker integration="woocommerce"]
[wpdomainchecker integration="whmcs"]
[wpdomainchecker integration="whmcs_bridge"]
[wpdomainchecker integration="whm_press"]
[wpdomainchecker integration="custom"]
|
| whois_button | Enable / Disable Whois Button | [wpdomainchecker whois_button="enable"]
[wpdomainchecker whois_button="disable"]
|
| class | Add additional Class to the Search Box You can use “mobile” class if you place the shortcode in small container, This will make the design fit with the container. | [wpdomainchecker class="mobile"] |
IMPORTANT! All above shortcode parameters will override the WP Domain Checker settings in WP Admin Dashboard.
Now to use these shortcodes in your page or posts. Select the page you want to show WP Domain

Checker form on. Navigate to Pages in WP Dashboard Menu. If you want to create a new page for WP Domain Checker search bar then click on “Add New” button.But if you want to add WP Domain Checker in an already existing page then click on “All Pages”. Find the page you want to use WP Domain Checker on and click on the “Edit” button.
Now in WP Bakery Back End Editor, insert a Text box in a row. Click on Pen Icon as shown in screenshot to edit that Text Box Now insert the shortcode in the text area. Then click on “Save Changes”.

Now update your page by clicking on the “Update” button. And then click on the Preview Changes button to view your changes in your page.
In your page, you can see a domain search bar is added to search a domain through WP Domain Checker. You can style this search bar as you like.

If you want to set domain checker form size to 300px and button text with “Search”
You have to add “width” and “button” to the shortcode like this [wpdomainchecker width="300" button="Search"]
Widgets:
Follow these steps to setup WP Domain Checker for Widgets:
- Step 1: Navigate to Appearance > Widgets in WP Dashboard Menu.

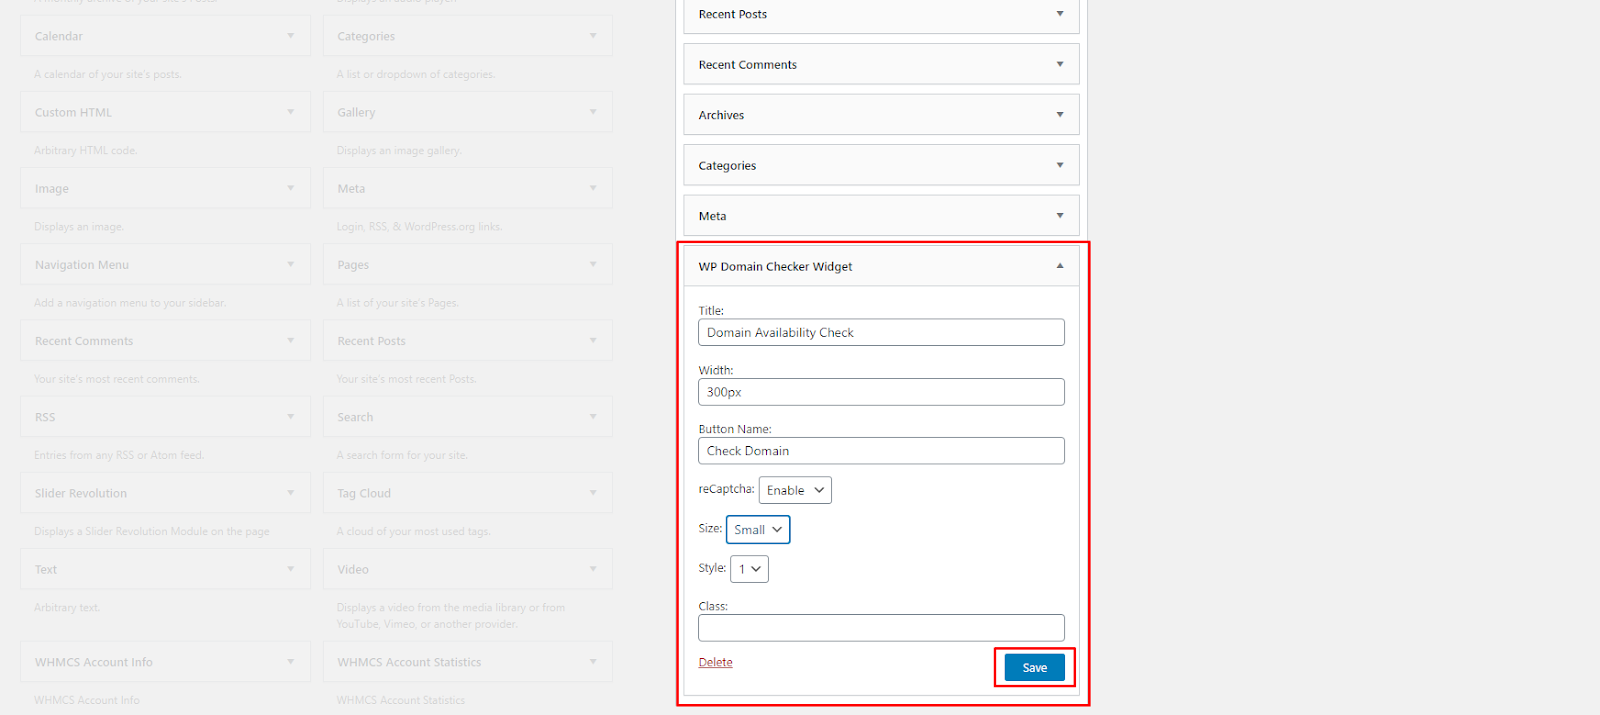
- Step 2: Scroll down until you find the WP Domain Checker Widget section. Click on WP Domain Checker Widget and a dropdown will display. Here you can choose where you want to display it on your site. Select it and click on the “Add Widget” button. For Example I want to display it in the Sidebar.

- Step 3: Once I added the widget, a WP Domain Checker dropdown select tab will appear in that section.

- Step 4: In this dropdown, you can set Title, Width, Button Name, reCaptcha, Size and Style. You can also add Class to design it like you want. Once you have set everything like on “Save” and your WP Domain Checker Widget will be set.
- Now your WP Domain Checker Widget will appear in the sidebar

WhoIs Lookup Button:
In WP Domain Checker, the WhoIs button appears when a domain is unavailable. Follow the steps below to setup WhoIs Lookup Button:
- Step 1: To enable WhoIa Button function, first you need to create a WhoIs page. Navigate to Pages > Add New in WP Dashboard Menu.

- Step 2: You can create the page with whatever name you want. Example: “WhoIs Domain” or “WhoIs Button”. But make sure that it is a page and not a post. In the text block section, insert shortcode
[wpdomainwhois]. Click on the “Publish” button. 
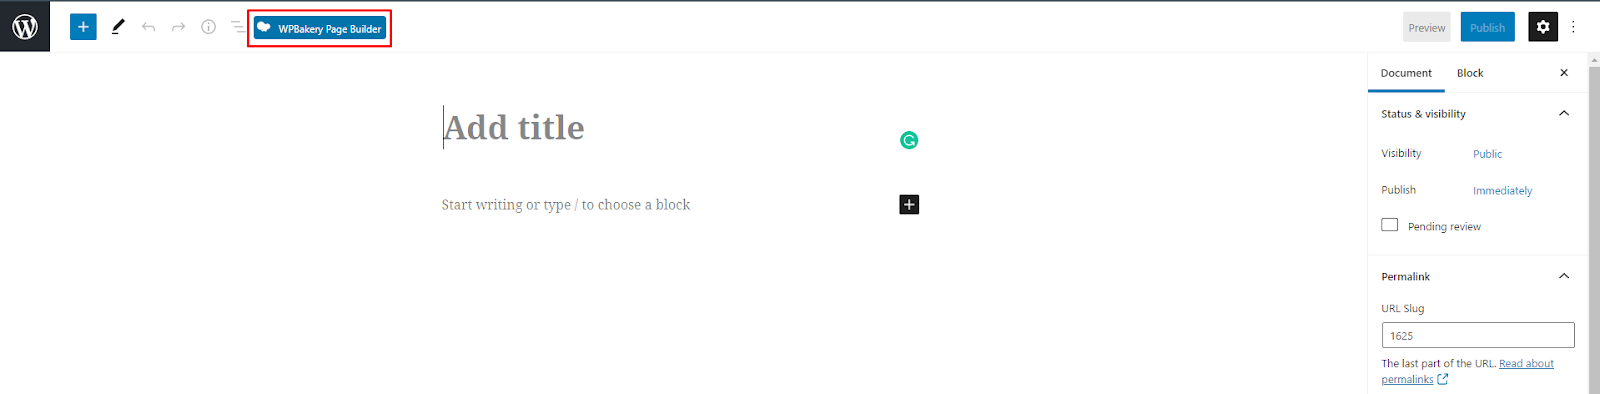
- You can also use WP-Bakery Page Builder to design your page properly. Click on “WPBakery Page Builder” button on the top of your editor page shown in screenshot above. Now click on the Back End Editor button. Here you can add a Text Block and insert a shortcode there. Once you’re done click on the “Publish” button.

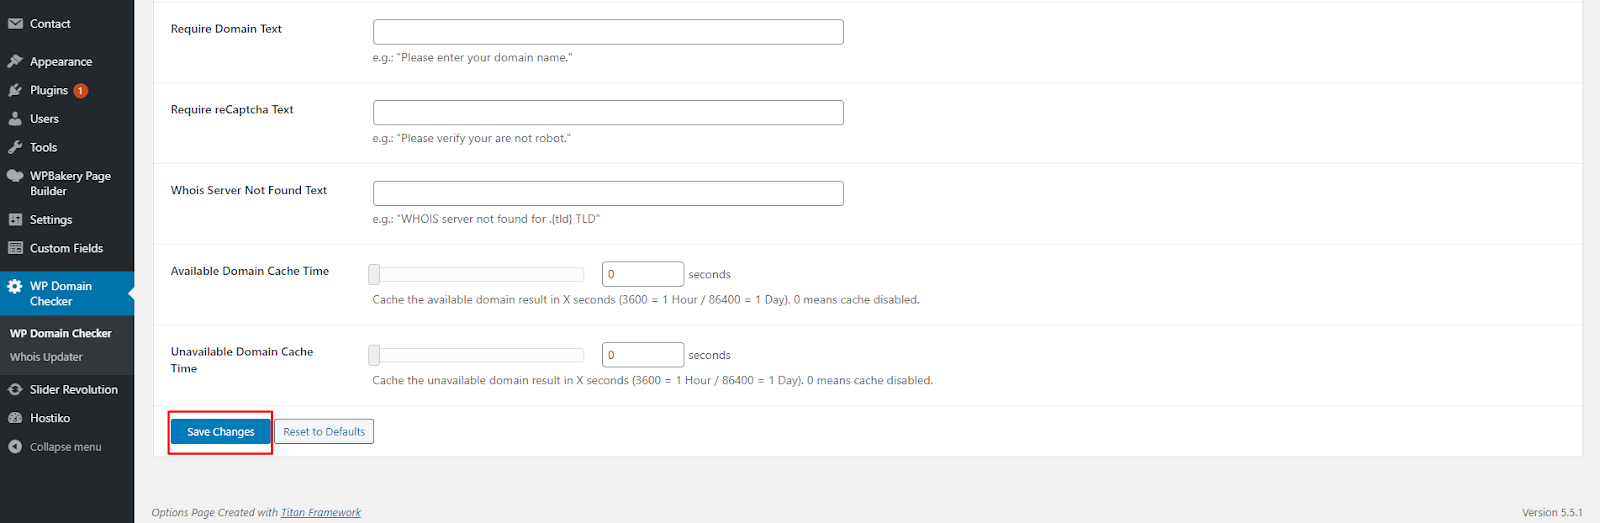
- Step 3: After your page is published, navigate to WP Domain Checker in WP Dashboard Menu. Find WhoIs Page settings option. From dropdown, select the page you created.
- Step 4: In WhoIs Button Text input box, you can add your button text that will show on the page. In the WhoIs Custom URL input box, you can directly add your page url instead of using WhoIs Page option.

- Step 5: After setting up your WhoIs Page settings, scroll down to the end of the page and click on the “Save Changes” button.

- Now when you search a domain that isn’t available, a WhoIs Button will display. Using this button you can check unavailable domain details.


WHMCS Integration
Hostiko provides you with the WHMCS plugin too. To set it up, you can see the WHMCS Integration section. In WHMCS Integration with WP Domain Checker, a Purchase Button will appear when the domain is available. Through this button you will be redirected to your WHMCS Domain Configuration and your domain will be added to your WHMCS cart.
Follow these steps to integrate WHMCS:
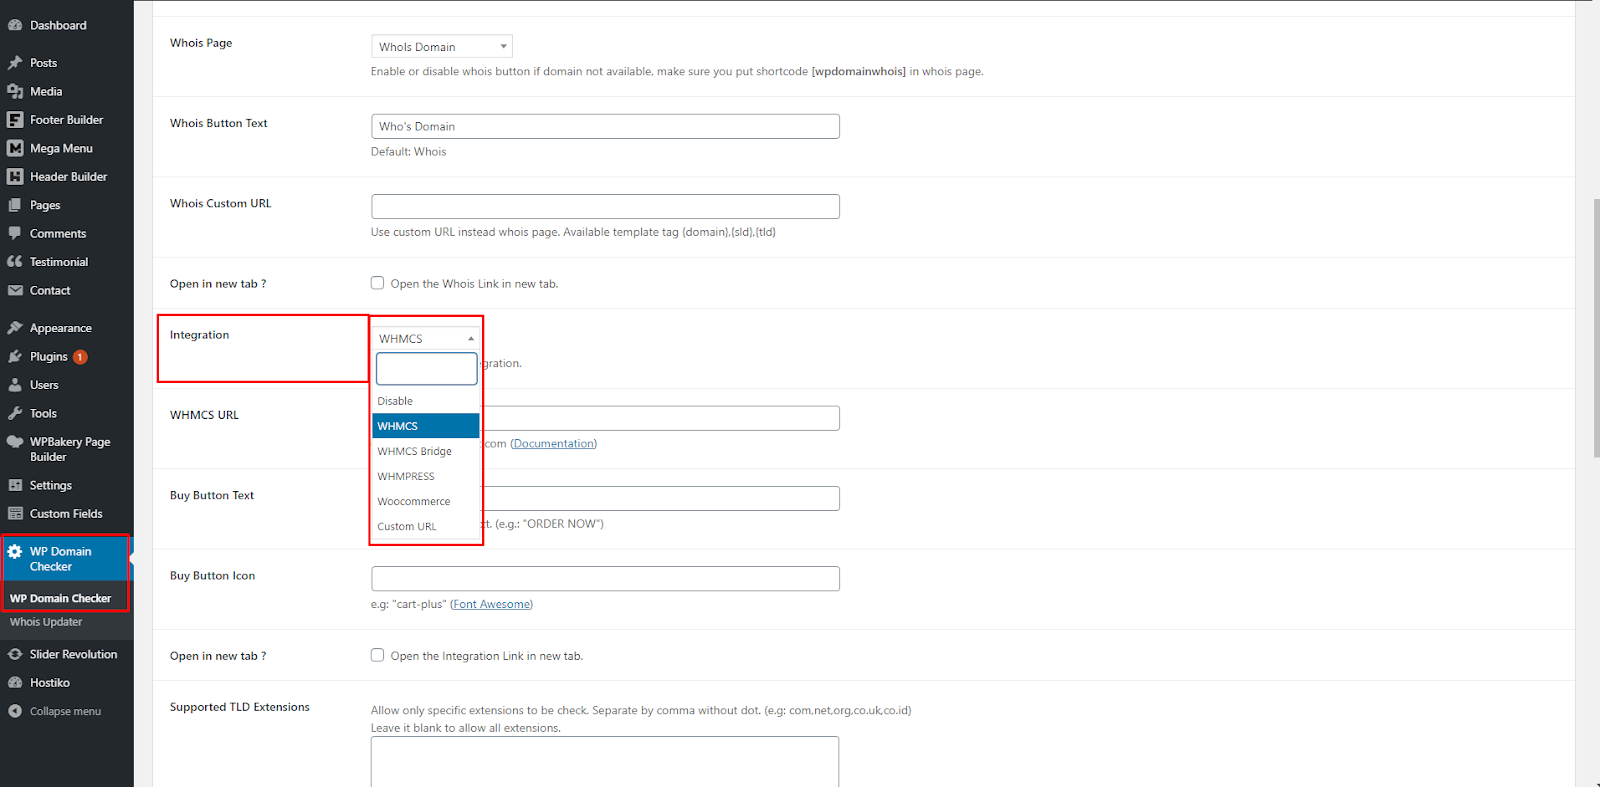
- Step 1: Navigate to WP Domain Checker in WP Dashboard Menu. Find the Integration option section. Select WHMCS from dropdown.
- Step 2: In the WHMCS URL input box, add your WHMCS Site Url.

- Step 3: You can add your Button Text & Button Icon in Buy Button Text and Buy Button Icon input box.

- Step 3: Click on the “Save Changes” button.

- Now a Purchase Button will appear when the domain is available. Through this button you will be redirected to your WHMCS Domain Configuration and your domain will be added to your WHMCS cart.

Custom Link Integration
WP Domain Checker also provides you with the option to Integrate a Custom Link.
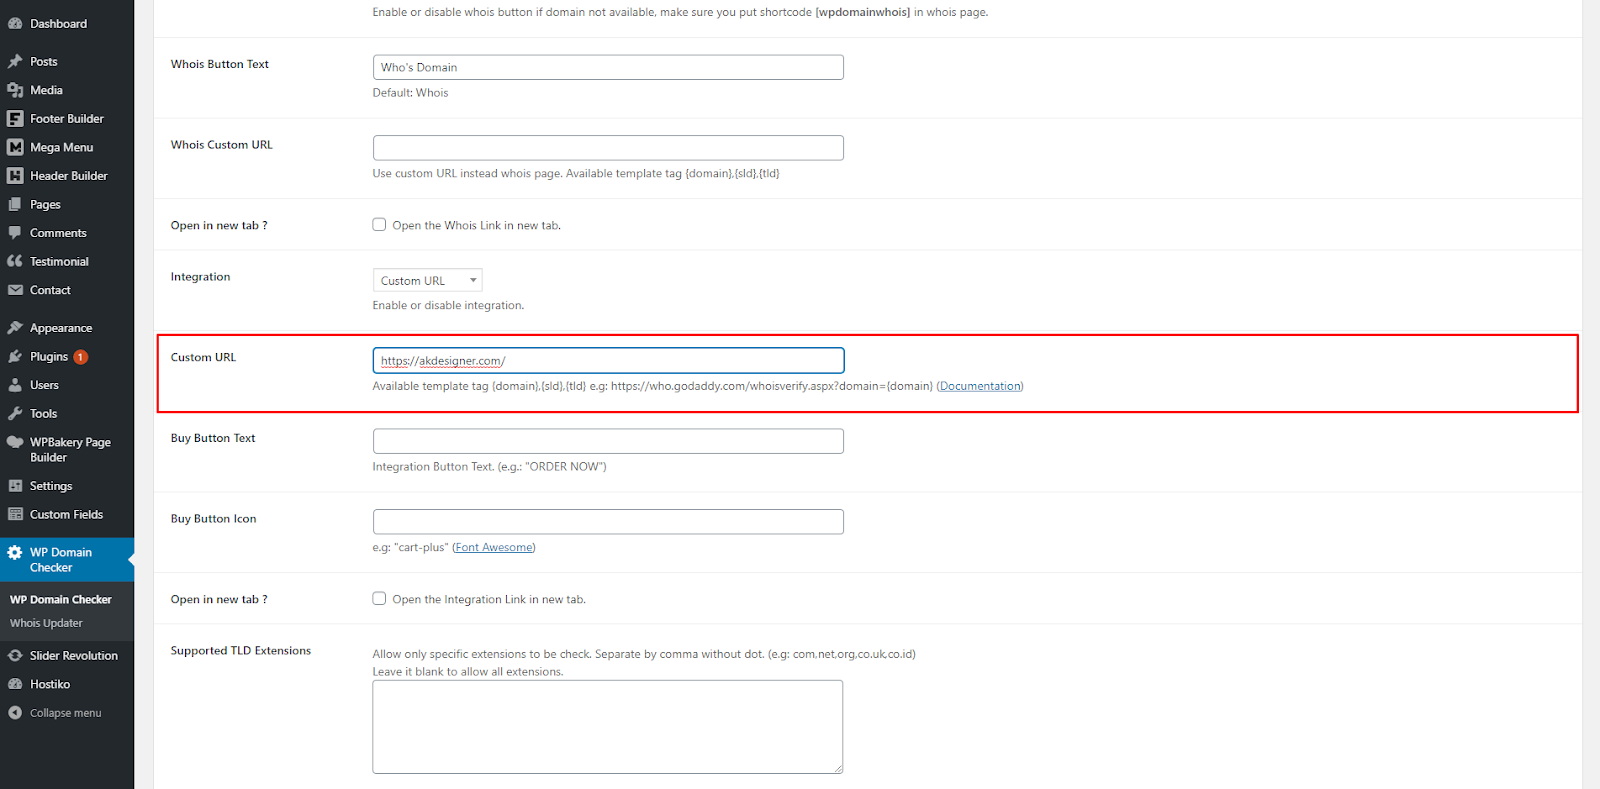
- Step 1: Navigate to WP Domain Checker in WP Dashboard Menu. Find the Integration option section. Select Customer URL from dropdown.

- Step 2: Custom URL input box will appear once you select Integration > Custom URL. Enter your URL in the Custom URL input box.
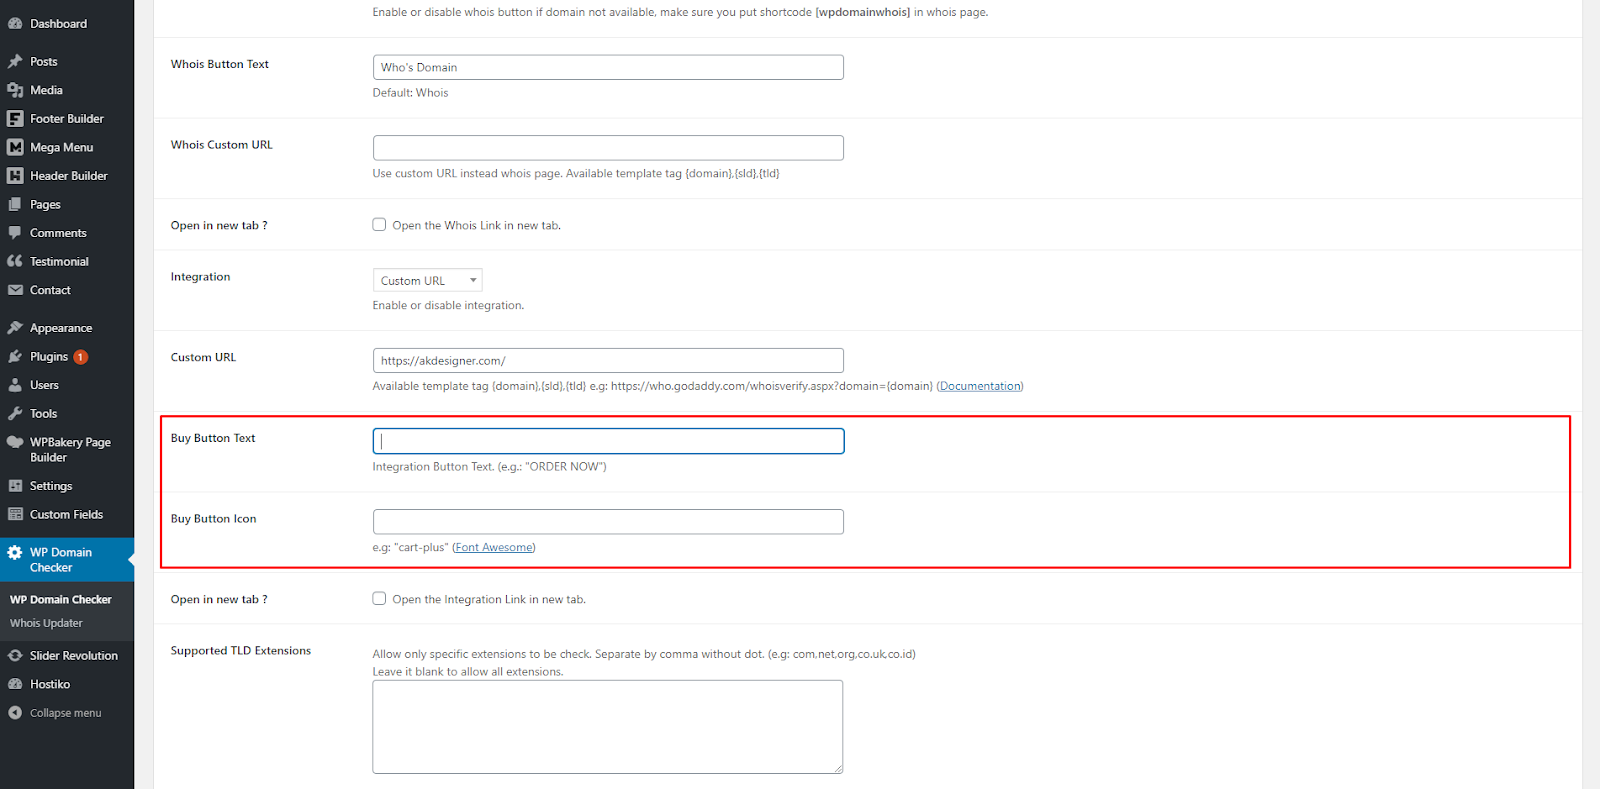
- Step 3: You can add your Button Text & Button Icon in Buy Button Text and Buy Button Icon input box.
- Step 4: After updating WP Domain Checker settings, scroll down and click on the “Save Changes” button.
Google ReCaptcha
WP Domain Checker gives you an option to protect your domain checker from spam and abuse while letting real people pass through with ease.
Follow these steps to use Google reCaptcha with WP Domain Checker:
- Step 1: To use reCaptcha in any site, first you need to get a Site Key and a Secret Key for your website. If you already have a Site key and Secret Key then skip ahead to Step 5.
- Step 2: Open this link to get reCaptcha Site & Secret Key. Login to your Google or Gmail Account. Once you’re logged in, the page shown in the screenshot will open.

- Step 3: In this page, enter your site name in the Label input box. Choose whether you want to use a score or challenge reCaptcha.in reCaptcha Type. Add your site’s domain name in the Domain Name input box. In the Owners input box, enter any other email address you might want to add. Check Accept the reCAPTCHA Terms of Service checkbox. When you are done click on the “Submit” button.

- Step 4: Once you’ve submitted the form with correct information, then the page will load with your website’s Site Key & Secret Key. Now copy both these keys and save them somewhere in a text document on your computer.

- Step 5: Now Login to your WordPress website, navigate to WP Domain Checker in WP Dashboard Menu. Go to the reCaptcha tab.

- Step 6: Now paste your Site Key & Secret Key that you copied earlier in Google reCAPTCHA v2 Site Key & Google reCAPTCHA v2 Secret Key respectively. Click on the “Save Changes” button.

- Step 7: Navigate to Pages in WP Dashboard Menu. Select the page where your WP Domain Checker is displayed. Click on Edit. Now edit your Text Block where your WP Domain Checker shortcode is placed. Replace your shortcode with
[wpdomainchecker button="SEARCH" recaptcha="yes"]or just add recaptcha = “yes” in the shortcode. Click on the Save Changes button. 
- Now update your page by clicking on the “Update” button. And then click on the Preview Changes button to view your changes in your page.

- reCaptcha button will now display with WP Domain Checker on your site.
Transfer WHMCS Domain Button
WP Domain Checker does not provide a Transfer Domain button, but there is an alternative way to get Transfer Domain Button on your site with WP Domain Checker. We can achieve this by transforming Whois Button into Transfer Domain Button that will be linked to WHMCS Add To Cart.
- Step 1: Navigate to WP Domain Checker in WP Dashboard Menu. In the WhoIs Page option, select Custom URL from dropdown.

- Step 2: In WhoIs Button Text input box, write “Transfer Domain”.
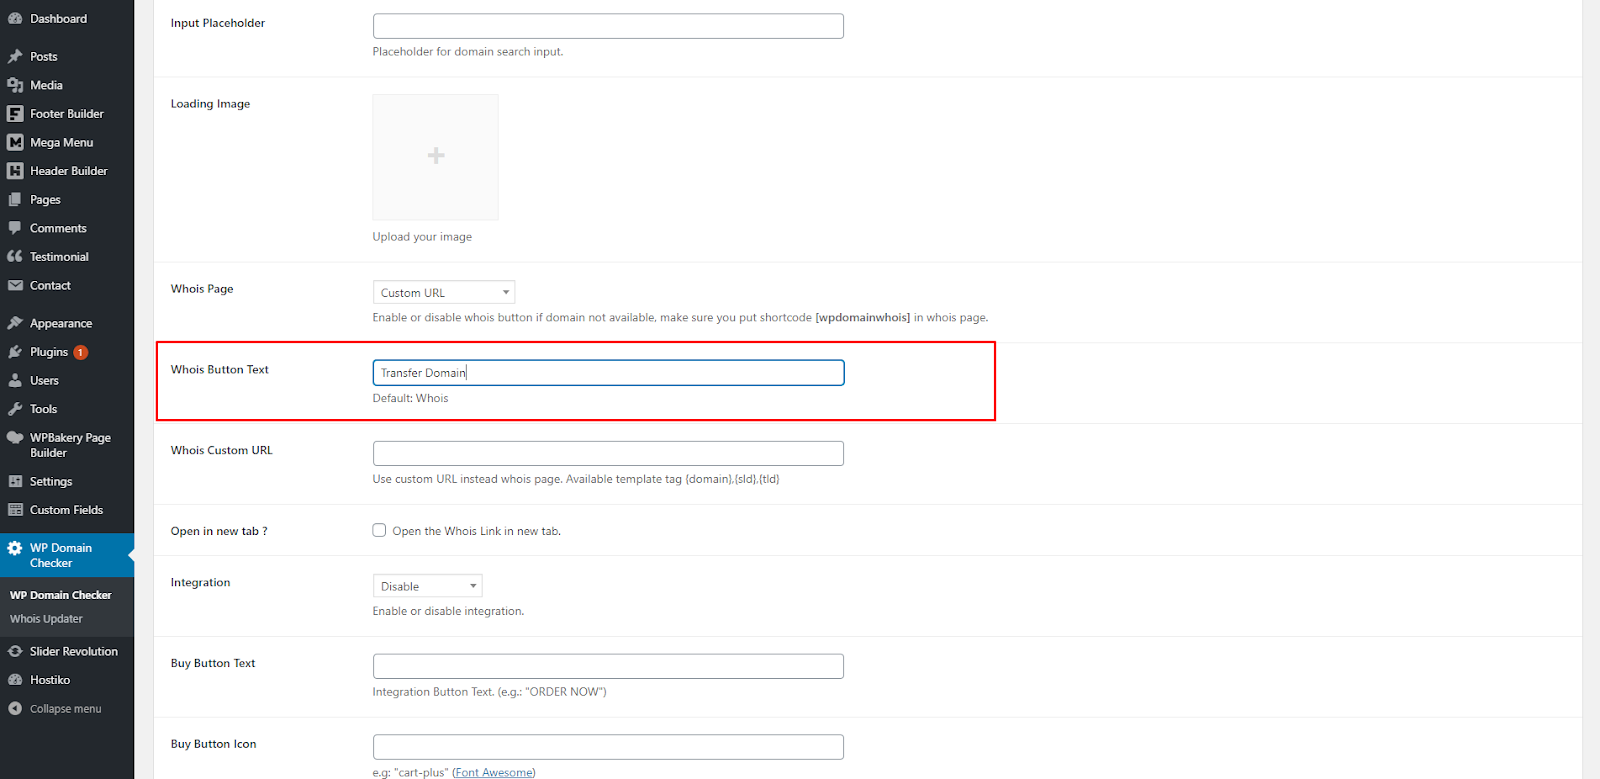
- Step 3: In WhoIs Custom URL input box, write this URL:
https://yourwhmcssite.com/cart.php?a=add&domain=transfer&sld={sld}&tld=.{tld}
URL will link this button to WHMCS Add to Cart. 
- Step 4: Click on the “Save Changes” button.

- Now when you will search a domain that it isn’t available, you’ll see a Transfer Domain button that will be linked to your WHMCS Add to Cart.

WHMCS Integration
WHMCS Installation
If you’re using WHMCS for the first time, then read this. There is a step-by-step guide & a video guide explaining how to Install WHMCS through cPanel.
WHMCS Bridge
To use WHMCS Bridge with Hostiko Theme, first you have to make sure that WHMCS Bridge plugin is installed and activated. Navigate to Plugins in WP Dashboard Menu. Check if the plugin is activated.

Following are the steps to setup WHMCS Bridge plugin:
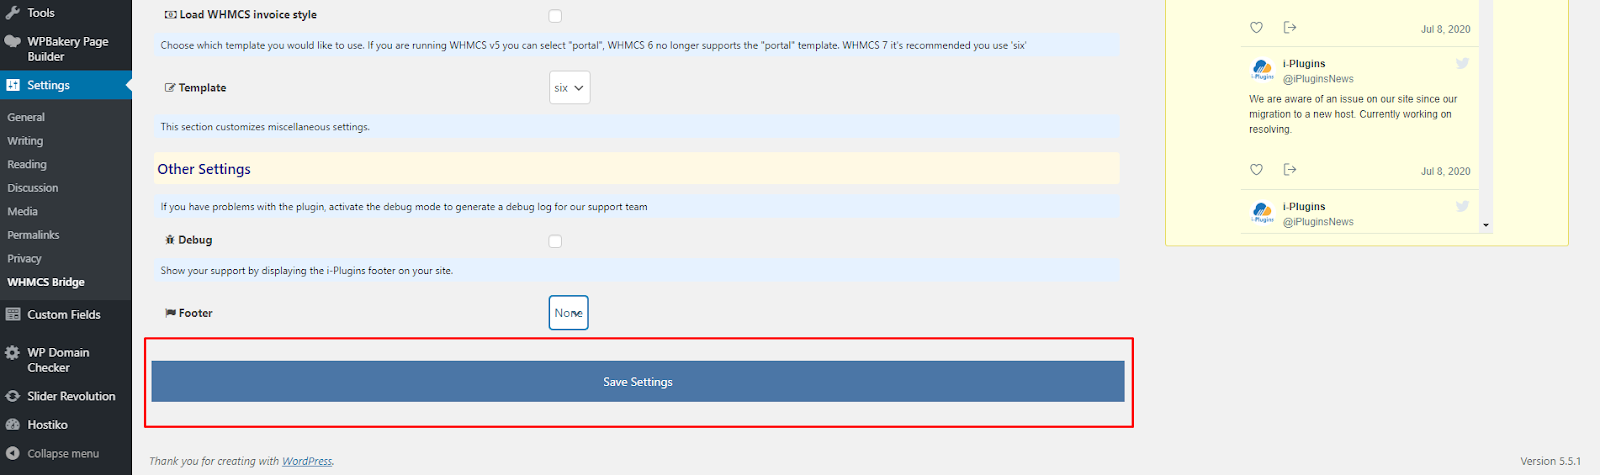
- Step 1: Navigate to Settings > WHMCS Bridge.

- Step 2: In the Integration Settings section, enter your WHMCS URL in the WHMCS URL input field.

- Step 3: After entering the URL, scroll down to the end of the page and set the Footer option to None.

- Step 4: Now click the “Save Settings” button.
- Step 5: After saving your settings WHMCS will auto create WHMCS Page that will have all your WHMCS options. Go to the “Help” tab. Under The Bridge Page section you’ll see the full WHMCS url of your site.

- Step 6: Under “Check my Installation” section, click on “Check for problems with my setup” button. This will check if there are any errors in your setup. If you receive any errors then we recommend you to resolve those errors first and then proceed further. If there are no problems with your setup then a message saying “As far as we can see, it all looks good!” will display under the “Check for problems with my setup” button.

- Step 7: Open WHMCS Url that is mentioned in Step 5. On this url page you will see that WHMCS Bridge has been set up for your website. Your page will look something like this. You can see WHMCS Bridge is set up but it isn’t displaying properly.

- Step 8: You can see in Step 7 that WHMCS Bridge is set up but it isn’t displaying properly. Now to display it properly, click on “Edit with WPBakery Page Builder” button located at the top of your page.

- Step 9: Now click on the “Backend Editor” button located at the top right corner of the page.

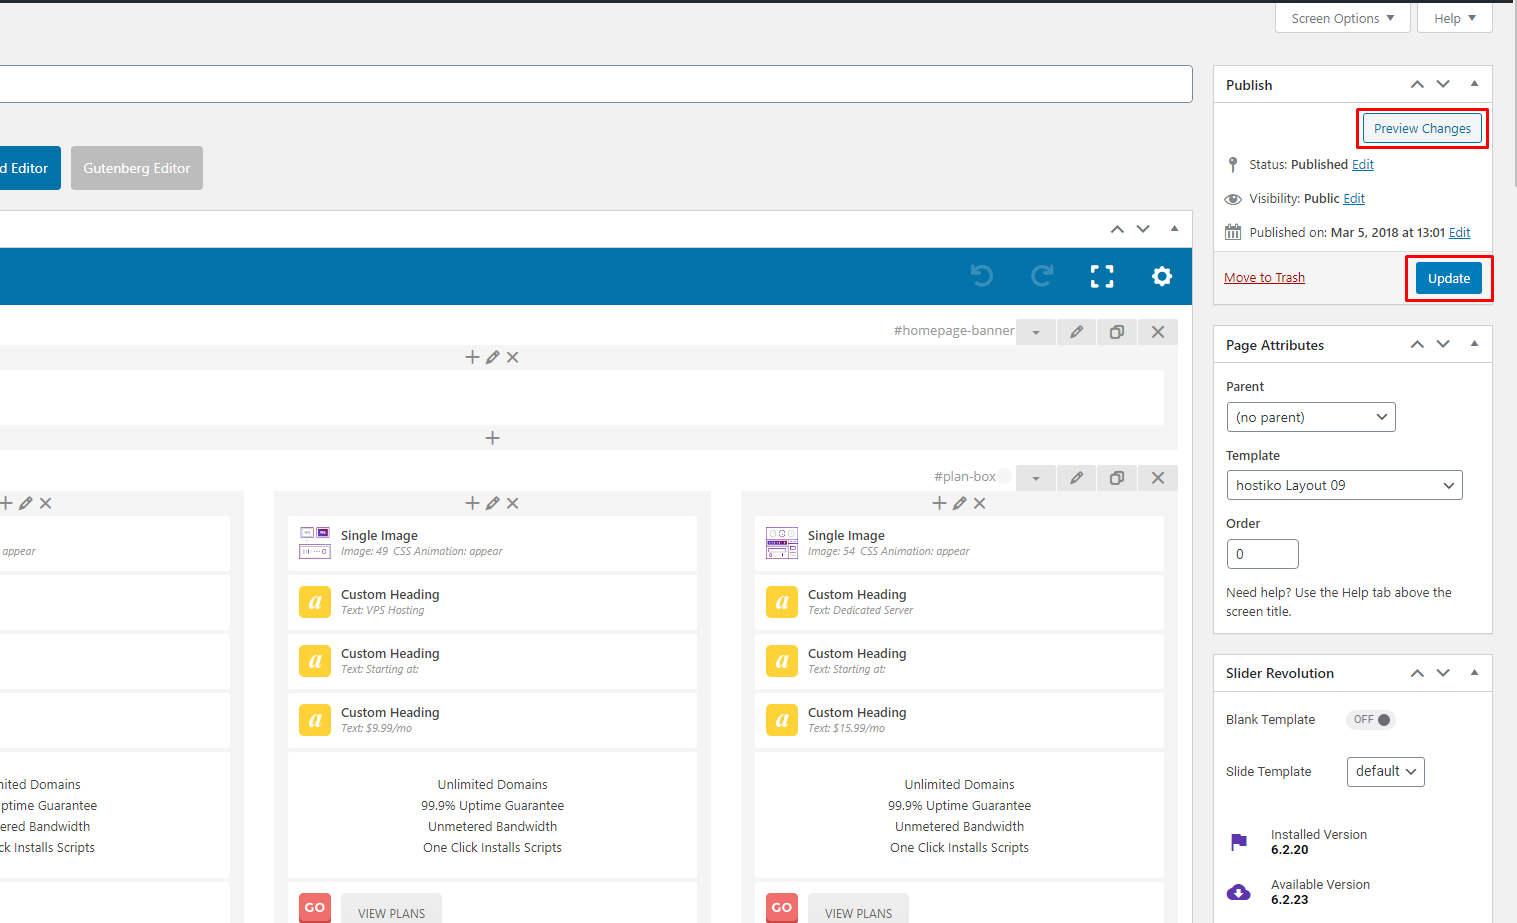
- Step 10: Now go to the “Page Attributes” section in the right column. Navigate to Templates option.

- Step 11: Now, choose hostiko layout from Template dropdown. Keep it in mind that you need to select Layout as same as your Demo Layout. Otherwise your Template for WHMCS Bridge won’t work. For Example: If you are using Demo Layout 09 for your website design, then you will have to choose hostiko Layout 09 from Template dropdown.

- Step 12: After you’ve selected your template, click on the “Update” button to save changes.

- Step 13: After updating, view your page by clicking on the “View Page” button.

Now you’ll see that your WHMCS Page is displayed properly.

WHMCS Templates
Hostiko WordPress Theme also provides WHMCS Templates, if you don't want to use WHMCS-Bridge you can use WHMCS Templates. Follow these steps to install WHMCS Templates via FTP:
- Step 1: Get the Hostiko Package you downloaded from Theme Forest. Find the “Hostiko_WHMCS_TEMP_UD4.9” zip file and extract it in a desired location in your computer. Open the extracted folder, go to “Templates” folder and choose the latest WHMCS version folder and open it. Extract “hositko light” & “hostiko dark” zip files somewhere in your computer.
- Step 2: Connect to your site’s FTP using desktop client software like FileZilla. If you’re using Filezilla for the first time then read this. This is a step-by-step guide on how to access your site’s FTP. When you’re connected to the FTP, Go to the root location for your WHMCS Installation. This is the topmost directory and has subdirectories like /admin, /includes and others. Look for a sub-directory named /templates. This directory contains all your WHMCS client area templates.

- Step 3: Now locate the folders “hositko light” & “hostiko dark” you extracted on your computer. Upload both these folders through FTP in the WHMCS templates folder.

- Step 4: Now that you have uploaded your templates. Log In to your WHMCS Dashboard. Navigate to tab Setup > General Settings.

- Step 5: Under General Section, you can see our Hostiko templates that you just uploaded in Template Dropdown. Now you can easily choose WHMCS Templates.

WHMCS Cart
Whatever type of products and services you offer, Hostiko Order Cart Template has a variety of order form styles you can choose from to showcase your products in the most effective way possible.
Upload Hostiko Cart Template
- Step 1: Get the Hostiko Package you downloaded from Theme Forest. Find the “Hostiko_WHMCS_TEMP_UD4.9” zip file and extract it in a desired location in your computer.
- Step 2: Connect to your site’s FTP using desktop client software like FileZilla. If you’re using Filezilla for the first time then read this. This is a step-by-step guide on how to access your site’s FTP. When you’re connected to the FTP, Go to the root location for your WHMCS Installation. This is the topmost directory and has subdirectories like /admin, /includes and others. Look for a sub-directory named /templates. This directory contains all your WHMCS client area templates.

- Step 3: Now locate the folder you extracted on your Computer in FileZilla. Open it and you’ll see a folder “orderforms”. Now upload “orderforms” folder in “templates” folder we located in Step 2, by right clicking on “orderforms” folder.

Now you have uploaded Hostiko Order Cart Templates in WHMCS.
Setting/Editing a Product Group Template
WHMCS allows you to specify an order form template for each product group you create. This allows you to use different order form styles for different types of products you offer. Follow these steps to edit group templates:
- Step 1: Log In to your WHMCS Dashboard. Navigate to Setup > Product/Services.

- Step 2: In the Product/Services page you have the option to Create a new product and Create a new group product.

- You can also Edit or Delete a product or group of products through these buttons.
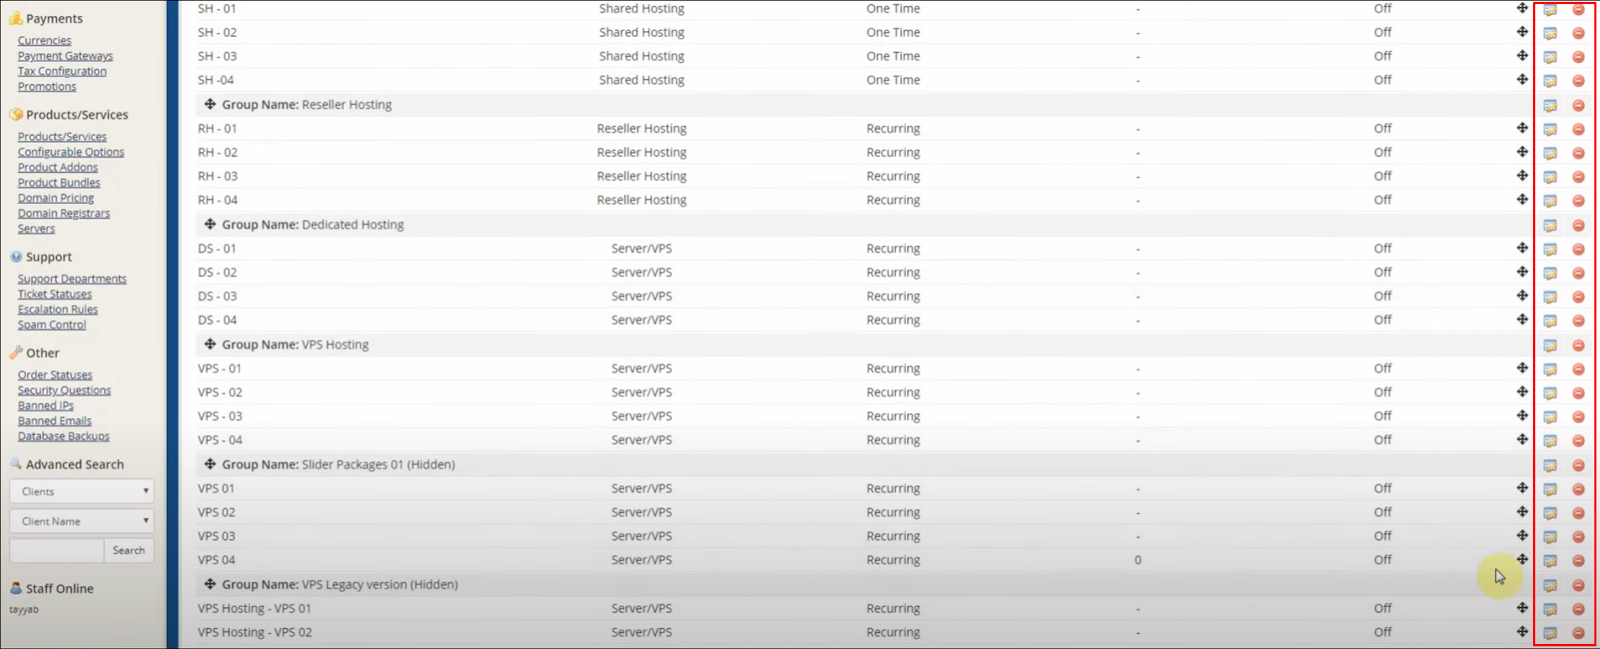
- Step 3: Click on the Edit icon in the product. On the Edit Product page, navigate to Details tab > Product Description. While editing or setting up a new product, keep in mind the Feature Highlights for Product Description.
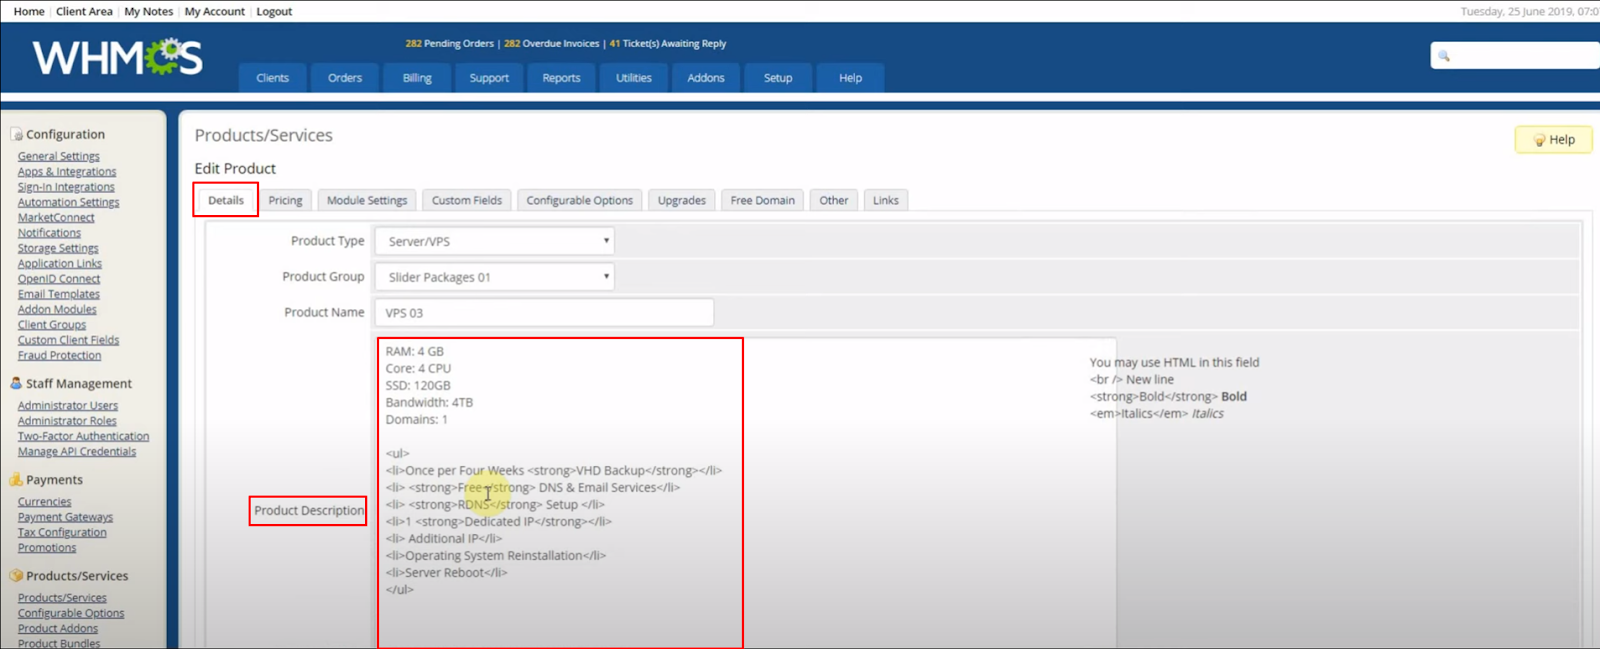
- Note: Hositko uses this code in Product. For best results we recommend that you use the same features and in the same order for all products within the same product group.
RAM: 4 GB Core: 4 CPU SSD: 120GB Bandwidth: 4TB Domains: 1 ul li Once per Four Weeks strong VHD Backup /strong /li li strong Free /strong DNS & Email Services /li li strong RDNS /strong Setup /li li 1 strong Dedicated IP /strong /li li Additional IP /li li Operating System Reinstallation /li li Server Reboot /li /ul - Step 4: Feature Highlights are specified as part of the Product Description. They must be entered in the following format, with one feature per line.
Feature: Value
For example, the description for a shared hosting product using Feature Highlights might look like this:Disk Space: 1000MBDandwidth: 5GBEmail Accounts: 5Subdomains: 3Addon Domains: 1

Setting a Hostiko Order Cart Template
Skips this step if you are using WHMCS8.1 , alway use Default standard Cart
The Hostiko Order Cart form template will be used for any product group for which no custom template is set. Follow these steps to st your Hostiko Template with WHMCS:
- Step 1: Log In to your WHMCS Dashboard. Navigate to tab Setup > General Settings

- Step 2: Navigate to the Ordering tab in the General Settings Page.

- Step 3: Scroll Down until you see Hostiko Cart Templates.

- Step 4: Click on “Hostiko Cart”.

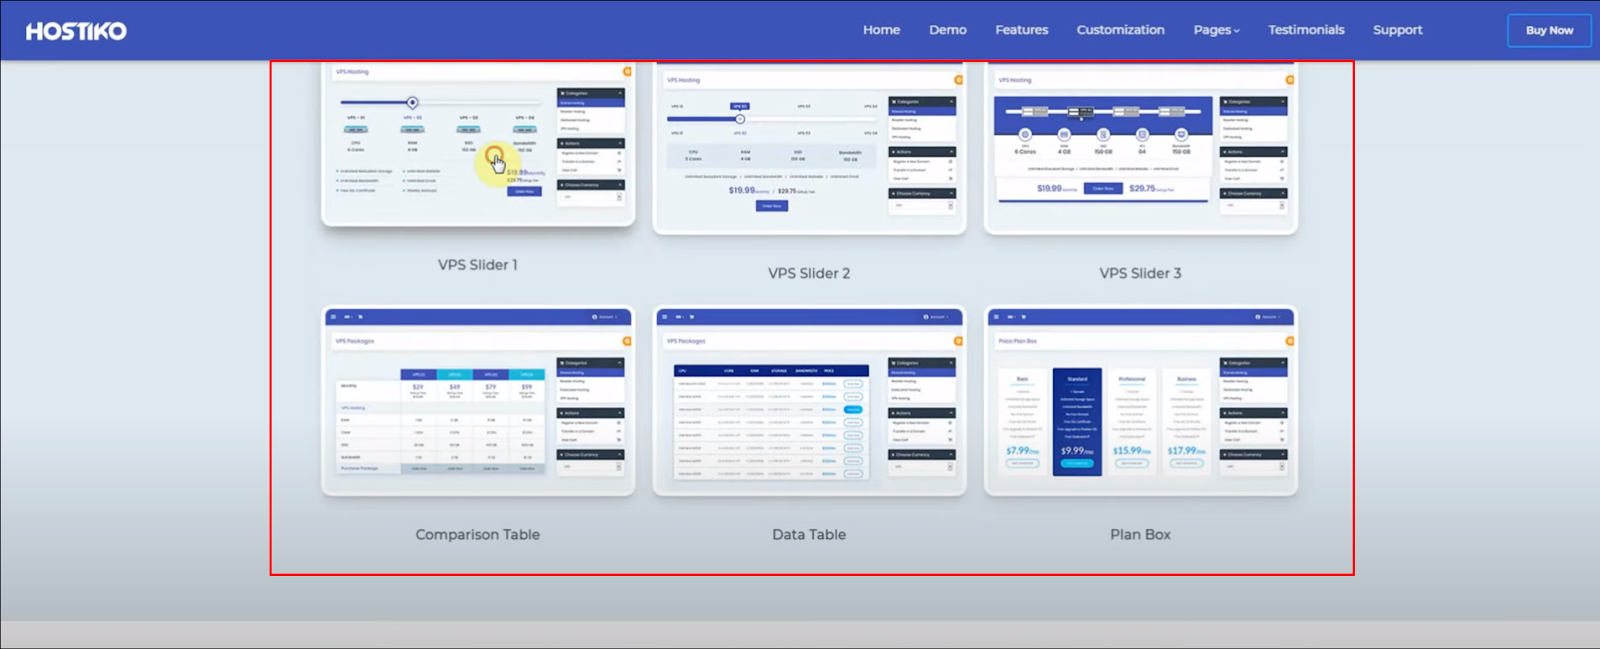
- You will be directed to the Hostiko Order Cart Dashboard. Here you can choose your Order Cart Templates.
FAQ’s
Hostiko WordPress theme is very easy to customize. Even if you have never used WordPress before, Hostiko customization will be a piece of cake for you. Now that you have Installed Hostiko Theme, Plugins and Demo. You might want to make some changes in the Demo Layout to set up your website. Here you’ll see how to do some basic customization for your Hositko Theme.
How to Change Logo?
- Step 1: Navigate to Header Builder > All Headers in WP Dashboard Menu. Select the Header that is activated and being used on your site, and click on the Edit button.

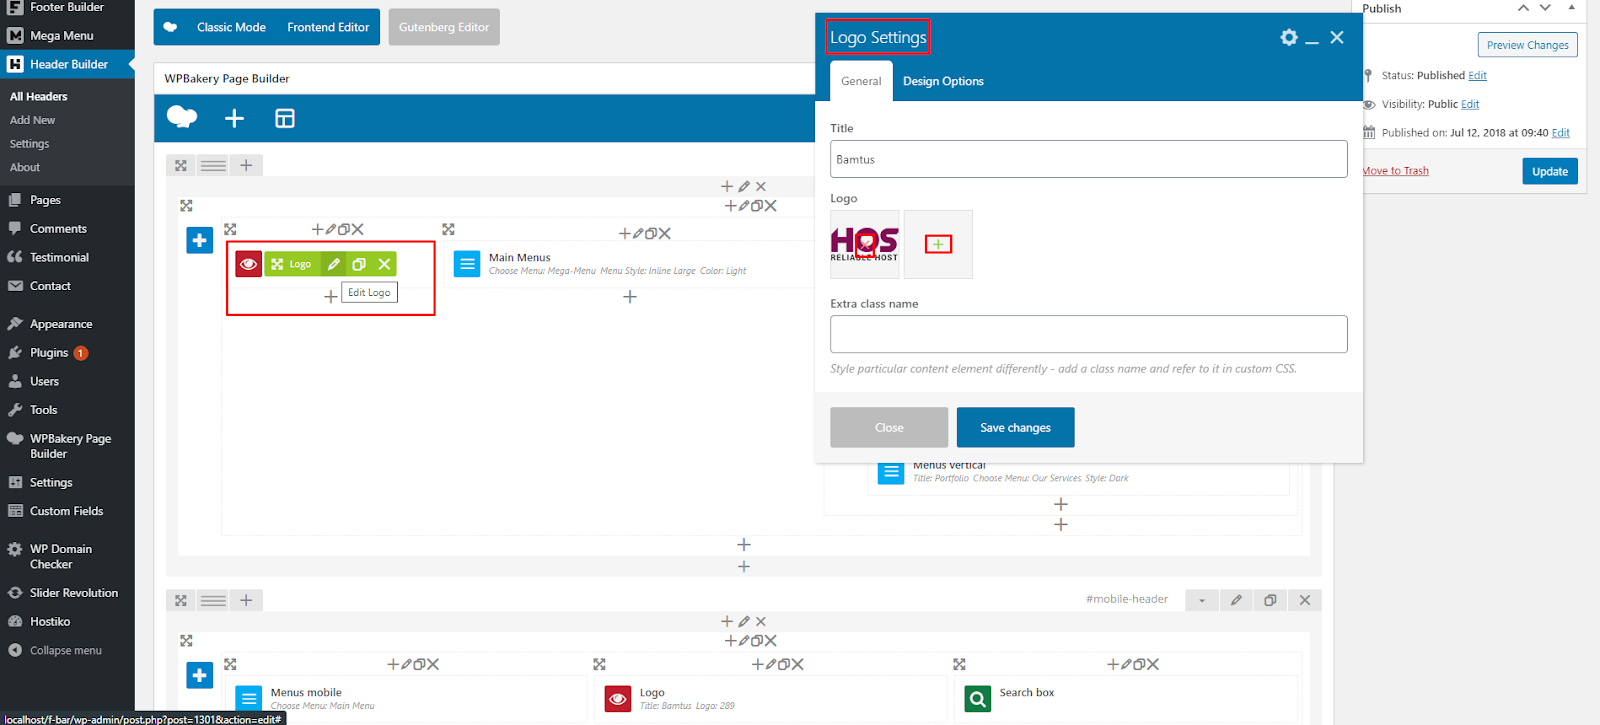
- Step 2: In WP-Bakery Back End Editor, find where Logo is used. Edit Logo by clicking on the Pen Icon when hovering over it. Logo Settings dialog box will appear. Here you can remove the Hostiko Logo by clicking on x, and click on + button to add your Logo.
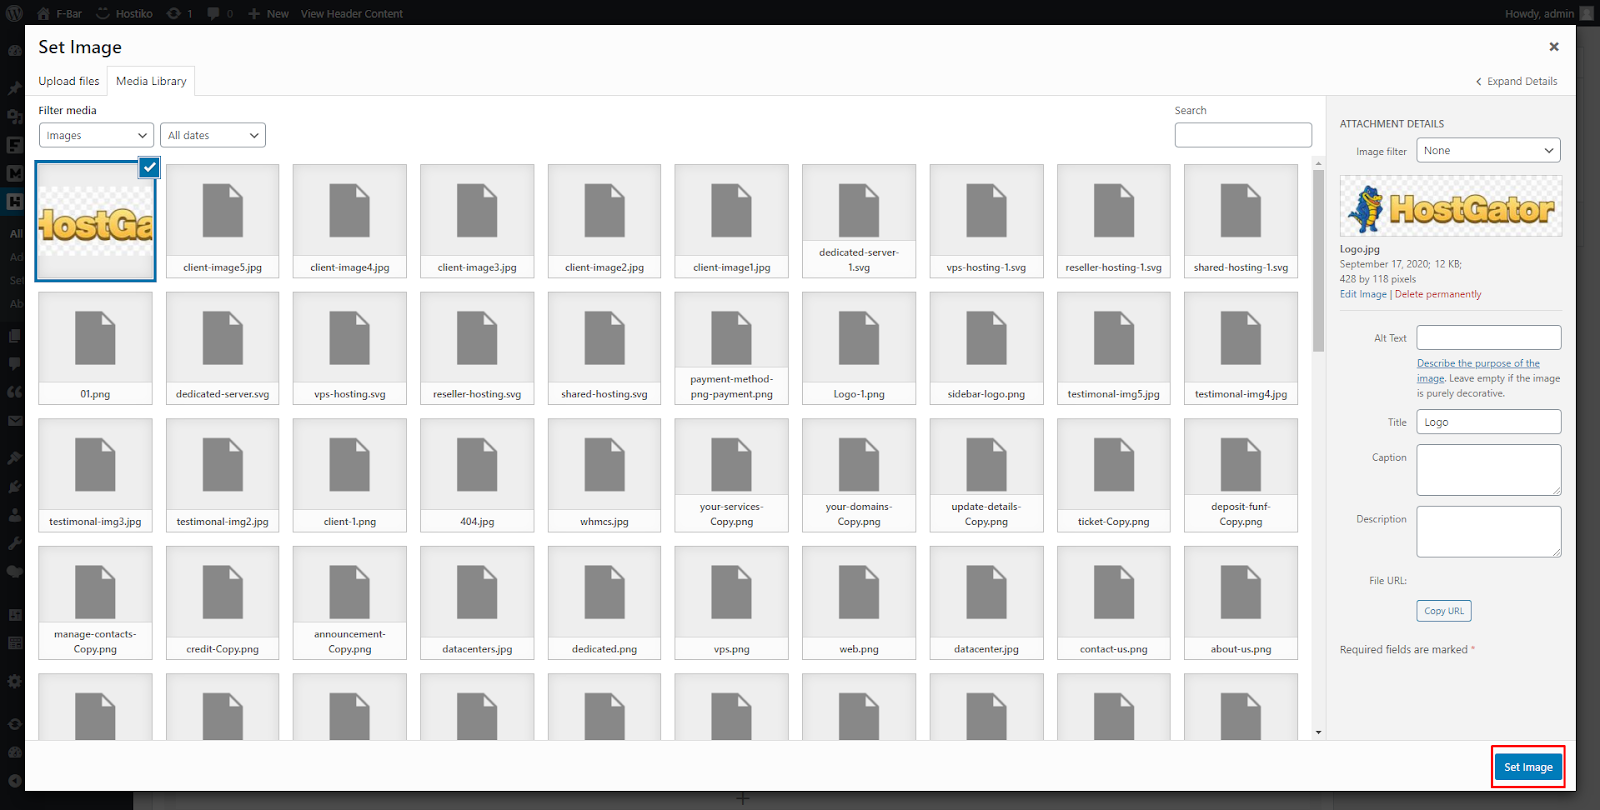
- Step 3: Now a dialog box will open, if you have already have your logo in the Image Library then go to Media Library tab and select your Logo from there and click on Set Image button.
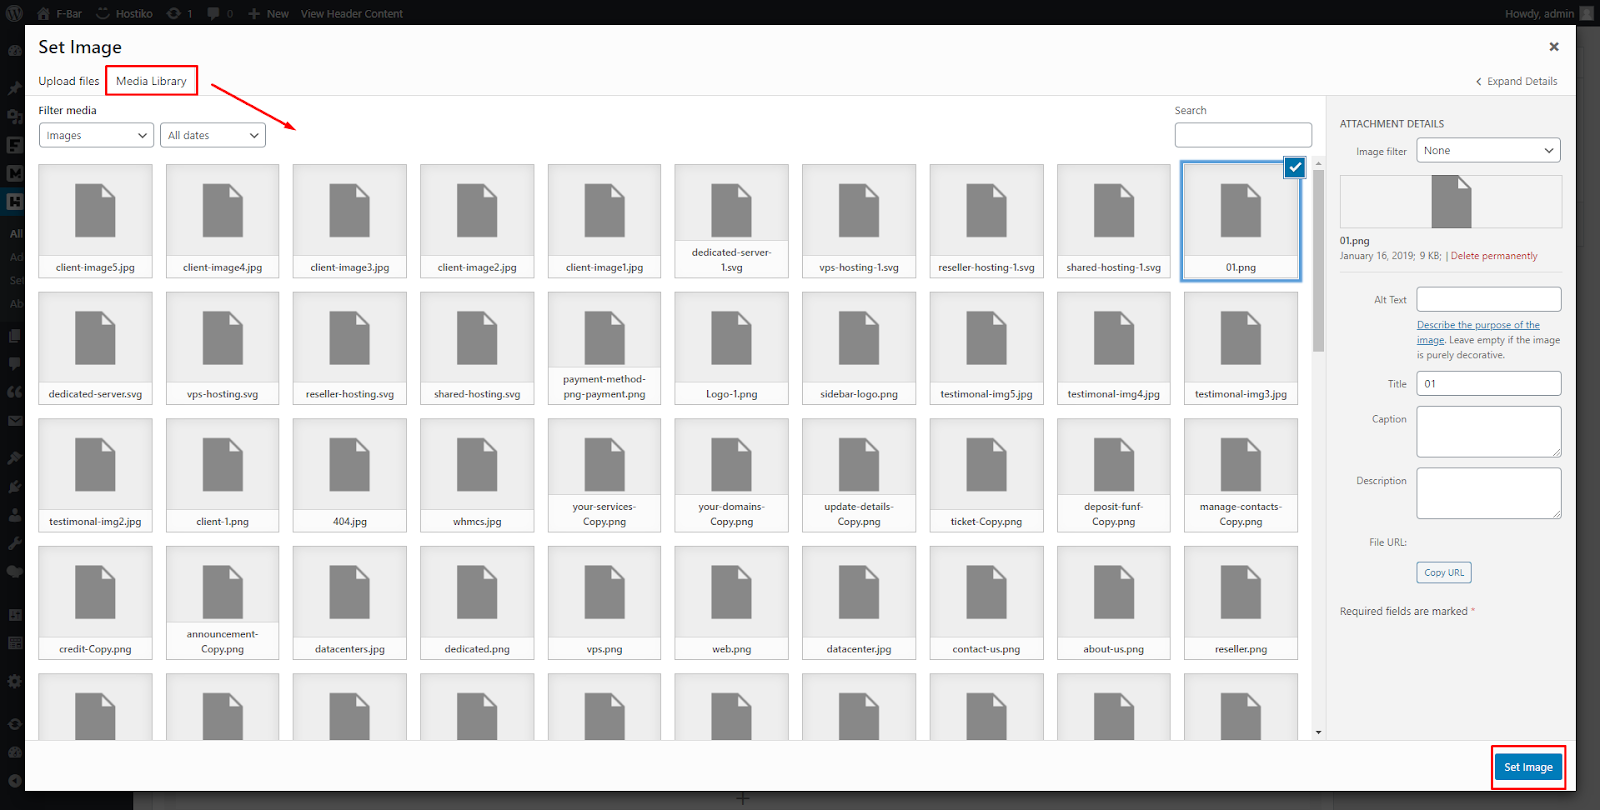
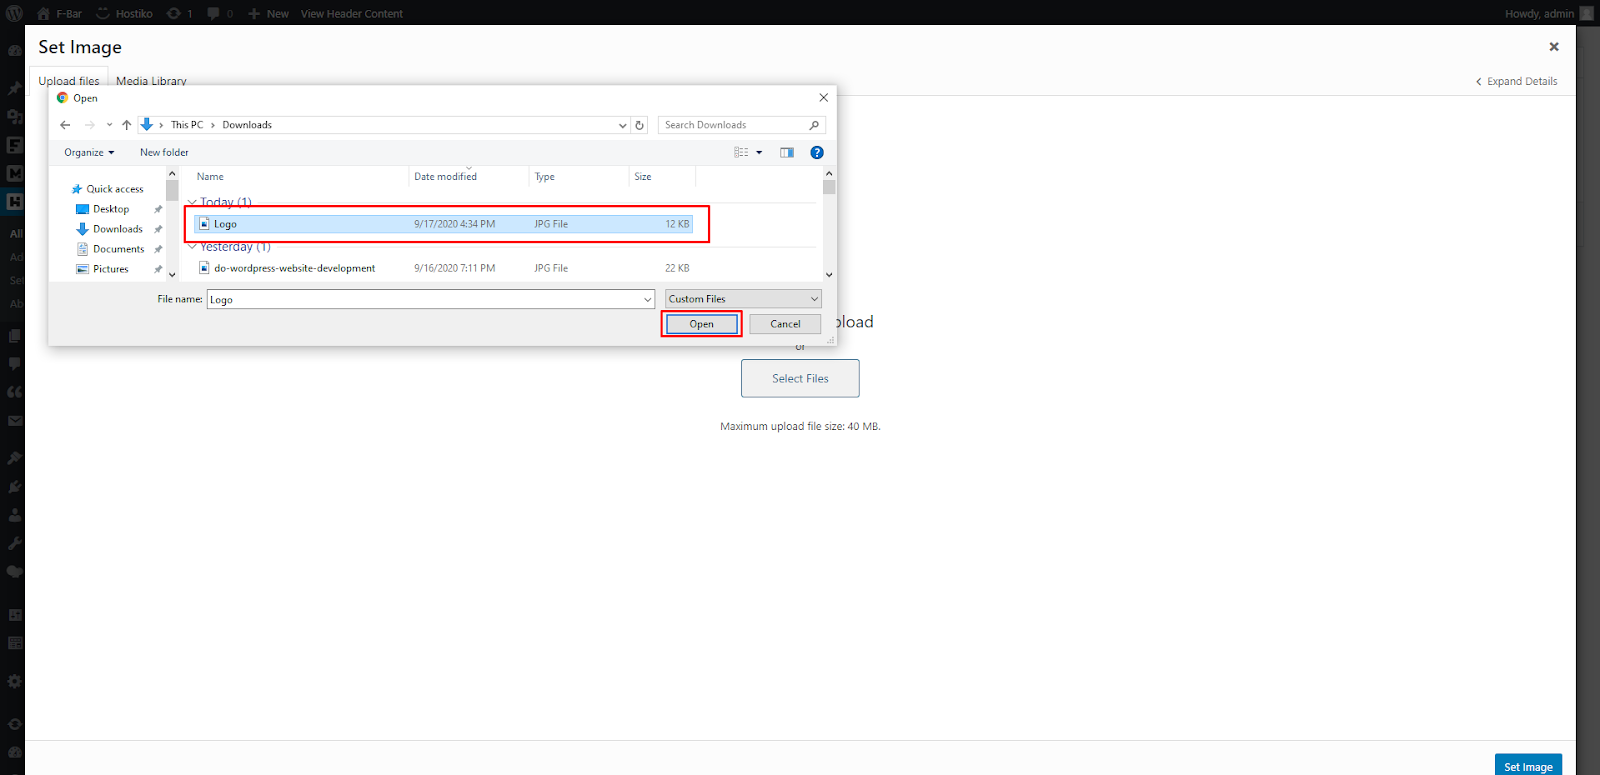
- If you are uploading your logo for the first time, then go to Upload Image tab. Click on the Select Files button.

- Select your Logo file from your local computer, and click on the Open button.
- Now your Logo file will be uploaded in the Media Library. Select your file and click on the Set Image button.
- Step 4: Now your Logo will be uploaded in Logo Settings. Click on the Save Changes button to save your Logo.

- Step 5: If you want to change Mobile Logo then, scroll down and you will see the Mobile Header section. Change your Mobile Logo by editing Logo Settings as shown above.

- Step 6: Click on Update button to save the changes you made in Header. And view your Logo by clicking on the Preview Changes button.

How to Change Menu?
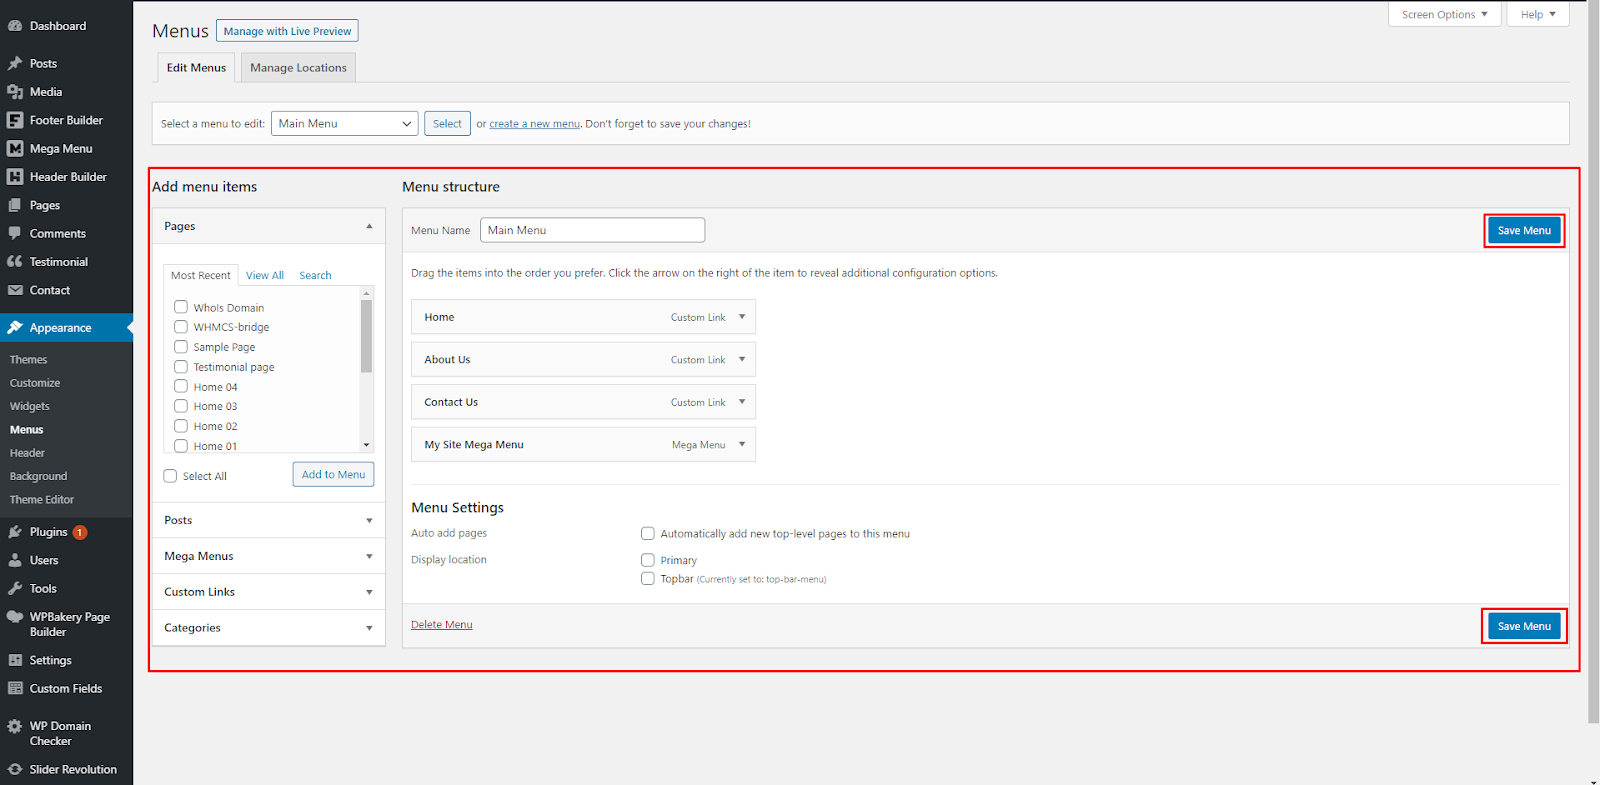
- Step 1: Navigate to Appearance > Menus in WP Dashboard Menu. Under the Edit Menus tab section, select the menu you want to edit in Select a Menu to edit dropdown. After selecting the menu click on Select button.

- Step 2: Now you can edit the menu you selected here.Once you’re done editing the menu, click on Save Menu and your changes to Menu will be saved.
- Step 3: After saving the menu, navigate to Header Builder > All headers in WP Dashboard Menu. Select the header that is activated on your site.and edit it.

- Step 4: In WP-Bakery Back End Editor, find where the Main Menus is used. Edit Main Menus by clicking on the Pen Icon when hovering over it. Main Menu Settings dialog box will appear. Here you can choose which menu you want to display in the Header.

- Step 5: You can also style the menu like you want. Click on the Save Changes button.

- Step 6: You can also change the menu for mobile. Scroll Down and you will see the Mobile Header section. Change your Menus Mobile by editing Main Menu Settings as shown above.

- Step 7: Click on Update button to save the changes you made in Header. And view your Main Menu changes by clicking on the Preview Changes button.

How to change Mega Menu links?
- Step 1: Navigate to Mega Menu > All Mega Menus in WP Dashboard Menu.Select mega menu that you want to change and click on Edit.

- Step 2: Go to Custom Heading where you want to change the link. Click on Pen Icon to edit. Custom heading Settings dialog box will appear. Click on Select URL button to change url.

- Step 3: You can add a custom URL in the URL input box or you can select the page you want to link. Click on the Set Link button to set your Mega Menu Link.

- Step 4: Your URL has now been added, you can save it by clicking on the “Save Changes” button.

- Step 5: Click on Update button to save the changes you made in Mega Menu. And view your Mega Menu changes by clicking on the Preview Changes button.

How to add WP-Bakery (Visual Composer) Templates in a Page?
- Step 1: Navigate to Pages > Add New in WP Dashboard Menu. Click on the WP-Bakery Page Builder button at the top of the page.
- Step 2: Click on WP-Bakery Back End Editor.

- Step 3: Click on any one of the Add Templates buttons, and the Templates dialog box will open. Now select any template that you want to use in your page and click on + sign. Your template will be added to the page. Hostiko Page Templates are available.

- Step 4: Click on the Update button to save your Template. And view your Template by clicking on the Preview Changes button.

How to Regenerate Thumbnails in the Media Library?
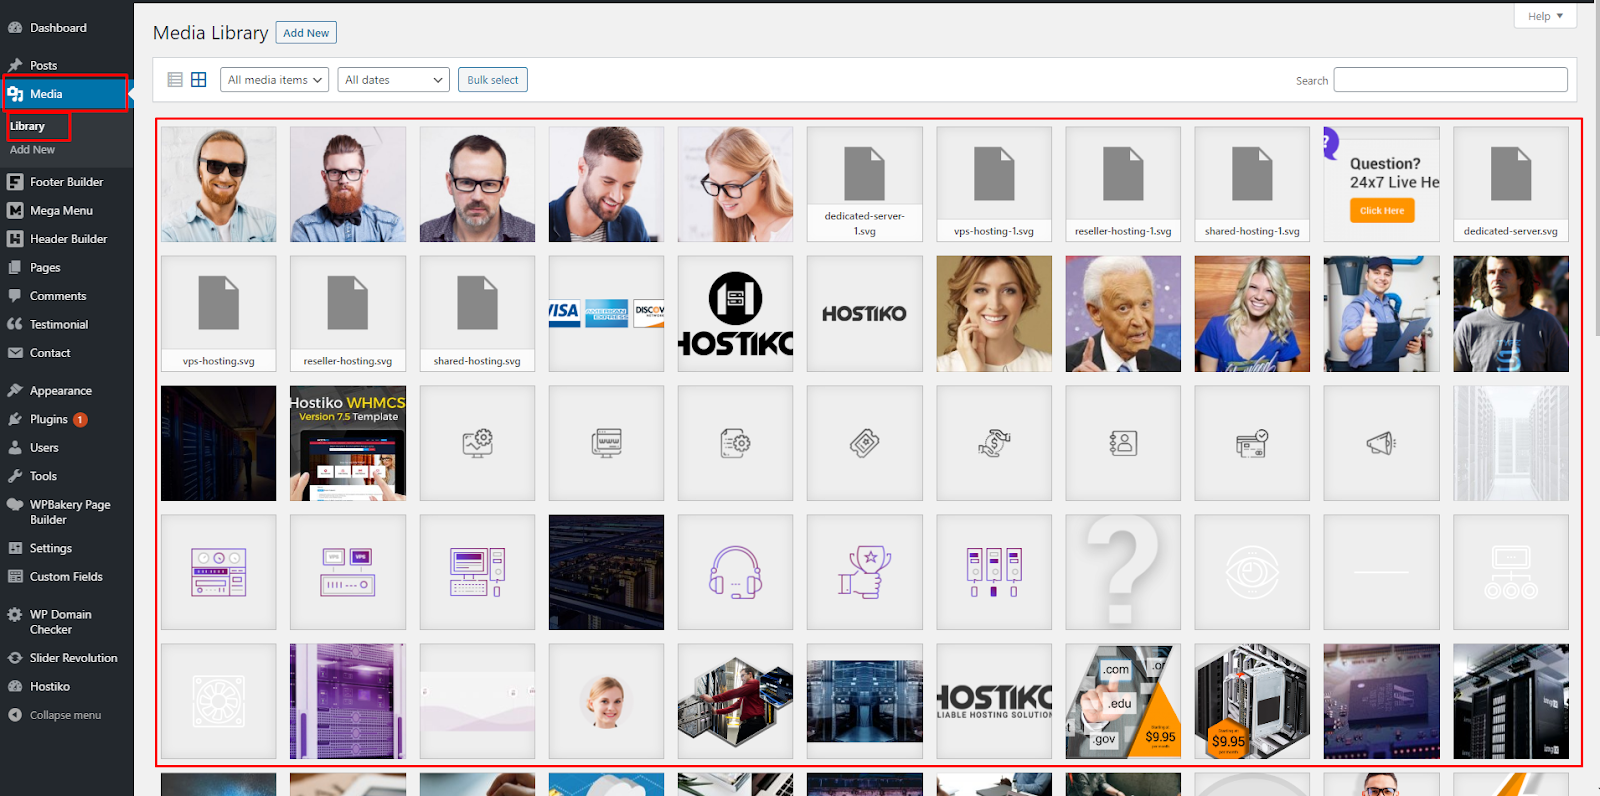
- Step 1: Navigate to Media > Library in WP Dashboard Menu. If your images in the media library are not displaying, and are showing as shown in the screenshot then keep on reading.

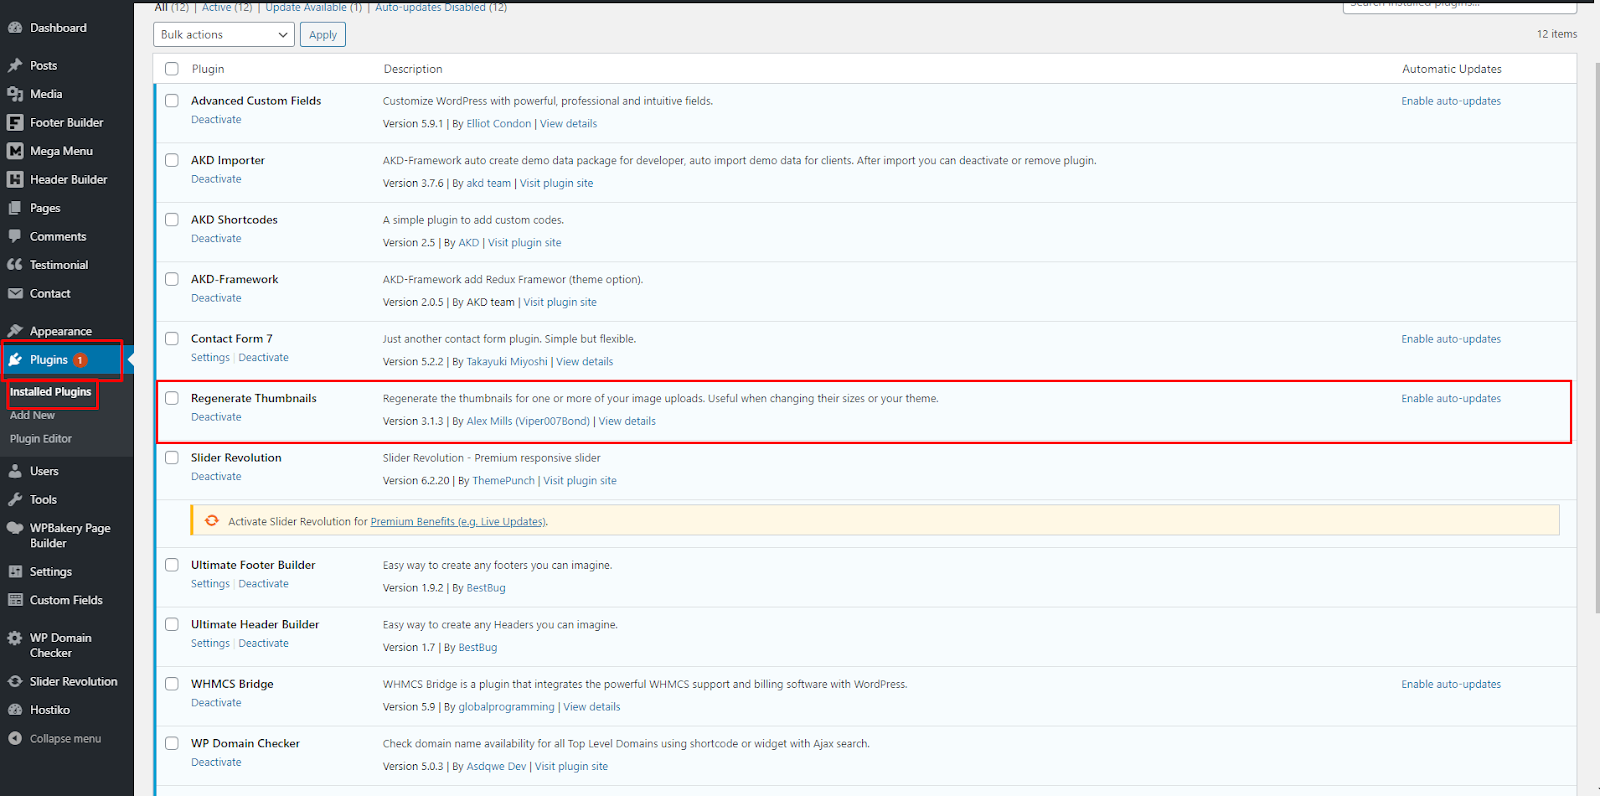
- Step 2: Navigate to Plugin > Add New in WP Dashboard Menu. Type “Regenerate Thumbnails” in the search bar. Find the plugin shown in the screenshot. Click on the Install Now button. Once the plugin is installed activate it by clicking on the Activate button.

- Check if plugin is activated, navigate to Plugins > Installed Plugins in WP Dashboard Menu.
- Step 3: Navigate to Tools > Regenerate Thumbnails in WP Dashboard Menu. Click on the “Regenerate Thumbnails for all 15 Attachments” button.

- Step 4: Your thumbnails will start regenerating. Wait till all thumbnails are regenerated.

- Step 5: When all your thumbnails are done regenerating, navigate to Media > Library in WP Dashboard Menu. Now you’ll see here that all your thumbnails are displaying properly.
How to Reset Theme?
- Step 1: In your WP Admin area, at the top left corner of your page next to Wordpress Icon there is a Home Icon with your site name. Hover over your site name and you’ll see a dropdown. Click on Reset Site.

- Step 2: On the Reset page, type ‘reset’ in the input field. And click on the Reset button.

- Now you’ll see that all the Plugins and Hostiko Theme is deactivated and WordPress default Twenty Twenty theme is activated.
Theme Translation
Hostiko uses English Language but it also supports other languages. Now to translate Hostiko to the language of your choice. We recommend using Poedit Software for translation-related purposes.
To translate the theme to your language, please follow these steps:
- Step 1: First you need to download and install Poedit software.

- Step 2: Navigate to the theme/.../languages/ folder and locate .pot file. Copy it to your desktop for editing.

- Step 3: Double click on the .pot file. In the Poedit window click on the "Create New Translation" button, choose the necessary language of the translation from the dropdown list and click "OK".

- Step 4: Now select the constant text string you need to translate from the "Source text - English" field and type in the necessary translation into the "Translation" field.
- You can translate as much as you want, just go through the file and click on each string in "Poedit" and add your translation.

- Step 5: Next, you have to save the changes to your .po file using the naming convention based on the language code (e.g. pt for Portuguese) followed by the country code (for instance _BR for Brazil). To do that click on the "sheet" icon (you can also use hotkeys CMD+Shift+S in OS X or Win+S in Windows) and type in the name according to the screenshot below. The first lower-case letters define the language, whereas the second upper-case letter defines the country. In most cases, the language and country are the same, like “de_DE” for Germany. However, there is a difference for languages like English or Portuguese, which are spoken in several countries natively. In this case, the difference is in the first and second letter pairs; for the UK, the code would be en_GB, whereas the en_US stands for the USA. If you are not familiar with the codes for your native language and country, then visit the GNU website. See Language Codes and Country Codes for the lists of codes.
- Please note, if you use the wrong naming convention WordPress can not process your translation.

- Step 6: When saving your .po file, Poedit automatically creates a new .mo file, with the same naming convention. According to the example above, the file would be called pt_BR.mo.
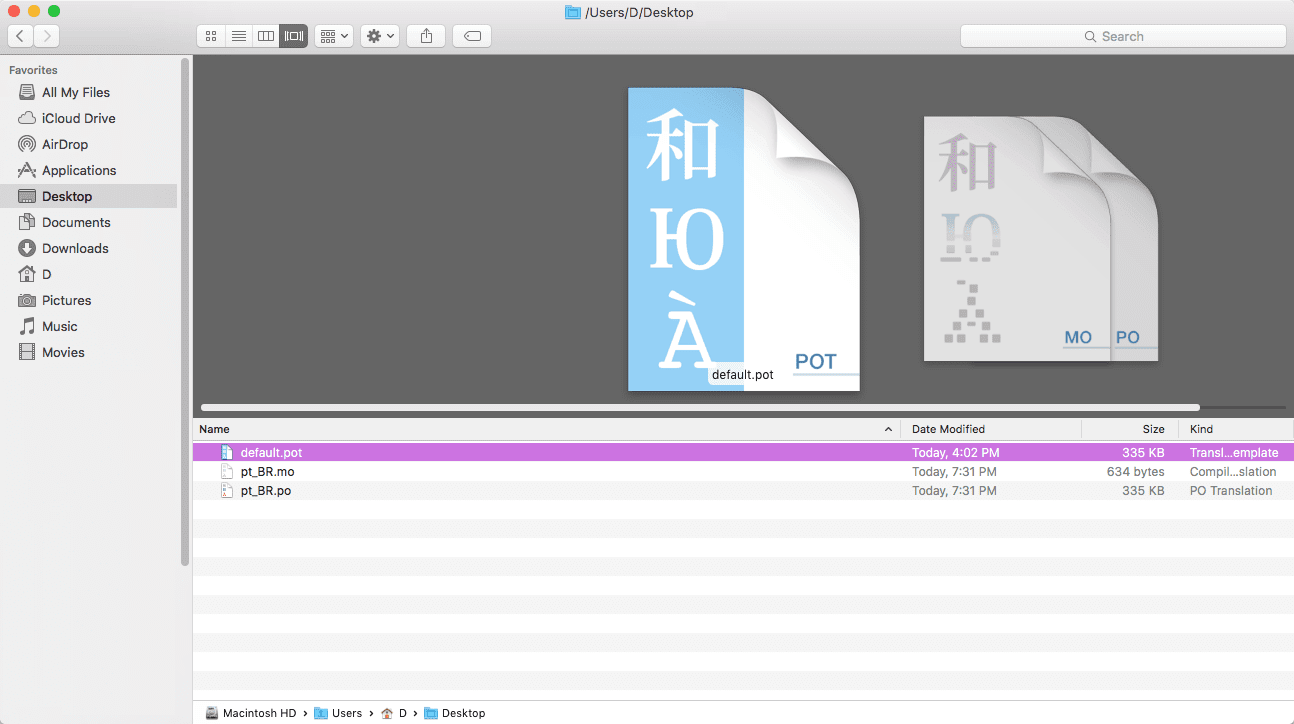
- Step 7: Upload the .po and .mo files you just created to the .../languages folder. Make sure these files are in the same directory as the default.pot one.
Note: In case you still have questions on how to use Poedit, please check the following resources: